Have you ever flipped a light switch, only to wonder which bulb or fixture it actually controls? It’s a common puzzle that can leave you frustrated, especially when you need to fix something or add new lighting.
Knowing exactly where a light switch leads can save you time, prevent accidents, and even help you upgrade your home’s lighting with confidence. You’ll discover simple, practical steps to quickly find out where a light switch goes—no electrician needed. Keep reading, and you’ll unlock the secrets to mastering your home’s electrical layout like a pro.

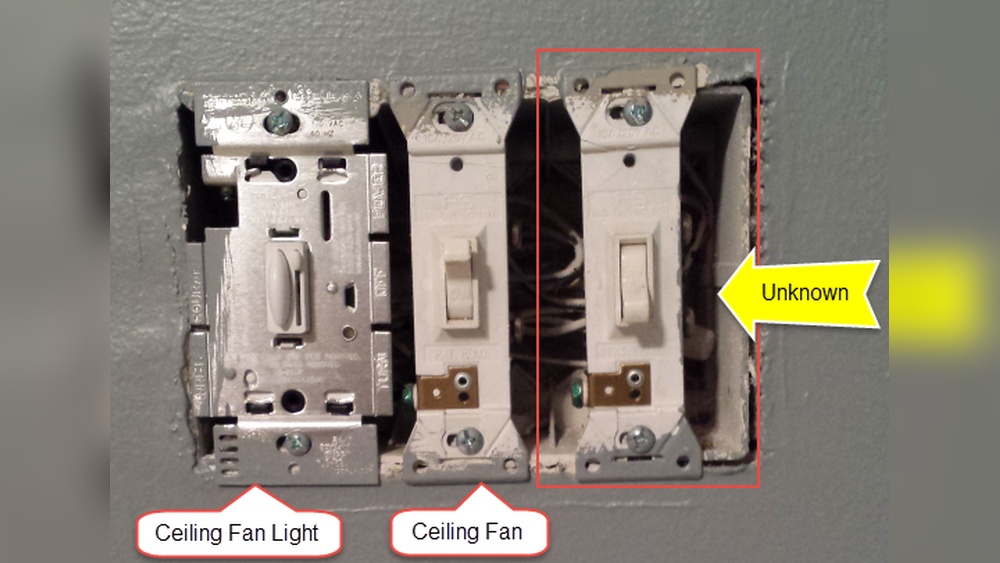
Credit: arcangelelectric.com
Tools You’ll Need
Safety is the top priority when working with light switches. Electricity can cause serious injury or damage. Always take careful steps before handling any electrical parts.
Follow safety rules to protect yourself and others. Simple precautions can prevent accidents and keep the work smooth and safe.
Turn Off Power
Start by turning off the power at the circuit breaker. This stops electricity from flowing to the switch. Never trust the wall switch alone to cut power.
Use a label or note to mark the breaker you turned off. This avoids confusion or accidental reactivation while working.
Use A Voltage Tester
Check the switch with a voltage tester before touching any wires. This tool shows if electricity is still present. It confirms the power is fully off.
Test the voltage tester on a known live source first. This ensures the tester works correctly and gives accurate results.
Safety First
Identifying the type of light switch is the first step to understanding where it leads. Different switches control lights in different ways. Knowing the switch type helps you trace the wiring and find the connected light or device. This section explains how to spot the common switch types and their features.
Single-pole Vs. Three-way Switches
Single-pole switches control one light or set of lights from one location. They have two terminals and a simple on/off function. Most home light switches are single-pole.
Three-way switches allow you to control one light from two locations. They have three terminals, including a common terminal and two traveler terminals. These switches are common in hallways or large rooms with multiple entrances.
Check the switch body or remove the cover to see how many wires connect to it. Two wires usually mean a single-pole switch. Three wires suggest a three-way switch.
Common Switch Features
Switches often have markings or labels to help identify them. Look for letters like “COM” for common terminal on three-way switches.
Toggle switches are the most common style. Rocker switches are flat and easy to press. Push-button switches are less common but still used.
Some switches include a small light or indicator to show if they are on or off. This can help trace the circuit.
Identifying The Switch Type
Tracing the wiring of a light switch helps you discover which lights or outlets it controls. This process involves examining the electrical connections directly behind the switch. It gives clear clues about where the wires lead and what they power.
Removing The Switch Cover
Start by turning off the power at the circuit breaker. Use a screwdriver to remove the screws holding the switch cover. Gently pull the cover away from the wall. This exposes the switch and the wires behind it. Take care not to touch any wires before confirming the power is off.
Inspecting Wire Connections
Look closely at the wires attached to the switch. Notice how many wires connect to it and their colors. Typically, black wires carry current, and white wires are neutral. Sometimes, a red wire indicates a switch loop. Identifying these wires helps you understand the switch’s function. Use a non-contact voltage tester to double-check no current flows. This step ensures your safety during inspection.

Credit: www.reddit.com
Tracing The Wiring
Using a wire tracer tool is a simple way to find where a light switch leads. This tool helps you follow electrical wires inside walls. It saves time and avoids guesswork. Anyone can use it with little training. The wire tracer sends a signal through the wire. The receiver picks up this signal to show the wire’s path. This method works well for hidden or complex wiring.
How Wire Tracers Work
A wire tracer has two parts: a transmitter and a receiver. The transmitter connects to the wire you want to trace. It sends a small electric signal along the wire. The receiver detects this signal through walls and ceilings. It beeps or lights up to show the wire’s location. The stronger the signal, the closer you are to the wire. This tool works without turning off the power in most cases.
Following The Wire Path
Start by attaching the transmitter to the switch wire. Turn on the receiver and move it along the wall. Watch for signals that get stronger or weaker. This shows the wire’s direction and path. Mark the spots with a pencil to remember. Continue tracing until you reach the fixture or outlet. This process helps find the exact connection of the light switch. It avoids unnecessary drilling or damage to walls.
Using A Circuit Tester
Complex wiring can make finding where a light switch goes tricky. The wires may connect to more than one place or control several lights. Understanding some tips can make this task easier and safer. The following advice focuses on common challenges in complex wiring.
Multi-switch Setups
Some rooms have more than one switch for the same light. These setups use special wiring. Each switch connects to the others with traveler wires. Check if the switch is part of a three-way or four-way system. Turn off the power before testing wires. Use a voltage tester to find which wires lead to the light. Label each wire to avoid confusion later.
Hidden Or Multiple Fixtures
Sometimes one switch controls several lights in different spots. Some fixtures may be hidden or inside cabinets. Trace the wires from the switch carefully. Look for wire bundles leading to other locations. Use a circuit tester on each fixture. Note which fixture lights up. This helps map out all connected fixtures. Mark switches and fixtures on a simple diagram.

Credit: www.youtube.com
Mapping The Switch To The Fixture
Knowing when to call a professional electrician is important. Some electrical problems can be risky. Handling them without proper knowledge may cause harm or damage.
Always consider a professional if you face complex wiring or unclear switch functions. They have the tools and experience to fix issues safely and correctly.
Signs Of Electrical Issues
Flickering lights or switches that do not work properly are common signs. Burning smells near switches or outlets indicate serious problems. Sparks or small shocks when touching a switch need immediate attention. Warm or hot switch plates can signal overloaded circuits. These signs mean it is time to call an expert.
Safety Concerns
Electricity is dangerous without proper skills and equipment. Risk of electric shock or fire increases with DIY mistakes. Professionals follow safety rules and use special tools. They can also check if wiring is up to code. Protect your home and family by hiring a licensed electrician for uncertain issues.
Frequently Asked Questions
How Can I Identify The Device A Light Switch Controls?
Check the switch by turning it on and off while observing nearby lights or appliances. Use a helper to watch various rooms. This simple test reveals which device the switch operates without any tools.
What Tools Help Find What A Light Switch Controls?
A non-contact voltage tester or circuit tracer can detect live wires linked to the switch. These tools help trace wiring paths safely and efficiently to find the connected device.
Can Circuit Diagrams Assist In Locating Switch Connections?
Yes, circuit diagrams show wiring layouts and switch connections. Reviewing your home’s electrical plan clarifies which switch controls which device, saving time and avoiding guesswork.
How To Test A Light Switch Without Removing The Cover Plate?
Flip the switch on and off while observing changes in lighting or appliance operation. This non-invasive method helps identify the switch’s function without exposing wiring.
Conclusion
Finding out where a light switch goes can save time and effort. Test switches one by one to see which light turns on. Use a voltage tester for safety and accuracy. Mark switches once identified to avoid confusion later. Always turn off the power before inspecting wires.
With patience, you can easily map your switches. This helps with repairs and home improvements. Keep these tips handy for future reference. Simple steps make the task less confusing and safer. You can handle this like a pro.