
Have you ever wondered how to connect a one way light switch yourself and save time and money? Whether you’re upgrading your home or fixing a faulty switch, knowing the right steps can make the process simple and safe.
You’ll discover easy-to-follow instructions that anyone can understand, even if you’re not an expert. By the end, you’ll feel confident handling your own light switch installation—and enjoy the satisfaction of doing it yourself. Ready to get started? Let’s dive in!
Tools And Materials Needed
Connecting a one way light switch is a simple task with the right tools and materials. Preparing everything before starting makes the job faster and safer. This section lists all the essentials needed for the project.
Basic Tools
You will need a screwdriver, either flathead or Phillips, depending on the switch screws. A wire stripper helps remove the insulation from wires easily. Use a voltage tester to ensure power is off before working. Pliers are useful for bending and holding wires securely.
Materials
Get a one way light switch that fits your electrical setup. Electrical wires, usually 14 or 12 gauge, are necessary to connect the switch. Wire connectors or terminal blocks help join wires safely. Electrical tape is needed to cover exposed wire ends.
Safety Equipment
Wear insulated gloves to protect against electrical shocks. Safety glasses shield your eyes from sparks or debris. A flashlight or headlamp helps see clearly in dark areas. Always work with the power off for safety.

Credit: www.diynot.com
Safety Precautions
Working with electrical switches can be risky. Safety comes first to avoid shocks or fires. Follow clear steps to protect yourself and your home.
Always take safety seriously before starting any electrical work. Small mistakes can cause big problems.
Turn Off The Power
Switch off the main circuit breaker or fuse box. This stops electricity from flowing to the switch. Use a tester to confirm no power is present.
Use Insulated Tools
Pick tools with insulated handles to avoid electric shocks. Check tools for damage before use. Proper tools keep you safe during wiring.
Wear Safety Gear
Wear rubber-soled shoes and safety gloves. These protect from electric shock and sharp objects. Keep your work area dry and clean.
Check Wires Carefully
Identify live, neutral, and ground wires correctly. Wrong connections cause short circuits or damage. Label wires if needed for clarity.
Work In Good Lighting
Ensure the workspace is bright. Clear visibility helps avoid mistakes. Use a portable lamp if the area is dim.
Identify Existing Wiring
Identifying the existing wiring is the first step in connecting a one-way light switch. This step helps you understand how the current electrical system works. It also ensures safety and correct installation.
Before starting, always turn off the power at the main circuit breaker. Use a voltage tester to confirm there is no electricity flowing through the wires. Safety first.
Locate The Switch Box
Find the box where the current light switch is installed. This box holds the wires you need to connect the new switch. Remove the switch cover carefully using a screwdriver.
Identify The Wires Inside The Box
Look for three common wires: live (hot), neutral, and ground. The live wire usually has black or red insulation. The neutral wire is often white, and the ground wire is green or bare copper.
Use A Voltage Tester To Check Wires
Test each wire with a voltage tester to know which one is live. The live wire will show voltage. Neutral and ground wires should not have voltage. This step avoids mistakes.
Take Note Of Wire Connections
Observe how wires connect to the existing switch. Usually, the live wire connects to one terminal, and the other terminal connects to the light fixture. Take a picture for reference.
Mark The Wires For Easy Identification
Use colored tape or labels to mark each wire. This helps when connecting the new switch. Clear labeling reduces confusion during installation.
Turn Off Power Supply
Turning off the power supply is the first and most important step when connecting a one way light switch. It keeps you safe from electric shocks and prevents damage to the electrical system. Always take this step seriously before starting any work on your switch.
Before you begin, locate the main electrical panel or fuse box in your home. This is where you control the power supply to all circuits. Turning off the correct circuit breaker or removing the fuse will stop the flow of electricity to the switch you want to work on.
Locate The Circuit Breaker
Find the circuit breaker panel in your house. It is usually in the basement, garage, or utility room. Look for labels that show which breaker controls the light switch. If labels are missing, turn off breakers one by one to find the right one.
Switch Off The Correct Breaker
Flip the breaker handle to the OFF position. This stops the electricity flow. Double-check by trying to turn on the light switch. It should not work. This means power is off and safe to work on.
Use A Voltage Tester
Use a voltage tester to confirm no electricity is present. Touch the tester probes to the switch wires. If the tester shows zero voltage, it is safe to proceed. Never skip this step.
Remove Old Switch
Removing the old switch is the first step in connecting a one way light switch. It makes space for the new switch and ensures safety during installation.
Take your time to do this carefully. A wrong move can cause electrical issues or injury.
Turn Off The Power
Find the circuit breaker that controls the switch. Flip it off to cut power to the switch. Use a tester to be sure no electricity flows. Safety first.
Remove The Switch Cover Plate
Use a screwdriver to take off the cover plate. Keep the screws in a safe place. This reveals the switch and wiring behind.
Unscrew The Old Switch
Loosen the screws holding the switch to the wall box. Pull the switch out gently. Do not force it to avoid wire damage.
Note Wire Positions
Look closely at where each wire connects. Take a photo or label wires with tape. This helps when connecting the new switch.
Disconnect The Wires
Loosen the terminal screws to free each wire. Handle wires carefully to prevent damage. Keep them separated to avoid mixing.
Credit: flameport.com
Connect The New Switch
Connecting the new switch is the next step after preparing the wires. This part involves attaching the live wire, load wire, and ground wire to the switch. Each wire has its own place. Proper connection ensures the switch works safely and correctly.
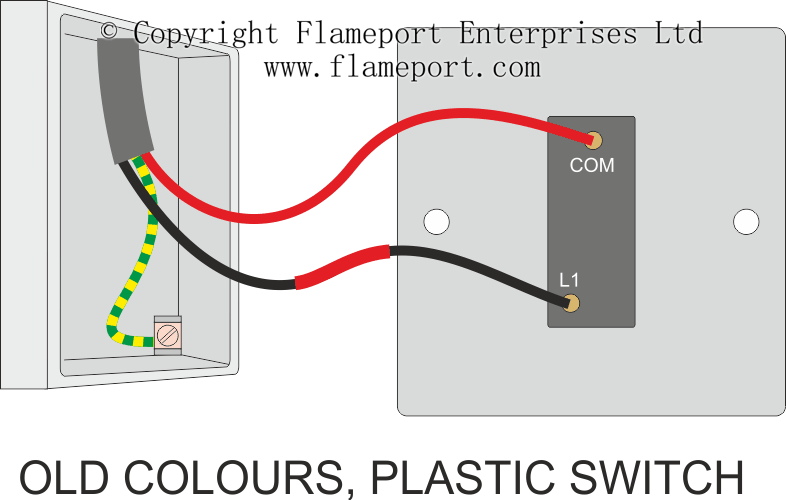
Attach Live Wire
The live wire carries power from the main supply to the switch. It is usually black or red. Connect this wire to the terminal marked “Live” or “L” on the switch. Tighten the screw firmly to hold the wire in place. Loose connections can cause sparks or failure.
Attach Load Wire
The load wire sends power from the switch to the light fixture. This wire is often black, red, or brown. Attach it to the terminal marked “Load” or “L1” on the switch. Make sure the wire is secure and the connection is tight. This completes the circuit for the light.
Connect Ground Wire
The ground wire protects from electric shocks. It is usually green or bare copper. Connect it to the green screw or ground terminal on the switch. If the switch box has a ground wire, connect it too. Proper grounding keeps the switch safe to use.
Secure The Switch And Cover Plate
Securing the switch and cover plate is the final step in installing a one way light switch. This step keeps the switch safe and ensures it looks neat. A firmly fixed switch prevents loose connections and possible hazards.
Properly attaching the cover plate protects the wires inside. It also gives the switch a clean, finished appearance. Take your time to align everything correctly for the best result.
Align The Switch With The Wall Box
First, check the switch fits well inside the wall box. Hold it steady and make sure the wires do not get pinched. The switch should sit flat and even with the wall surface.
Secure The Switch With Screws
Use the screws that come with the switch. Tighten them firmly but do not over-tighten. Over-tightening can crack the switch or damage the wall box.
Attach The Cover Plate
Place the cover plate over the switch. Line up the screw holes carefully. Insert the screws and tighten them just enough to hold the plate firmly.
Check The Final Installation
Ensure the switch moves smoothly and the cover plate does not wiggle. A secure fit means safe and reliable use. Clean the area to remove any dust or fingerprints.
Restore Power And Test
Restoring power and testing the switch is the final step. This step ensures your one way light switch works correctly. It also confirms the wiring is safe and secure.
Turn the power back on carefully. This allows electricity to flow through the circuit again. Be cautious to avoid shocks.
Turn On The Circuit Breaker
Locate the main circuit breaker in your home. Flip the switch to the “on” position. This restores electricity to the switch and light fixture.
Test The Light Switch
Press the switch to check if the light turns on. Then, press it again to turn the light off. The light should respond immediately.
Check For Any Issues
Look for flickering or dim lights. Listen for buzzing sounds from the switch. Stop and turn off the power if any issues occur.

Credit: www.youtube.com
Frequently Asked Questions
How Do I Wire A One Way Light Switch Safely?
Turn off the power at the circuit breaker before starting. Connect the live wire to the switch’s common terminal. Attach the load wire to the switch’s output terminal. Secure all connections and use insulated tools for safety.
What Tools Are Needed To Connect A One Way Switch?
You need a screwdriver, wire stripper, voltage tester, electrical tape, and pliers. These tools help in stripping wires, testing voltage, and securing connections safely.
Can I Connect A One Way Switch Without Professional Help?
Yes, if you understand basic electrical wiring and safety precautions. Always turn off power and double-check connections. If unsure, consult a licensed electrician to avoid hazards.
What Wire Colors Are Used For One Way Light Switches?
Typically, live wires are brown or black, neutral wires are blue, and earth wires are green/yellow. Confirm local wiring color codes as they may vary by region.
Conclusion
Connecting a one way light switch is simple and clear. Follow safety steps first. Turn off the power before starting work. Identify the live wire and connect it to the switch terminal. Secure all connections tightly. Test the switch to make sure it works well.
This small task can save money on electrician fees. With practice, wiring a switch becomes easier. Keep learning and stay safe with every project you try.


