Changing a 2 way light switch might sound tricky, but with the right steps, you can do it yourself quickly and safely. If your lights aren’t working properly or you just want to upgrade, this guide will walk you through everything you need to know.
By the end, you’ll feel confident handling your home’s lighting like a pro. Ready to save time and avoid calling an electrician? Let’s get started.

Credit: www.youtube.com
Tools And Materials Needed
Changing a 2 way light switch requires certain tools and materials. Preparing these before starting makes the job easier and safer. Knowing what you need helps avoid interruptions and ensures a smooth process.
Essential Tools
You need a few basic tools to change the switch. A screwdriver set is important, both flathead and Phillips types. Use a voltage tester to check if the power is off. Wire strippers help prepare the wires for the new switch. A pair of pliers can assist with twisting wires together. Keep a flashlight handy if the workspace is dark.
Safety Gear
Safety is key when working with electricity. Wear insulated gloves to protect your hands. Safety goggles shield your eyes from sparks or debris. Use shoes with rubber soles to reduce shock risk. Avoid wearing metal jewelry during the work. Always turn off power at the breaker before starting.
Replacement Switch Types
Choose the right replacement switch for your setup. A standard 2 way switch has three terminals. Confirm it matches the existing switch type. Some switches have a toggle, others a rocker style. Select a switch that fits your wall box size. Check the switch’s voltage and current ratings to match your circuit.

Credit: www.youtube.com
Preparing For The Switch Replacement
Preparing for a 2 way light switch replacement takes careful steps. Safety is the top priority before starting any electrical work. Proper preparation helps avoid accidents and makes the process smooth.
Gather all tools before you begin. A screwdriver, voltage tester, and replacement switch are necessary. Clear the work area for easy access to the switch panel.
Turn Off Power
Switch off power at the main circuit breaker. This stops electricity from reaching the switch. Do not rely on the wall switch alone to cut power.
Verify Power Is Off
Use a voltage tester to check the switch wires. Touch the tester to each wire to confirm no electricity flows. This step confirms your safety before touching wires.
Remove Switch Cover
Unscrew the cover plate carefully. Set screws aside to avoid losing them. Removing the cover exposes the switch and wiring for replacement.
Removing The Old Switch
Removing the old 2 way light switch is the first step in replacing it. Safety is key. Always turn off the power at the circuit breaker before starting. This prevents electric shocks and keeps you safe during the work.
Once the power is off, you can begin taking out the old switch. This process involves unscrewing the switch, identifying the wiring, and disconnecting the wires carefully.
Unscrew The Switch
Start by removing the screws holding the switch cover plate. Use a screwdriver that fits well. Keep the screws in a safe place. Next, unscrew the switch itself from the electrical box. Gently pull the switch out to see the wires behind it.
Identify Wiring
Look at the wires connected to the switch. Usually, there are three wires: one common and two travelers. The common wire is often darker or marked. Take a photo or note how the wires connect. This helps when installing the new switch.
Disconnect Wires
Loosen the screws holding the wires on the switch. Carefully pull the wires free. Avoid touching wire ends together. If wires are pushed into holes, use a small tool to release them. Now, the old switch is free and ready to be replaced.
Installing The New Switch
Installing the new 2 way light switch is a key step. It ensures your light works correctly from both switches. Follow the steps carefully for safety and good results. Take your time and stay organized to avoid mistakes.
Connect Wires To New Switch
Start by matching wires to the new switch terminals. Usually, you see three wires: common, L1, and L2. The common wire connects to the terminal marked “COM” or “Common.” The other two wires go to L1 and L2 terminals. Tighten the screws firmly to hold the wires. Make sure no bare wire is showing outside the terminal.
Secure The Switch In Place
Push the connected switch back into the wall box gently. Align the screw holes with the box. Use a screwdriver to fix the screws tightly. The switch should sit flush with the wall. Check it is stable and does not move.
Attach The Switch Cover
Place the switch cover over the switch. Line up the screw holes on the cover with the switch plate. Insert the screws and tighten them carefully. The cover should fit snugly without gaps. This step finishes the look and protects the wiring.
Testing The New Switch
Testing the new switch is an important step after installation. It ensures your wiring is correct. It also confirms the switch works as it should. This step helps avoid electrical issues later.
Restore Power
First, turn the power back on at the circuit breaker. Be careful and avoid touching any wires. Switch on the breaker slowly. This step powers the switch and connected lights.
Check Switch Functionality
Press the new switch to test it. The light should turn on and off smoothly. Try flipping the switch at both locations if it is a two-way switch. The light must respond correctly from each switch.
Troubleshooting Tips
If the light does not work, check your connections again. Make sure wires are secure and in the right place. Use a voltage tester to confirm power flows to the switch. Replace the switch if it feels faulty or broken.
Safety Tips And Best Practices
Changing a 2 way light switch requires care and attention. Safety is the top priority during the process. Following safety tips and best practices helps prevent accidents and damage. It keeps you and your home safe while working with electricity.
Avoid Common Mistakes
Always turn off the power at the breaker before starting. Test the switch with a voltage tester to confirm no electricity flows. Do not touch wires with wet hands or metal tools. Label wires before disconnecting to avoid confusion. Use the right tools and avoid forcing parts into place. Double-check all connections before restoring power. Simple errors can cause shocks or short circuits.
When To Call A Professional
Call an electrician if you are unsure or nervous about wiring. Complex wiring setups need expert knowledge. If breakers trip repeatedly, do not try to fix it yourself. Faulty wiring can cause fires. Professionals have the tools and experience to handle tricky situations. They ensure work meets safety codes and regulations.
Maintenance Tips
Check switches regularly for signs of wear or damage. Replace any switch that feels hot or works irregularly. Keep switch plates clean and dry to avoid moisture build-up. Tighten loose screws to maintain good connections. Regular checks extend the life of your switches and reduce risks.

Credit: www.realpars.com
Frequently Asked Questions
How Do You Identify A 2 Way Light Switch?
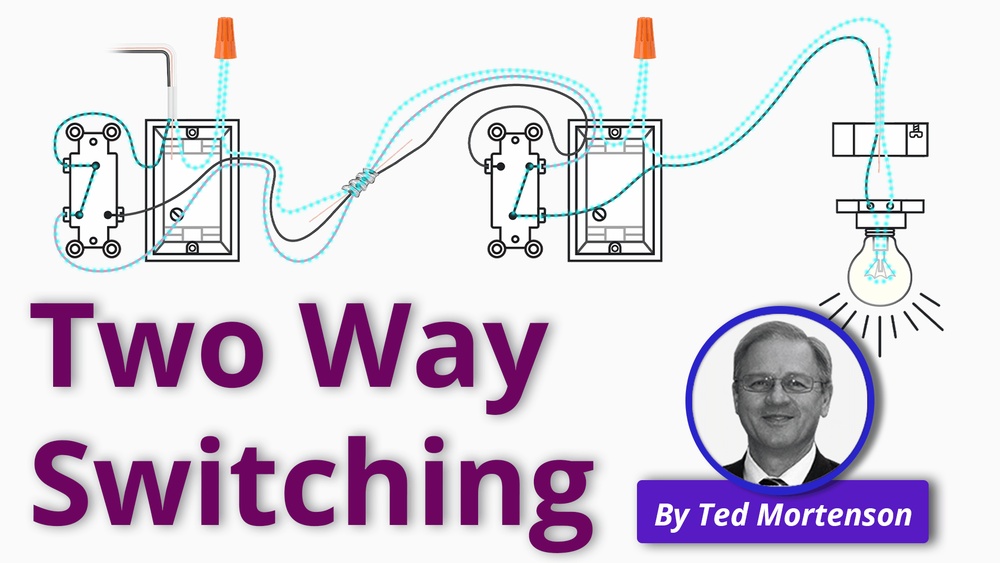
A 2 way switch has three terminals: common, L1, and L2. It controls one light from two locations. Look for two switches linked to the same light fixture.
What Tools Are Needed To Change A 2 Way Switch?
You need a screwdriver, voltage tester, wire stripper, and electrical tape. These tools ensure safe removal and installation of the switch.
Is It Safe To Change A 2 Way Switch Myself?
Yes, if you turn off power at the breaker and use a tester. Follow instructions carefully and avoid touching live wires.
How Do I Wire A New 2 Way Switch Correctly?
Connect the common terminal to the live wire. Link L1 and L2 to traveler wires. Match old switch wiring exactly on the new switch.
Conclusion
Changing a 2 way light switch can be simple and safe. Always turn off the power first. Follow each step carefully to avoid mistakes. Take your time and check your work. With the right tools and instructions, anyone can do it.
Your lights will work just like before, but with a new switch. Feel confident in your skills and stay safe. Now, enjoy the bright and easy control of your lights.


