Are you ready to take control of your home lighting and add convenience to your space? Connecting 3 lights to 3-way switches might sound tricky, but with the right steps, you can do it yourself and save money.
Imagine turning on multiple lights from two different switches—making your home smarter and more comfortable. In this guide, you’ll learn exactly how to wire those lights and switches safely and efficiently. Keep reading, and by the end, you’ll feel confident handling this project like a pro.
Tools And Materials Needed
Before starting to connect three lights to three-way switches, gather all necessary tools and materials. Having the right items makes the job easier and safer.
Prepare a clean workspace. Make sure the power is off before you begin any electrical work.
Electrical Tools Required
- Screwdrivers (flathead and Phillips) for removing and securing screws
- Wire strippers to remove insulation from wires
- Voltage tester to check if wires are live
- Needle-nose pliers for bending and holding wires
- Electrical tape for securing wire connections
- Wire nuts to safely join wires together
- Drill with bits for mounting switch boxes
Materials Needed
- Three-way switches (two switches per circuit)
- Light fixtures compatible with your setup
- Electrical cables (14/3 or 12/3 wire depending on load)
- Switch boxes to hold the switches securely
- Wire connectors to join wires safely
- Mounting screws and anchors for fixtures and boxes
Safety Equipment
- Insulated gloves to prevent electric shock
- Safety glasses to protect eyes from debris
- Flashlight or headlamp for working in low light
- Dust mask if drilling into walls or ceilings

Credit: www.reddit.com
Basics Of 3-way Switch Wiring
Understanding the basics of 3-way switch wiring is key for controlling lights from two spots. It allows you to turn lights on or off from different locations. This setup is common in hallways, stairs, and large rooms.
Learning the wiring basics helps you install or troubleshoot these switches safely. It also makes your lighting more convenient and flexible. Below, explore how 3-way switches work and the main wiring parts involved.
How 3-way Switches Work
3-way switches control one or more lights from two places. Each switch has three terminals and a common screw. The common connects to the power source or the light fixture.
Two traveler wires connect the switches. They carry current between switches to change the light’s state. Flipping either switch changes the connection path, turning lights on or off.
This wiring lets you control lights from different rooms or ends of a hallway easily.
Key Wiring Components
The main parts include the power source, two 3-way switches, traveler wires, and light fixtures. The power source brings electricity to the circuit.
Traveler wires link the switches, allowing them to communicate. The common terminal connects either the power or the light fixture. Ground wires provide safety by preventing shocks.
Understanding these parts makes wiring simpler and safer. Each component plays a vital role in the system’s function.
Planning Your Wiring Setup
Planning your wiring setup is the first step to connect three lights to 3-way switches. A clear plan helps avoid mistakes and saves time. It also ensures safety and proper function. Before starting, consider the layout of your lights and switches. Think about how wires will run between them. Check your tools and materials are ready. A good plan makes the wiring process smooth and efficient.
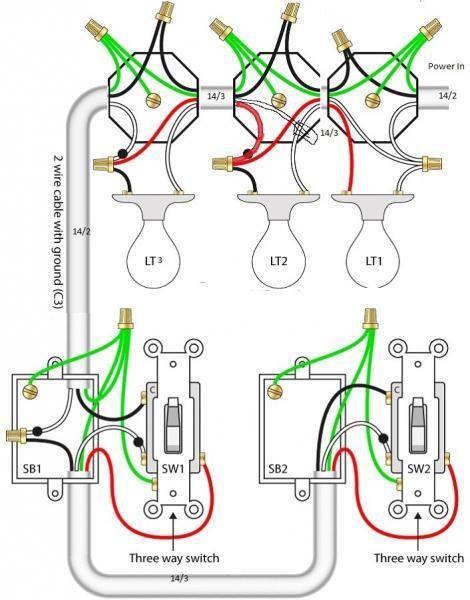
Layout For Three Lights
Decide the position of each light in the room. Space the lights evenly for balanced lighting. Draw a simple diagram showing light locations. Mark where the wires will run from one light to another. Plan the path for power supply to the first switch. Include the connection between the switches and lights. Keep wires short but enough to reach each point safely.
Switch Placement Tips
Place switches at convenient spots near room entrances. Make sure switches are easy to reach and use. Avoid placing switches behind doors or furniture. Keep switches at the same height for uniformity. Plan wiring paths to avoid walls with pipes or other obstacles. Use electrical boxes that fit the switches properly. Label your switches to know which controls which light.
Step 1: Turn Off Power
Start by switching off the power at the circuit breaker. This step keeps you safe from electric shock during installation. Always double-check that the power is off before touching any wires.
Why Turning Off Power Is Crucial
Working with electrical wiring can be dangerous. Turning off the power stops electricity from flowing. This step protects you from electric shocks. It also prevents damage to your switches and lights.
How To Safely Turn Off The Power
Locate the main circuit breaker panel in your home. Find the breaker that controls the light circuit. Flip the breaker switch to the “off” position. Double-check that the power is off by testing the lights.
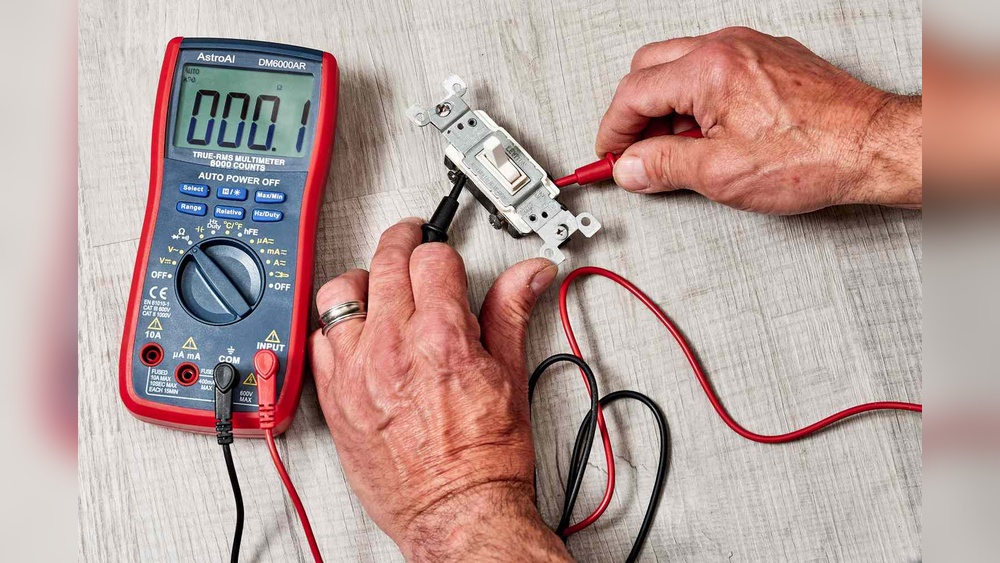
Using A Voltage Tester
A voltage tester helps confirm no electricity flows in the wires. Touch the tester to the wires you will work on. If the tester does not light up or beep, the power is off. This step adds an extra layer of safety.
Step 2: Run Cables Between Switches And Lights
Step 2 focuses on running cables between the switches and lights. This step is crucial for ensuring proper electrical connections. Careful planning and accurate wiring will make the switches control the lights effectively.
Start by measuring the distance between each switch and its corresponding light. This helps you buy the right length of cable. Use a cable designed for electrical wiring, usually 14/3 or 12/3 NM cable for 3-way switches.
Plan Cable Routes
Choose the safest and easiest paths for the cables. Avoid sharp bends and places where the cable could get damaged. Keep cables away from water sources and heat areas. Follow local electrical codes for routing cables.
Prepare The Switch And Light Boxes
Open the switch and light boxes carefully. Check that there is enough space for the cables. Use cable clamps or connectors to secure the cables in the boxes. This prevents movement and protects the wires.
Run The Cables
Feed the cable from the first switch box to the first light box. Then, run cables from one light box to the next. Finally, connect the cable to the second switch box. Make sure the cables are straight and not twisted.
Label The Wires
Mark each wire with tape or labels. Note which wire goes to which switch or light. This helps during final wiring and troubleshooting. Clear labels reduce confusion and mistakes.
Step 3: Connect The First Switch
Connecting the first switch is a key step in wiring three lights to three-way switches. This switch controls the flow of electricity between the power source and the rest of the circuit.
It is important to identify the right wires and connect them carefully. Proper connections ensure the lights work smoothly and safely.
Identify The Common Terminal
The first switch has one common terminal and two traveler terminals. The common terminal usually has a different color screw, often black or dark.
Connect the power source wire (hot wire) to this common terminal. This wire brings electricity into the switch.
Connect The Traveler Wires
Two traveler wires run between the first and second switch. These wires connect to the traveler terminals on the first switch.
Attach each traveler wire to one of the two traveler terminals. These terminals are usually brass-colored screws.
Secure The Ground Wire
Locate the ground terminal on the switch. It is often a green screw or a bare copper wire.
Connect the ground wire to this terminal. Grounding is important for safety and helps prevent electric shocks.
Test The First Switch Connection
After connecting all wires, carefully push the switch into the box. Screw it in place without pinching wires.
Turn on the power and test the switch. Flip it on and off to check if it controls the lights properly.
Step 4: Wire The Lights In Sequence
Wiring the lights in sequence is a key step in connecting three lights to three-way switches. It ensures that the lights work smoothly together.
Each light must connect properly to the power source and switches. This step-by-step process helps avoid wiring mistakes.
Identify The Power Source And Traveler Wires
Start by finding the power source wire. This wire brings electricity to the first light.
Next, locate the traveler wires between the switches. These wires carry current to control the lights from different points.
Connect The First Light To The Power Source
Attach the live wire from the power source to the first light’s black wire. This powers the light.
Connect the white neutral wires together from the power source and the light. This completes the circuit.
Link The Second And Third Lights In Series
Use the black wire from the first light to connect to the second light’s black wire. This passes power forward.
Do the same for the third light, connecting its black wire to the second light’s black wire.
Complete The Neutral Connections
Join all the white neutral wires from the three lights together. This keeps the circuit balanced.
Make sure these neutral wires connect back to the power source’s neutral wire.
Secure The Ground Wires
Connect all ground wires from the lights and switches. Ground wires are usually green or bare copper.
Attach these wires to the grounding screw or grounding wire in the electrical box.
Credit: www.doityourself.com
Step 5: Connect The Second Switch
Next, attach the wires to the second switch terminals carefully. Make sure each wire matches the correct terminal for proper function. Double-check connections before securing the switch in place.
Understanding The Second Switch Wiring
Step 5 focuses on connecting the second switch in the 3-way setup. This switch controls the same lights as the first switch. It works by sending power back and forth through traveler wires.
Identify the traveler terminals on the second switch. These usually have brass or black screws. Connect the traveler wires from the first switch to these terminals. This creates a path for electricity between switches.
Connecting The Common Terminal
The second switch has a common terminal, often marked with a black screw. Connect the wire coming from the light fixture or power source to this terminal. This allows the switch to complete or break the circuit.
Ensure the wire is tightly secured under the terminal screw. Loose connections can cause flickering or switch failure. Double-check the wire colors to avoid mistakes.
Securing Ground Wires
Ground wires provide safety by preventing electrical shocks. Connect the bare copper or green ground wire to the green screw on the switch. If the box is metal, attach the ground wire to the box as well.
Use wire nuts to join multiple ground wires if needed. Proper grounding is essential for a safe electrical system.
Testing The Second Switch Connection
After wiring, turn the power back on at the breaker. Test the second switch by toggling it on and off. The lights should respond correctly along with the first switch.
If the lights do not work, turn off power and recheck all connections. Confirm traveler wires and common terminal wires are in the right place.
Step 6: Test The Circuit
Step 6: Test the Circuit is a crucial part of connecting 3 lights to 3 way switches. Testing ensures everything works safely and correctly. It helps find any wiring mistakes early. This step saves time and avoids future problems.
Testing the circuit means turning on the power and checking each switch. Each switch should control the lights properly. The lights should turn on and off without flickering or delays. This confirms the wiring is correct.
Turn On The Power
First, switch on the main power at the breaker box. Do this carefully to avoid shocks. Use a voltage tester on the wires to check if power flows. Confirm the circuit is live before testing the switches.
Check Each Switch
Flip the first switch and watch the lights. Turn it on and off several times. Do the same with the second switch. Both switches should control all three lights. This shows the 3 way switches work properly.
Look For Wiring Issues
Notice if any lights do not turn on or off. Flickering or dim lights can indicate loose wiring. If something seems wrong, turn off power and recheck connections. Tighten screws and secure wires as needed.
Use A Helper
Ask someone to watch the lights while you flip switches. This helps confirm the lights respond correctly from both locations. It makes testing faster and more accurate.

Credit: www.youtube.com
Troubleshooting Common Issues
Troubleshooting common issues helps fix problems fast. It saves time and keeps your lights working well. Understanding simple fixes can avoid calls to an electrician. Here are some common issues and how to solve them.
Lights Not Turning On
Check if the bulbs are screwed in tight. Loose bulbs cause lights to stay off. Test bulbs in another socket to see if they work. Confirm the power is on at the breaker panel. A tripped breaker stops power to switches and lights. Look for any loose wires in the switch box. Turn off power before checking wires for safety. Tighten any loose connections you find. Replace any damaged wires or connectors. Use a voltage tester to confirm power reaches the switch. If no power, the problem may be in the wiring or breaker.
Switches Not Working Properly
Test both switches to see if either feels loose or broken. Loose switches can cause flickering or no light. Swap the switches with new ones if unsure about their condition. Check wiring connections at each switch. Incorrect wiring causes switches to malfunction. Make sure traveler wires connect to the right terminals. Tighten all terminal screws firmly. Inspect for any signs of wear or damage. Replace old or worn switches for better performance. Confirm the ground wire is connected for safety. Always turn off power before working on switches.
Safety Tips When Working With Electricity
Working with electricity can be dangerous. Taking safety seriously protects you from harm. Always follow key safety tips before starting any electrical project. These tips help keep you safe and your home secure.
Turn Off Power At The Circuit Breaker
Always switch off the power before touching wires. Use the main breaker to cut electricity. Double-check by trying the light switch or using a voltage tester. Never trust a switch alone.
Use Proper Tools And Equipment
Choose tools made for electrical work. Insulated screwdrivers and pliers reduce shock risk. Avoid metal tools without insulation. Wear rubber-soled shoes for extra protection.
Wear Safety Gear
Safety glasses protect your eyes from sparks. Gloves guard your hands from cuts and shocks. Avoid loose clothing that can catch wires. Keep hair tied back to stay clear of equipment.
Check For Damaged Wires
Inspect wires for cracks or frays before starting. Replace any damaged wiring to avoid shorts. Damaged wires increase the risk of fire and shock. Use wires rated for your electrical load.
Work In A Dry Environment
Moisture increases the chance of electric shock. Avoid working in damp or wet areas. Keep your hands dry while handling electrical parts. Use a dry cloth to clean tools and surfaces.
Follow Electrical Codes And Instructions
Read instructions carefully before connecting switches and lights. Follow local electrical codes to ensure safety. Codes help prevent hazards and keep systems reliable. If unsure, consult a professional electrician.
Frequently Asked Questions
How Do 3-way Switches Control Multiple Lights?
3-way switches allow two switches to control one or more lights. They use traveler wires to connect switches. This setup enables turning lights on or off from different locations, improving convenience and flexibility in lighting control.
Can I Connect Three Lights To One 3-way Switch Setup?
Yes, you can connect three lights to a 3-way switch setup. Wire the lights in parallel, ensuring consistent voltage. Proper wiring and correct switch placement are essential for safe and effective operation.
What Tools Are Needed For Wiring 3-way Switches And Lights?
You need wire strippers, screwdrivers, voltage testers, electrical tape, and wire nuts. These tools help safely strip wires, connect terminals, and test circuits. Using the right tools ensures a secure and code-compliant installation.
Is It Necessary To Turn Off Power Before Wiring Switches?
Yes, always turn off power at the breaker before wiring switches. This step prevents electrical shock and injury. Confirm power is off using a voltage tester before starting any electrical work.
Conclusion
Connecting three lights to three-way switches can seem tricky at first. Take your time and follow each step carefully. Double-check your wiring to keep everything safe. Testing the switches helps ensure the lights work properly. This setup gives you better control over your lighting.
With practice, wiring three-way switches feels easier. Stay patient and enjoy the improved lighting in your home.