Have you ever wanted to control a single light from two different switches? Whether it’s a hallway, staircase, or large room, a two-way light switch makes your life easier and more convenient.
But if you’re wondering how to connect a two-way light switch without getting lost in confusing wires, you’re in the right place. This guide will walk you through simple steps you can follow, even if you’re not an expert. By the end, you’ll have the confidence to install your own two-way switch safely and efficiently.
Ready to make your lighting smarter? Let’s get started!
Tools And Materials Needed
Before starting to connect a two way light switch, gather all necessary tools and materials. Having the right items makes the job easier and safer. This section lists everything needed for a smooth installation.
Basic Tools
Prepare simple tools like a screwdriver and wire stripper. A flathead and a Phillips screwdriver work best. Wire strippers help remove insulation without damaging wires.
Electrical Tester
An electrical tester checks if wires are live. It keeps you safe by confirming power is off before working. Always test wires before touching them.
Materials For Wiring
Use electrical wires rated for your home’s voltage. You need three wires: live, neutral, and traveler wires. Select wires that match the switch specifications.
Two Way Light Switches
Buy two compatible two way light switches. They allow control of one light from two places. Make sure switches fit your electrical box size.
Additional Supplies
Have electrical tape to cover wire connections. Wire nuts secure wire ends safely. A voltage detector pen adds extra safety when testing.

Credit: www.sciencephoto.com
How Two-way Switches Work
Two-way switches control one light or group of lights from two different places. This setup is common in hallways, stairs, or large rooms. It allows you to turn the light on or off from either switch. Understanding how these switches work helps you install them correctly and safely.
Basic Function Of Two-way Switches
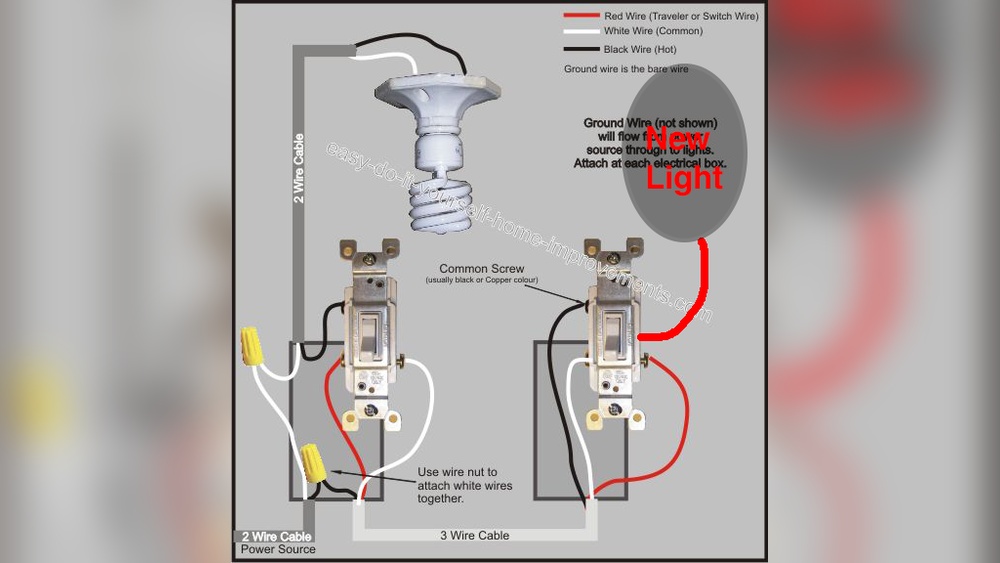
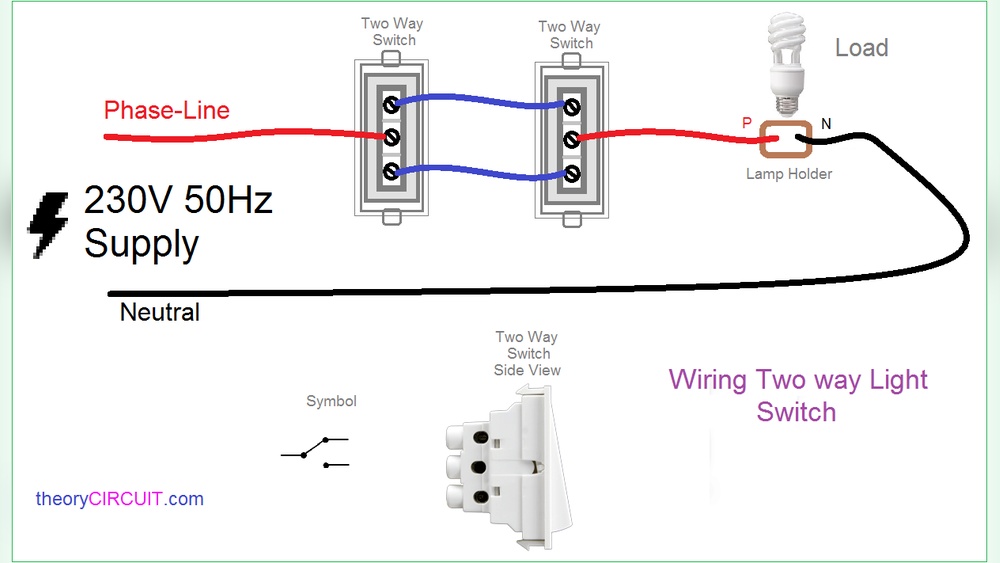
Each two-way switch has three terminals. One terminal connects to the power source, the others connect to the light and the other switch. The switches work together to open or close the circuit. This controls the flow of electricity to the light.
The Role Of The Traveler Wires
Two traveler wires connect the two switches. These wires carry current between switches. They allow either switch to change the light’s state. The position of each switch decides the light’s status.
How The Circuit Completes
When both switches align, the circuit is complete. Electricity flows through the circuit and lights the bulb. Changing one switch breaks the circuit. This stops the electricity and turns off the light.
Why Two-way Switches Are Useful
Two-way switches add convenience. You can control lights from two locations. This saves walking back to a single switch. It also improves safety in dark areas.
Safety Precautions
Safety is the most important part of working with electrical switches. Taking proper precautions helps avoid shocks and accidents. Follow these steps closely to keep yourself and your home safe.
Turn Off The Power
Always switch off the power at the circuit breaker before starting. Do not rely on the wall switch alone. Use a tester to make sure the wires are not live. Safety first.
Use Proper Tools
Use insulated tools designed for electrical work. Avoid metal tools without insulation. This lowers the risk of electric shock. Keep tools organized and within reach.
Wear Safety Gear
Wear rubber-soled shoes and gloves made for electrical work. Do not work barefoot or with wet hands. Safety gear protects you from accidental shocks.
Check Wiring And Materials
Inspect all wires for damage or wear before starting. Use wires that match the switch’s specifications. Replace any old or frayed wiring to avoid hazards.
Work In A Dry Area
Ensure the workspace is dry. Avoid working in damp or wet conditions. Water and electricity do not mix. A dry space reduces the risk of shock.
Identify Existing Wiring
Identifying the existing wiring is the first step to connect a two-way light switch. This step ensures safety and helps you understand how the wires are arranged. Knowing the wire types and their positions makes the installation easier and prevents errors.
Before touching any wires, turn off the power at the circuit breaker. Use a voltage tester to confirm no electricity flows through the wires. Safety first.
Locate The Switch Box
Find the switch box that controls the light. Remove the cover plate carefully. Check inside for the wires connected to the switch. Usually, you will find three wires: a live wire, a neutral wire, and a traveler wire.
Identify Wire Colors
Wire colors have specific meanings. Black or red wires often carry current. White wires are usually neutral. Green or bare wires are for grounding. Note these colors before disconnecting anything.
Mark Each Wire
Use tape or labels to mark each wire. This helps to remember which wire goes where. Clear labels avoid confusion during installation. Keep track of the live, neutral, and traveler wires.
Understand Wire Functions
The live wire carries power from the breaker. The neutral wire completes the circuit. Traveler wires connect two switches in the two-way system. Knowing these functions helps in correct wiring.
Turn Off Power Supply
Turning off the power supply is the first and most important step before connecting a two-way light switch. It keeps you safe from electric shock. Always make sure no electricity flows through the wires you will handle.
Electricity can be dangerous. Even a small mistake can cause injury or damage. Turning off the power stops any current from reaching the switch or wires. This creates a safe working environment.
Locate The Main Circuit Breaker
Find your home’s main circuit breaker panel. It is usually in the basement, garage, or utility room. The panel controls electricity to the entire house.
Look for the switch labeled for the area where you will work. This helps to avoid cutting power to the whole house unnecessarily.
Switch Off The Correct Circuit
Turn off the circuit breaker that controls the lights you want to work on. This stops power from reaching the two-way switch wiring.
Double-check by flipping the switch off. Make sure the lights go off to confirm the power is off.
Test The Power With A Voltage Tester
Use a voltage tester to check if wires still have electricity. Touch the tester to the wires in the switch box.
If the tester shows no voltage, the power is off. Never skip this step. It ensures your safety before starting work.
Wiring The First Switch
Start by turning off the power at the breaker for safety. Connect the live wire to the common terminal on the first switch. Then, attach the traveler wires to the other two terminals.
Gathering Necessary Tools And Materials
Start by collecting all tools and materials. You need a screwdriver, wire stripper, voltage tester, and electrical tape. Also, have the two-way switch and suitable wires ready. Using the right tools makes the job safer and easier.
Turning Off The Power Supply
Safety first. Switch off the power at the circuit breaker. Use a voltage tester to check that no electricity flows to the wires. This step prevents electric shocks during wiring.
Identifying The Wires
Look inside the switch box to find the wires. Usually, there are three wires: live (line), traveler, and ground. The live wire carries power. Travelers connect the two switches. The ground wire ensures safety.
Connecting The Live Wire
Attach the live wire to the common terminal of the first switch. The common terminal is often marked or colored differently. Tighten the screw firmly to hold the wire in place.
Attaching The Traveler Wires
Connect the two traveler wires to the remaining terminals on the switch. These wires carry current between the two switches. Make sure each traveler wire is secured tightly under the screws.
Securing The Ground Wire
Fasten the ground wire to the green grounding screw on the switch box or switch. This wire protects from electrical faults. Proper grounding is vital for safety.
Checking And Finalizing The Wiring
Double-check all connections for tightness and correctness. Ensure no bare wires touch each other. Wrap exposed wire ends with electrical tape for extra safety.
Wiring The Second Switch
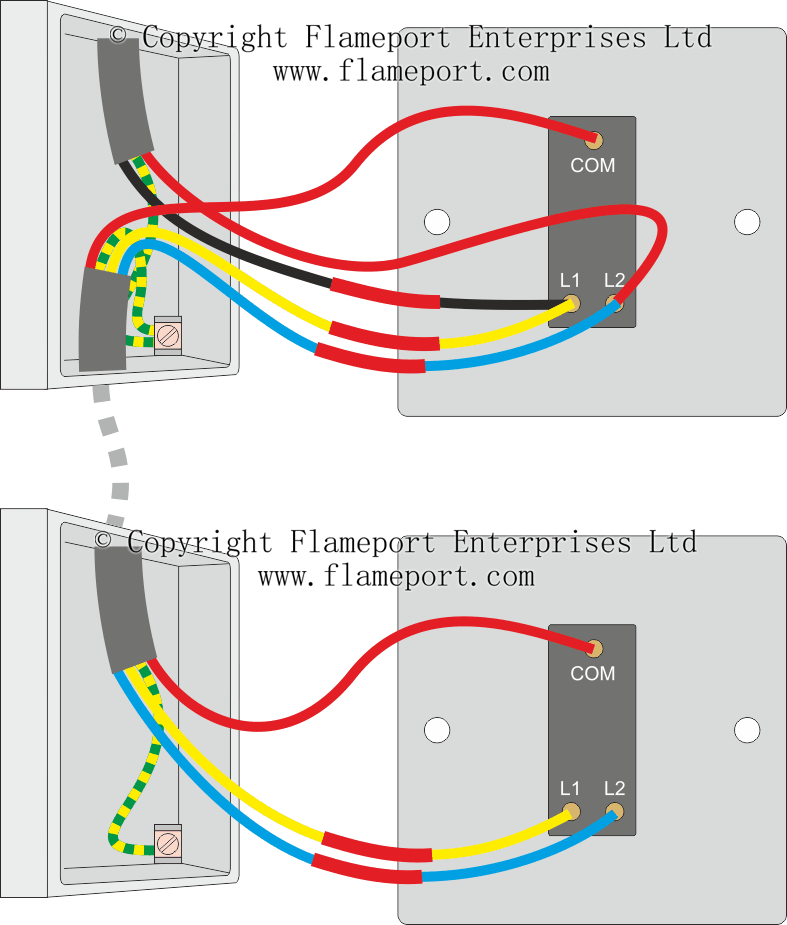
Start by connecting the traveler wires from the first switch to the second switch terminals. Then, attach the common wire to the correct terminal on the second switch. Finally, secure all connections tightly to ensure the circuit works properly.
Understanding The Second Switch Box
The second switch controls the same light as the first. It connects through special wires called travelers. These wires carry the electric current between switches. Before wiring, turn off the power at the circuit breaker. Safety first.
Identifying The Wires Inside
Inside the second switch box, find three main wires. Two traveler wires usually red and black. One common wire, often black or darker. Also, look for a ground wire, which is bare copper or green.
Connecting The Traveler Wires
Attach the two traveler wires to the traveler terminals on the switch. These terminals are often brass or copper-colored screws. Tighten the screws to hold the wires firmly. No loose connections allowed.
Attaching The Common Wire
Connect the common wire to the common terminal on the switch. This terminal is usually darker or marked as “common.” This wire completes the circuit and controls power flow.
Ground Wire Connection
Fasten the ground wire to the green grounding screw on the switch. This step protects against electrical shock. If no ground wire is present, check local codes before proceeding.
Final Checks And Closing The Box
Double-check all connections are tight and correct. Push the wires gently back into the box. Secure the switch to the box with screws. Restore power and test the switch for proper function.

Credit: www.youtube.com
Connect The Light Fixture
Connecting the light fixture is an important step in wiring a two-way light switch. It links the electrical current to the bulb, making the switch work properly. Proper connection ensures safety and functionality.
Start by turning off the power at the circuit breaker. This prevents electric shocks during installation. Always test the wires with a voltage tester to confirm no power is flowing.
Identify The Wires On The Light Fixture
Look for the live, neutral, and ground wires on your light fixture. The live wire usually has brown or black insulation. The neutral wire is often blue or white. The ground wire is green or bare copper. Knowing these helps avoid wrong connections.
Connect The Neutral Wire
Connect the neutral wire from the fixture to the neutral wire in the ceiling box. Use a wire connector to secure them tightly. This creates a complete circuit for electricity to flow back safely.
Attach The Live Wire To The Switch Loop
Connect the live wire of the fixture to the switch loop wire. This wire carries current when the switch is on. Secure the connection with a wire nut or connector for safety.
Secure The Ground Wire
Attach the fixture’s ground wire to the grounding screw or wire in the ceiling. This step reduces the risk of electric shock. Always make sure the ground connection is tight and secure.
Mount The Light Fixture
Once all wires are connected, carefully place the fixture back into its position. Use screws or mounting brackets as needed. Check that the fixture is stable and does not wobble.
Testing The Switches
Testing the switches is a key step in connecting a two way light switch. It ensures both switches control the light correctly. This step helps find wiring mistakes early. It saves time and prevents damage.
Testing is simple. You only need a few tools and careful checks. Follow each step to confirm the switches work perfectly.
Check Power Supply
Turn the power back on at the breaker. Use a voltage tester to check if power reaches the switches. Confirm the wires have electricity. No power means a wiring issue or breaker problem.
Test Each Switch Separately
Flip the first switch on and off. Watch if the light turns on or off. Repeat with the second switch. Both switches should control the light independently. If one switch fails, check its wiring.
Use A Continuity Tester
Turn off the power. Use a continuity tester or multimeter on the switch terminals. Test for correct connection when switches change position. This test checks internal switch function and wiring accuracy.
Look For Loose Connections
If the light does not respond correctly, inspect all wire connections. Tighten any loose screws or terminals. Loose wires often cause switch failure. Secure connections improve safety and function.
Credit: flameport.com
Troubleshooting Common Issues
Troubleshooting common issues with a two-way light switch can save time and frustration. Small mistakes in wiring or installation often cause problems. Understanding basic troubleshooting steps helps find and fix these problems quickly.
Check each part of the switch and wiring carefully. Look for loose wires, wrong connections, or damaged parts. Testing with simple tools like a voltage tester can identify where the problem lies.
Checking Loose Or Disconnected Wires
Loose wires are a frequent cause of switch failure. Switch off power before inspecting. Tighten any loose screws or wire connectors. Ensure all wires fit snugly into their terminals. A loose wire can stop the light from working.
Verifying Correct Wire Connections
Incorrect wiring can confuse a two-way switch. Match wires to the correct terminals using a wiring diagram. Common wires include live, neutral, and traveler wires. Swapping traveler wires often causes the switch to misbehave. Use labels if needed to keep track.
Testing The Switch Itself
A faulty switch can prevent the light from turning on. Use a multimeter to check switch continuity. Switch off power before testing. Replace the switch if it shows no continuity when toggled. A new switch often solves the problem.
Inspecting The Light Fixture And Bulbs
Sometimes the issue is not the switch but the fixture. Check the light bulb for damage or burnout. Replace the bulb with a known working one. Ensure the fixture wiring is secure and not damaged.
Ensuring Power Supply To The Circuit
Power supply issues stop the switch from working. Confirm the circuit breaker or fuse is on. Use a tester to check for power at the switch terminals. No power means checking the main electrical panel is necessary.
Frequently Asked Questions
What Is A Two Way Light Switch?
A two way light switch controls a light from two locations. It uses two switches wired together. This setup is common in hallways and staircases for convenience.
How Do I Wire A Two Way Light Switch?
Connect the live wire to the common terminal on the first switch. Then, link traveler terminals between both switches. Finally, connect the light fixture to the common terminal on the second switch.
Can I Replace A Single Switch With A Two Way Switch?
Yes, you can replace a single switch with a two way switch. However, you must add wiring to connect the second switch location. This requires electrical knowledge or professional help.
What Tools Do I Need For Two Way Switch Installation?
You will need a screwdriver, wire stripper, voltage tester, and electrical tape. These tools help safely connect and secure the wires during installation.
Conclusion
Connecting a two-way light switch is easier than it seems. Follow each step with care and double-check your work. Turn off the power before starting to stay safe. Use the right tools and materials for best results. Once done, test the switches to ensure they work properly.
This skill saves time and money on small electrical tasks. Keep this guide handy for future projects. Now, you can control lights from two places with confidence. Simple and useful!