If you want your composite deck to look clean and polished without visible screws or nails, installing hidden fasteners is the way to go. But how do you do it right so your deck stays strong and beautiful for years?
You’re about to learn simple, step-by-step tips on how to install hidden fasteners on composite decking that professionals swear by. Whether you’re a DIY enthusiast or tackling your first deck project, this guide will help you master the technique easily.
Keep reading to discover the tools, fastener types, and tricks that will give your deck a flawless finish you’ll be proud of.

Credit: www.arcadecks.com
Hidden Fastener Types
Hidden fasteners give composite decking a clean, smooth look. They secure boards without visible screws on top. Choosing the right type depends on your decking style and tools. Two common options are side-fastening systems and screw-and-plug systems. Each works differently but hides fasteners well.
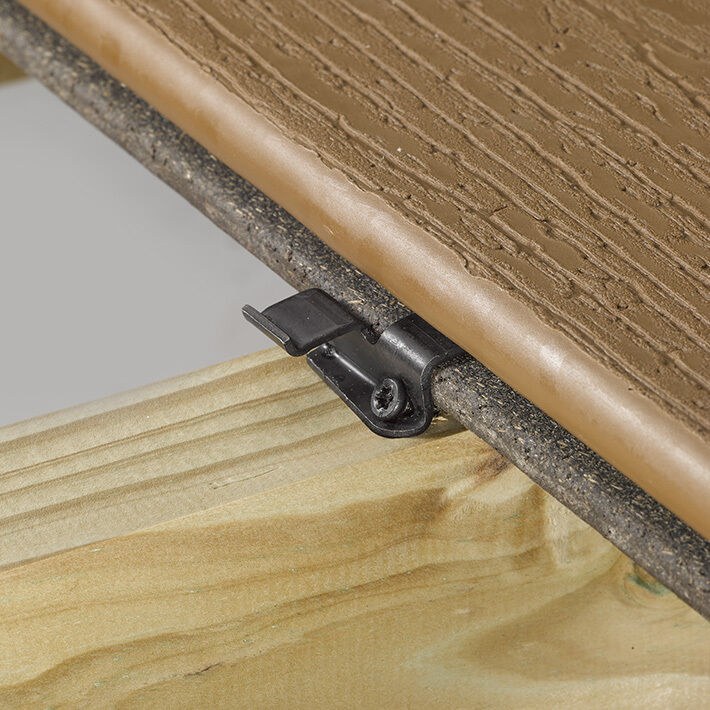
Side-fastening Systems
Side-fastening systems use clips that fit into grooves on the deck boards. The clips attach to the joists from the side, holding boards tightly. Brands like Camo and Turbo Clip are popular choices. They need special tools for proper installation and to keep gaps even.
This system works best with grooved composite boards. It avoids surface damage by not drilling on top of the boards. Side-fastening makes the deck look neat and helps water drain well between boards.
Screw-and-plug Systems
Screw-and-plug systems suit square-edge composite boards without grooves. You drive a special screw into the board, then cover the hole with a color-matched plug. This hides the screw head and keeps the deck surface smooth.
This method is simple and requires basic tools. The plugs come in colors matching the decking to blend in. It offers strong holding power while keeping the deck’s clean appearance.
Credit: www.fastenmaster.com
Preparing For Installation
Preparing for installation is the first step to a smooth and durable composite decking project. Taking time to prepare ensures your deck looks clean and lasts longer. You will avoid mistakes and save effort during the work.
Good preparation means choosing the right materials and gathering all tools before starting. This section explains how to select compatible fasteners and get the tools you need.
Selecting Compatible Fasteners
Choose fasteners made for composite decking only. Wood screws may not work well or hold tightly. Use hidden fasteners designed for your deck brand and board type.
Check the fastener size matches your deck boards’ thickness. Fasteners that are too long or short cause problems. Confirm the fasteners resist corrosion and weather damage for outdoor use.
Many composite decking brands offer recommended hidden fastener kits. Pick one from these kits for best results. Avoid mixing fasteners from different systems.
Gathering Necessary Tools
Collect all tools before you start installing hidden fasteners. You will need a drill with the correct drill bits for pilot holes. A screwdriver or impact driver helps drive fasteners tightly.
Use a special hidden fastener tool if your system requires it. This tool helps place clips evenly and holds them in place while securing.
Other useful tools include a tape measure, pencil for marking, and safety gear like gloves and eye protection. Prepare a work area free of clutter and debris.
Installing Side-fastening Clips
Installing side-fastening clips is a key step in creating a clean, fastener-free look on composite decking. These clips fit into the grooves on the board edges and hold the decking securely to the joists underneath. This method prevents visible screws on the deck surface, enhancing both appearance and safety.
Each clip must be carefully placed and fastened to ensure stability. Proper installation also allows for natural expansion and contraction of the composite material. Here is how to install side-fastening clips effectively.
Positioning Clips In Grooves
Start by sliding the clips into the grooves on the edges of the composite boards. Make sure the clips fit snugly without forcing them. Space the clips evenly, usually about every 12 to 16 inches along the board. Proper clip placement ensures a strong hold and consistent board spacing.
Securing Clips To Joists
Once clips are in place, align them over the joists below. Use the recommended screws to fasten each clip tightly to the joist. Avoid overtightening to allow the boards to expand naturally. Secure clips firmly to prevent any board movement or squeaking.
Handling Edge Boards
Edge boards need special attention because one side lacks a groove for clips. Use face screws or special edge clips designed for this purpose. Pre-drill holes to avoid splitting the board. Cover screw heads with matching plugs to keep the deck surface smooth and uniform.
Applying Screw-and-plug Method
The screw-and-plug method hides fasteners by covering screw heads with matching plugs. This technique works well with composite decking boards that have square edges. It keeps the deck surface smooth and clean, improving the deck’s appearance. The process involves two main steps: countersinking the screws and inserting color-matched plugs. Both steps require care to ensure a neat finish.
Countersinking Screws
Start by drilling pilot holes for the screws. The holes must be slightly smaller than the screw diameter. Next, use a countersink bit to create a shallow recess. This recess allows the screw head to sit below the board surface. It also makes room for the plug to fit flush. Countersinking prevents the screw from damaging the decking material. It ensures the plug will cover the hole perfectly.
Inserting Color-matched Plugs
Choose plugs that match the color of your decking boards. These plugs hide the screw heads and blend in naturally. Apply a small amount of waterproof adhesive inside the countersunk hole. Insert the plug firmly into the hole. Tap gently with a rubber mallet to secure it. Trim any excess plug material that sticks out. Sand lightly if needed for a smooth finish. This step completes the hidden fastener look, leaving no visible screws on the deck surface.
Ensuring A Seamless Finish
Ensuring a seamless finish is key to a professional-looking composite deck. Hidden fasteners create a clean, smooth surface without visible screws. This section covers how to keep your deck boards evenly spaced and well-secured. Proper technique and tools help achieve a flawless appearance that lasts.
Maintaining Proper Spacing
Correct spacing between deck boards allows for natural expansion and drainage. Use spacers or specialized clips to keep gaps consistent. Uneven gaps can cause warping or water buildup. Measure carefully and check alignment often during installation. Even small errors affect the deck’s look and durability.
Using Specialized Installation Tools
Tools like hidden fastener drivers or clip insertion tools speed up installation. These tools ensure clips fit tightly in the board grooves. They also help prevent damage to the decking material. Using the right tools improves precision and reduces effort. Avoid makeshift methods that risk slipping or misplacing fasteners.
Following Manufacturer Guidelines
Each hidden fastener system has specific instructions for best results. Follow recommended screw types, spacing, and clip placement. Ignoring guidelines may void warranties or cause installation problems. Check for updates or tips from the manufacturer before starting. Correct installation protects your investment and keeps the deck looking perfect.
Common Installation Mistakes
Installing hidden fasteners on composite decking improves the deck’s look and durability. Avoiding common mistakes saves time and prevents damage. Many installers face challenges that affect the final result. Understanding these mistakes helps achieve a smooth, lasting finish.
Using Incorrect Fasteners
Choosing the wrong fasteners causes many problems. Some fasteners do not fit the decking grooves properly. This leads to loose boards and uneven gaps. Fasteners not made for composite decking can cause stains or damage. Always use fasteners recommended by the decking manufacturer. Using cheap or generic clips can void warranties. Proper fasteners ensure a secure, clean installation.
Improper Tool Usage
Using the wrong tools slows down the work and creates errors. Hidden fastener systems often need special drivers or spacers. Regular drill bits may strip fastener heads or damage the boards. Applying too much force can crack composite decking boards. Not using a spacing tool results in uneven gaps. Use tools designed for the fastener system to keep clips in place. Proper tools make the job easier and protect your decking.
Maintenance Tips
Maintaining hidden fasteners on composite decking keeps your deck safe and looking great. Regular care helps avoid problems and extends the life of your deck. Follow simple steps to ensure your fasteners stay secure and your deck stays beautiful.
Inspecting Fasteners Regularly
Check your hidden fasteners every few months. Look for loose or missing fasteners. Use a flashlight to spot hard-to-see areas. Tighten any loose fasteners with the right tools. Early inspection stops damage from spreading. Catching small issues saves time and money later.
Replacing Damaged Components
Replace fasteners that are cracked or broken. Use fasteners designed for your decking brand. Remove damaged clips carefully to avoid deck damage. Install new fasteners firmly in place. Replacing faulty parts keeps the deck stable and safe. Do not ignore damaged fasteners to avoid bigger repairs.

Credit: www.fastenmaster.com
Frequently Asked Questions
How To Hide Screws In Composite Decking?
Use hidden fastener systems like Camo or Turbo Clip to secure boards from the side. For square-edge boards, drive screws and insert color-matched plugs into countersunk holes to conceal screw heads effectively.
How Many Hidden Fasteners For Composite Decking?
Use two hidden fasteners per composite decking board side, typically one every 12-16 inches along joists. Follow manufacturer guidelines.
How To Install Trex Hideaway Composite Deck Screws?
Install Trex Hideaway screws by placing clips into board grooves, then screw clips into joists. Use specialized tools for spacing. For edges, face-screw boards and cover with fascia. Follow manufacturer instructions for best results and a seamless finish.
Can I Drill Into Composite Decking?
Yes, you can drill into composite decking using proper tools and techniques. Use hidden fasteners or screw-and-plug systems for a clean finish. Choose fasteners recommended by the manufacturer to avoid damage. Drill carefully to prevent cracking and ensure secure installation.
Conclusion
Installing hidden fasteners on composite decking creates a clean, smooth surface. It improves deck durability and enhances its appearance. Follow the steps carefully for the best results. Use the right tools to ensure proper fastening and spacing. Remember to secure the first and last boards correctly.
Hidden fasteners keep screws out of sight and prevent damage. A well-installed deck adds value and comfort to your outdoor space. Take your time and enjoy the process. Your deck will look neat and last longer with hidden fasteners.