Have you ever wanted to disable a light switch but didn’t know where to start? Maybe you’re renovating a room, trying to save energy, or simply want to prevent accidental switching.
Whatever your reason, learning how to safely and effectively disable a light switch can save you time and frustration. In this guide, you’ll find clear, simple steps that anyone can follow—no special skills needed. Keep reading, and you’ll discover how to take control of your lighting with confidence and ease.
Safety Precautions
Disabling a light switch requires careful steps to stay safe. Electricity can cause serious harm if handled carelessly. Follow safety rules to protect yourself and your home.
Turn Off Power At Circuit Breaker
Always turn off the power before starting work. Find the correct circuit breaker and switch it off. This stops electricity from reaching the switch. Double-check by trying the switch to see if the light stays off.
Use A Voltage Tester
Use a voltage tester to confirm no power flows to the switch. Touch the tester to the wires carefully. If it shows no voltage, it is safe to proceed. This step prevents electric shocks during work.
Wear Protective Gear
Wear rubber gloves and safety glasses. Gloves protect your hands from shocks. Glasses shield your eyes from sparks or debris. Proper gear helps avoid injuries while working with electrical parts.
Credit: www.reddit.com
Tools And Materials Needed
Disabling a light switch is a simple task with the right tools and materials. Having everything ready helps you work safely and quickly. This guide lists what you need to disable a light switch properly.
Basic Hand Tools
Start with essential hand tools. A screwdriver is necessary to remove the switch cover and switch itself. Use a flathead and a Phillips screwdriver to cover all screw types. A voltage tester is important to check if the power is off. Needle-nose pliers help to bend or hold wires during work. Wire strippers may be needed to trim wires if necessary.
Electrical Tape And Wire Nuts
Electrical tape protects wires after you disconnect them. Wrap tape around wire ends to prevent shorts or shocks. Wire nuts connect and secure wire ends safely. They come in different sizes. Choose the right size to fit your wires tightly. These materials keep wires insulated and safe inside the electrical box.
Replacement Components
Sometimes, you may need replacement parts. A blank wall plate covers the switch opening after removal. It gives a clean and safe finish. Replacement screws might be required if old ones are damaged. Make sure all replacements match your existing setup for a neat look.
Identify The Switch Type
Knowing the type of light switch is important before disabling it. Different switches work in different ways. Identifying the switch helps you take the right safety steps. It also makes the process easier and safer.
Single-pole Switch
A single-pole switch controls one light or a group of lights. It has two screws on the side. The switch is simple and common in many homes. It turns the light on or off from one place.
Three-way Switch
A three-way switch controls lights from two locations. It has three screws on the side. This switch is used in hallways or large rooms. It lets you turn the light on or off from two spots.
Dimmer Switch
A dimmer switch changes the brightness of the light. It usually has a dial or slider. This switch helps save energy and sets mood lighting. It may look different but works like a normal switch.
Step-by-step Switch Disabling
Disabling a light switch is a useful skill for home projects. It allows you to control power safely. Follow these simple steps carefully to disable a switch.
Remove Switch Cover Plate
Start by turning off the power at the breaker box. Use a screwdriver to remove the screws holding the cover plate. Gently pull the cover plate away from the wall. This exposes the switch and wiring behind it.
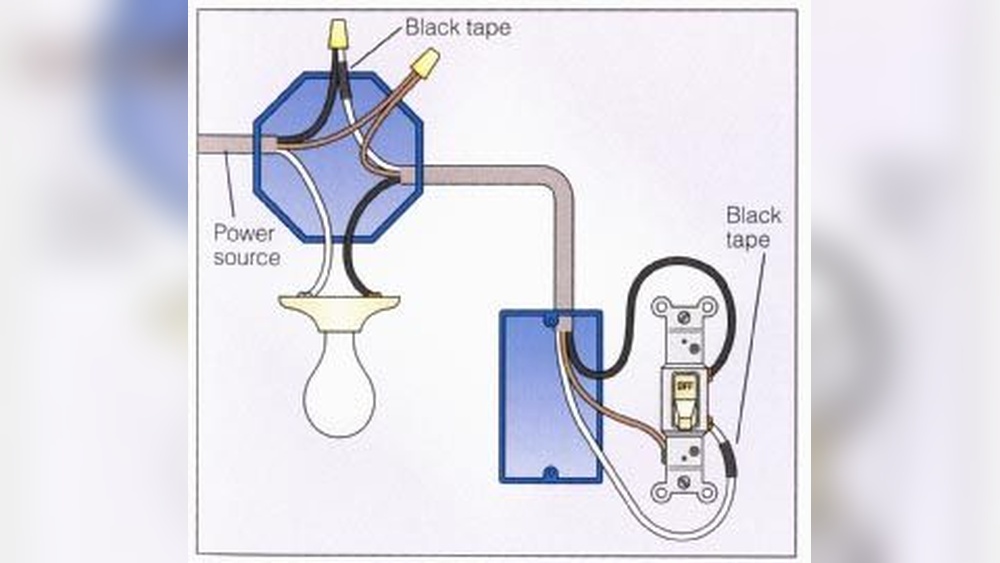
Disconnect Wires Safely
Check once more that the power is off. Use a voltage tester on the wires to be sure. Unscrew the wires connected to the switch terminals. Carefully pull the wires away from the switch. Keep the wires separated to avoid contact.
Cap And Secure Wires
Place wire nuts on the exposed wire ends. Twist them on tightly to prevent any contact. Wrap electrical tape around the wire nuts for extra safety. Push the wires back into the box carefully. Finally, screw the cover plate back on or use a blank plate.
Verify The Switch Is Disabled
After disabling a light switch, it is important to verify that it no longer controls the light. This step ensures safety and confirms the switch is fully disabled. Take time to check the switch carefully before moving on.
Restore Power And Test
Turn the main power back on to the circuit. Then, flip the switch to the off and on positions. Watch the connected light or fixture closely. If the light does not turn on or off, the switch is likely disabled. If it still works, the switch may need further attention.
Check For Power With Tester
Use a non-contact voltage tester to check the switch. Hold the tester near the switch terminals or wires. The tester will light up or beep if power is present. No signal means the switch is fully disabled. This tool provides an easy way to confirm no electricity flows through the switch.

Credit: www.reddit.com
Alternative Solutions
Disabling a light switch does not always mean cutting off power. There are other ways to keep the switch from working. These options help control the light without complex wiring or tools. They are easy and safe to use for many homes.
Install A Switch Lock
A switch lock stops anyone from turning the light on or off. It fits over the switch like a small cover. Only people with the key can unlock it and use the switch. This is helpful in homes with children or in shared spaces.
Switch locks are simple to install. They do not need any changes to the wiring. You just screw or clip the lock onto the switch plate. This keeps the switch in one position until unlocked.
Use A Smart Switch For Control
A smart switch lets you control lights remotely. You can turn the lights on or off using your phone or voice. This makes it easy to disable the switch without touching it. The physical switch can also be locked in the off position.
Smart switches often come with apps that allow scheduling. You can set times for lights to stay off automatically. This method saves energy and adds convenience. It suits modern homes with smart technology.

Credit: www.reddit.com
Frequently Asked Questions
How Do I Safely Disable A Light Switch?
To disable a light switch safely, first turn off the power at the breaker. Use a voltage tester to confirm no electricity flows. Remove the switch cover and disconnect the wires. Cap the wires with wire nuts and secure the switch box cover.
Can I Disable A Light Switch Without Removing The Wiring?
No, disabling a light switch requires disconnecting the wiring inside the switch box. Simply turning off the switch leaves the circuit live and unsafe. Properly capping the wires ensures safety and compliance with electrical codes.
What Tools Are Needed To Disable A Light Switch?
You need a voltage tester, screwdriver, wire nuts, and electrical tape. These tools help you safely test, remove, and cap wires when disabling a switch. Always use insulated tools for electrical safety.
Is Turning Off The Breaker Enough To Disable A Light Switch?
Turning off the breaker cuts power, but you must disconnect and cap the switch wires. This prevents accidental reactivation and ensures safety during maintenance or renovations.
Conclusion
Disabling a light switch is simple and safe with the right steps. Always turn off the power before starting. Use basic tools and follow clear instructions. Double-check your work to avoid any risks. This task can save energy and improve safety.
Take your time and be careful. You can handle this project confidently. Keep these tips in mind for future electrical work. Safety first, always.