Have you ever wished you could control one light from two different switches? Whether it’s for convenience or safety, knowing how to connect two switches to one light can make a big difference in your home.
Imagine turning your hallway light on or off from either end without getting up. In this guide, you’ll learn simple, step-by-step instructions that anyone can follow—even if you’re not an expert. Keep reading, and you’ll soon have the power to control your lights exactly how you want.

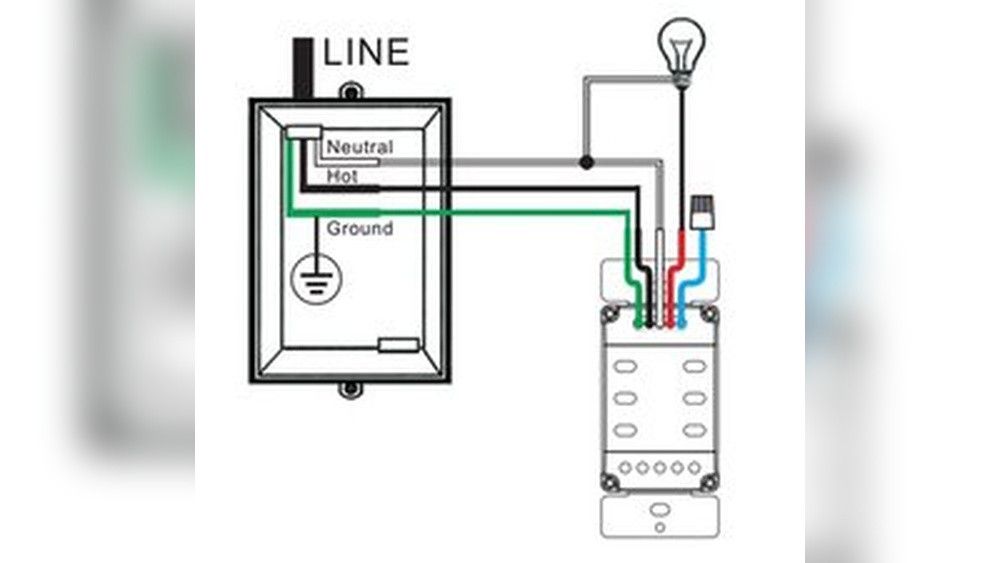
Credit: www.realpars.com
Types Of Switches
Understanding the types of switches helps to connect two switches to one light. Each switch type has a specific role in controlling lights. Choosing the right switch makes installation easier and safer.
Single-pole Switch
A single-pole switch controls one light from one location. It has two terminals and an on/off function. This switch is common in most homes for simple light control.
Three-way Switch
A three-way switch allows control of one light from two locations. It has three terminals and works with another three-way switch. This setup is perfect for hallways or large rooms.
Four-way Switch
A four-way switch controls one light from three or more locations. It works between two three-way switches. This switch has four terminals and is used in complex lighting setups.
Tools And Materials Needed
To connect two switches to one light, having the right tools and materials is important. These help you work safely and finish the job correctly. This section lists what you need before starting your project.
Basic Electrical Tools
Start with a good screwdriver set. You need flathead and Phillips screwdrivers. A wire stripper is essential to remove insulation from wires. Use a voltage tester to check if wires are live. Needle-nose pliers help to bend and hold wires. A tape measure is useful to measure wire length.
Wiring And Connectors
Use electrical wires rated for your home’s voltage. Commonly, 14 or 12 gauge wires are used for lighting circuits. Get wire nuts to join wires safely. Cable clamps keep wires secure inside boxes. Electrical tape is helpful to wrap wire connections.
Safety Gear
Wear insulated gloves to protect against shocks. Safety glasses shield your eyes from debris. Use a dust mask if cutting drywall or drilling. Work in a well-lit area to see clearly. Always turn off power at the breaker before starting.
Safety Precautions
Working with electrical wiring can be risky without proper safety steps. Taking safety precautions protects you from shocks and accidents. Follow these simple rules to stay safe while connecting two switches to one light.
Turn Off Power
Always switch off the power at the circuit breaker before starting. Double-check that the light and switches have no power. This step stops electric shocks and keeps you safe.
Use Voltage Tester
Use a voltage tester to make sure the wires are not live. Test each wire carefully before touching it. This tool confirms no current flows through the wires.
Follow Local Codes
Check local electrical codes before beginning your work. These rules ensure your wiring is safe and legal. Following codes helps prevent hazards and future problems.
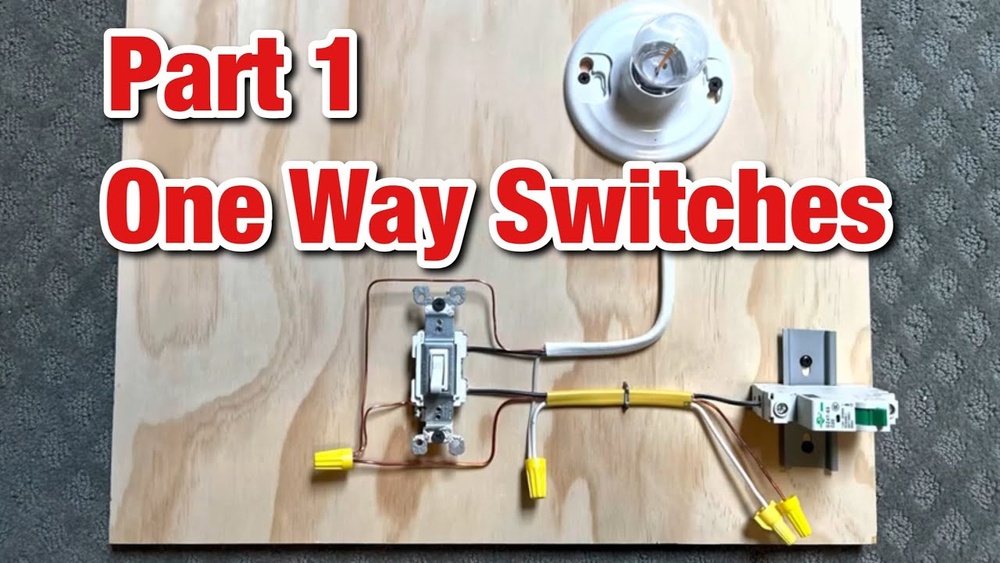
Credit: www.reddit.com
Wiring Two Switches To One Light
Wiring two switches to control one light allows you to turn the light on or off from two different places. This setup is common in hallways or large rooms. The process needs careful handling of wires to ensure safety and proper function. Follow these steps to wire two switches to one light effectively.
Identify The Wires
First, find the wires in the wall box. You will see three types: live (hot), neutral, and ground. The live wire carries electricity, usually black or red. The neutral wire is white. The ground wire is green or bare copper. Use a voltage tester to confirm the live wire. Label each wire to avoid confusion later.
Connect The First Switch
Attach the live wire to the common terminal of the first switch. Use a screwdriver to tighten the connection. Connect two traveler wires to the remaining terminals. These traveler wires link the two switches. Make sure all connections are secure and no bare wire is showing.
Connect The Second Switch
At the second switch, connect the traveler wires to the traveler terminals. Attach the wire going to the light fixture to the common terminal. Double-check the connections for tightness. The ground wires from both switches should be connected to the green screw or grounded properly.
Wire The Light Fixture
Connect the wire from the second switch to the live terminal on the light. Attach the neutral wire from the power source to the light’s neutral terminal. Secure the ground wire to the light fixture’s metal box or ground screw. Test the setup by turning both switches on and off to ensure the light works correctly.
Testing The Setup
Testing the setup is an important step after wiring two switches to one light. It ensures everything works safely and correctly. This phase helps to find any wiring mistakes or faults early. Follow these steps carefully to confirm your connection is successful.
Restore Power
Turn the circuit breaker back on. This restores electricity to the switches and the light. Make sure your hands are dry and you stand on a dry surface. Safety first. Check the light fixture for any signs of power.
Check Switch Operation
Flip each switch one by one. The light should turn on and off from both switches. Test all switch positions. The light must respond to each switch without flickering. This confirms the wiring is correct.
Troubleshooting Tips
If the light does not work, turn off the power again. Double-check all wire connections. Look for loose wires or wrong terminals. Use a voltage tester to check for power flow. Replace faulty switches if needed. Repeat the test until the light works properly from both switches.
Credit: theorycircuit.com
Common Mistakes To Avoid
Connecting two switches to one light might seem easy. Many make mistakes that cause the light to not work properly. Avoiding these errors saves time and frustration. Here are the common mistakes to watch out for.
Incorrect Wiring Connections
Wrong wiring is the top cause of failure. Each wire must connect to the right terminal. Mixing up live, neutral, or traveler wires causes problems. Double-check the wiring diagram before starting.
Using Incompatible Switch Types
Not all switches work for two-way control. Regular single-pole switches won’t work for this setup. Use two-way or three-way switches designed for two control points.
Ignoring Power Source Location
Power source placement affects wiring design. Connecting switches without knowing where power comes from leads to errors. Identify if power starts at the switch or the light.
Failing To Turn Off Power
Working with live wires is dangerous. Always switch off the breaker before wiring. Skipping this step risks electric shock and damage.
Not Testing The Circuit
Testing ensures the setup works correctly. Skip testing, and you might miss wiring mistakes. Use a tester to check connections before finalizing.
When To Call A Professional
Connecting two switches to one light can be a simple project for some. But certain situations need expert help to avoid risks. Safety is the top priority when dealing with electrical wiring. Knowing when to call a professional saves time and prevents hazards.
Electricity can be dangerous if handled incorrectly. Mistakes can cause shocks or fires. Professionals have the right tools and knowledge to work safely. They follow codes and standards to ensure proper installation. Hiring an expert protects your home and family.
Complex Wiring Layouts
Some homes have complicated wiring systems. Identifying the correct wires can be confusing. Professionals can map the circuits quickly and accurately. They avoid damaging existing wiring or causing shorts. Complex layouts require careful planning and skill.
Unfamiliar With Electrical Codes
Local electrical codes must be followed for safety. Rules vary by area and type of work. A licensed electrician knows the codes well. They ensure your installation passes inspection. This prevents future legal or insurance problems.
Broken Or Old Wiring
Old wires can be brittle or unsafe. Damaged insulation may cause shorts or shocks. Professionals inspect and replace faulty wiring properly. They use materials that meet safety standards. This keeps your home safe and reliable.
No Proper Tools Or Experience
Special tools are needed to handle electrical work. Without them, the job can be risky. Experience helps in troubleshooting and correct installation. Professionals work efficiently and reduce errors. This saves you time and frustration.
Electrical Panel Issues
Sometimes, switches connect back to the main panel. Problems in the panel require expert attention. Mistakes here can lead to power outages or hazards. Only trained electricians should open and fix panels. They ensure the system works safely and smoothly.
Frequently Asked Questions
How Do I Wire Two Switches To Control One Light?
To wire two switches for one light, use a three-way switch setup. Connect traveler wires between switches and a common wire to the light fixture. This allows either switch to turn the light on or off independently.
What Tools Are Needed To Connect Two Switches To One Light?
You need a screwdriver, wire stripper, voltage tester, electrical tape, and three-way switches. Also, use wire nuts and a drill if mounting new switch boxes. Safety gear like gloves and goggles is recommended.
Can I Use Regular Switches Instead Of Three-way Switches?
No, regular switches cannot control one light from two locations. Three-way switches are specifically designed for this. They have three terminals to manage the electrical flow between switches and the light.
Is It Safe To Install Two Switches For One Light Myself?
Yes, if you follow electrical codes and safety precautions. Turn off the power at the breaker before starting. If unsure, consult a licensed electrician to avoid hazards or code violations.
Conclusion
Connecting two switches to one light is easier than it seems. You just need the right tools and some patience. Follow the steps carefully, and always turn off the power first. This setup lets you control one light from two places.
It saves time and adds convenience to your home. Take your time, check your work, and stay safe. You can do this project with a little effort and focus. Enjoy the new light control once you finish the wiring. Simple and useful!