Are your dimmer lights flickering or not working like they used to? Replacing a dimmer light switch might seem tricky, but you can do it yourself with the right steps.
Imagine saving money on an electrician and gaining the confidence to handle simple home repairs. In this guide, you’ll learn exactly how to replace your dimmer switch safely and quickly. Keep reading, and by the end, you’ll have a brighter, smoother lighting experience in your home.
Tools And Materials Needed
Replacing a dimmer light switch requires specific tools and materials. Having everything ready makes the job easier and safer. Preparing before starting saves time and avoids hassle.
Gather the right tools and materials. This ensures a smooth replacement process. Here are the essentials needed for the task.
Basic Tools
You need a screwdriver set with flathead and Phillips heads. A voltage tester is essential to check power is off. Wire strippers help prepare the wires properly. Needle-nose pliers assist in bending and holding wires. A flashlight or headlamp is useful for dark areas.
Materials For Replacement
Start with a compatible dimmer switch for your lighting setup. Electrical tape helps secure wire connections safely. Wire nuts are needed to join wires firmly. A new wall plate may be required if the old one is damaged or mismatched.
Safety Equipment
Wear insulated gloves to protect against electrical shocks. Safety goggles shield your eyes from dust and debris. Use a sturdy ladder to reach high switches safely. Keep a first aid kit nearby in case of minor injuries.
Safety Precautions
Replacing a dimmer light switch involves working with electrical wiring. Safety is the top priority. Taking the right precautions prevents accidents and injuries.
Before starting, know the basic safety rules. These steps protect you from electric shocks and damage to your home.
Turn Off The Power At The Circuit Breaker
Always switch off the power supply before touching wires. Find the correct breaker in your panel and turn it off. Test the switch with a voltage tester to confirm no electricity flows.
Use Proper Tools And Equipment
Use insulated tools made for electrical work. Avoid metal tools without insulation. Wear rubber-soled shoes for extra protection. Keep your work area dry and clean.
Work In A Well-lit And Clear Space
Good lighting helps you see wires and connections clearly. Remove any objects that block your workspace. A tidy area reduces the chance of accidents.
Follow Manufacturer Instructions Carefully
Read the dimmer switch manual before installation. Follow each step exactly as described. Incorrect wiring can cause malfunctions and hazards.
Double Check All Connections Before Restoring Power
Make sure all wires are secure and correctly placed. Loose wires cause sparks and shorts. Tighten screws and confirm no bare wires touch metal parts.
Turn Off Power
Before starting to replace a dimmer light switch, always turn off the power. This step is very important for safety. Electricity can cause serious injury or damage. Taking time to switch off power protects you from electric shocks.
Turning off the power also prevents short circuits and sparks. It makes the work safe and easier. You need to locate the correct circuit breaker that controls the light switch.
Locate The Circuit Breaker Panel
First, find the main circuit breaker panel in your home. It is usually in the basement, garage, or utility room. The panel has a metal door with switches inside.
Identify The Correct Breaker
Look for the breaker that controls your dimmer switch. It might be labeled by room or area. If not, turn off breakers one by one to find the right one.
Switch Off The Breaker
Flip the breaker switch to the OFF position. This stops electricity from flowing to the dimmer switch. Make sure the switch stays in the OFF position while you work.
Confirm Power Is Off
Use a non-contact voltage tester or a simple light tester. Touch the tester to the dimmer switch wires. No light or sound means the power is off.

Credit: www.youtube.com
Remove Old Dimmer Switch
Removing the old dimmer switch is the first step in replacing it. Safety is important. Always turn off the power at the circuit breaker before you start. This step protects you from electric shocks.
Take your time. Removing the old switch carefully helps avoid damage to the wiring or wall.
Unscrew The Faceplate
Use a screwdriver to remove the screws holding the faceplate. Keep the screws safe for later use. Gently pull the faceplate away from the wall. It may stick, so pull slowly to avoid cracks.
Disconnect Wiring
Look at the wires connected to the dimmer switch. Take a photo for reference. Unscrew or unclip the wires from the switch. Use a voltage tester to make sure the wires are not live. Twist the wires apart carefully. Cap the wires with wire nuts if needed to keep them safe.
Identify Wiring
Identifying the wiring is a key step before replacing a dimmer light switch. It ensures safety and proper installation. Take time to observe and understand the wires connected to the existing switch. This will help you connect the new dimmer correctly and avoid electrical problems.
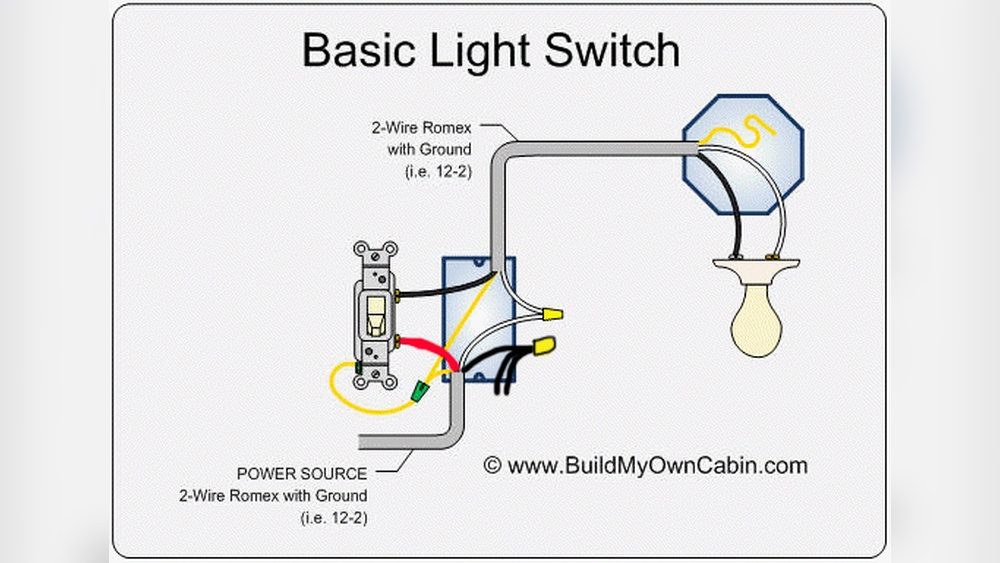
Check Wire Types
Look at the wires attached to the switch. Most dimmer switches have three types of wires: black, white, and green or bare copper. Black wires carry power. White wires are neutral. Green or bare wires are ground wires. Use a voltage tester to confirm which wire is live. Mark the wires if needed to avoid confusion later.
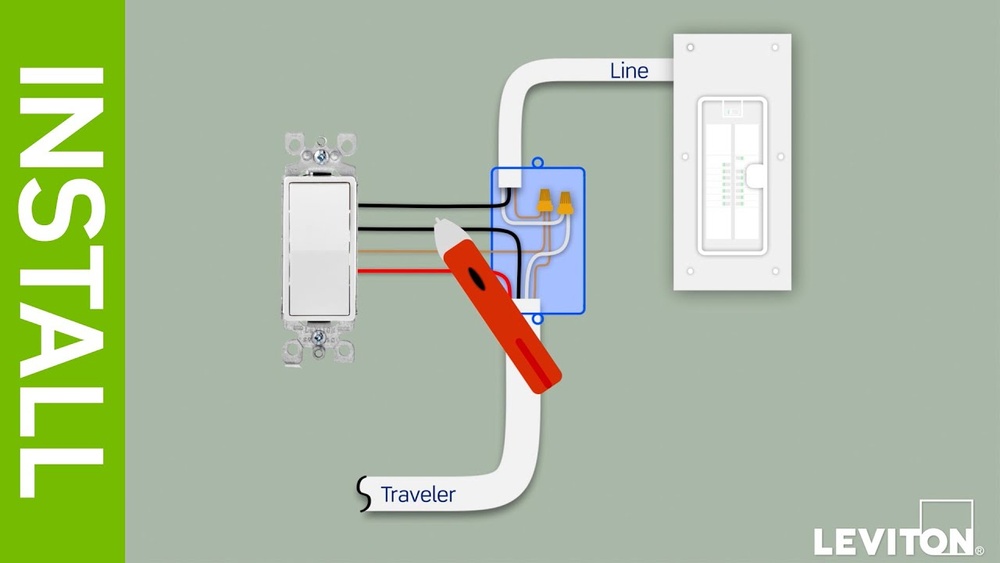
Match Wire Connections
Match the wires from the dimmer switch to the wires in the wall. Connect black to black, white to white, and green or bare copper to ground. Twist the wires together and secure them with wire nuts. Make sure each connection is tight and secure. Proper matching prevents shorts and ensures the dimmer works well.

Credit: www.gelighting.com
Install New Dimmer Switch
Installing a new dimmer switch is a simple way to control your room’s lighting. It lets you adjust brightness to fit your mood or activity. Follow these steps carefully to ensure safe and proper installation.
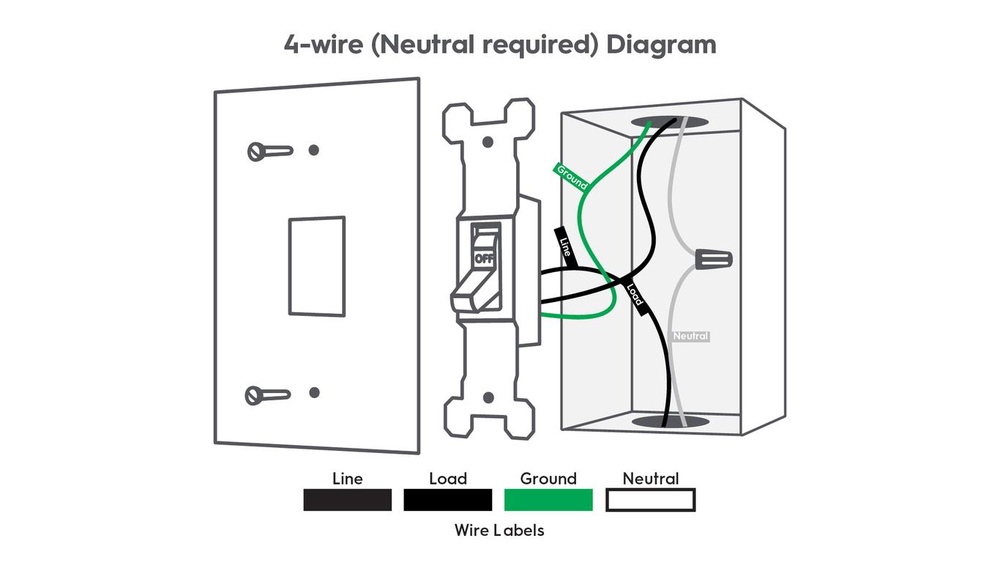
Connect Wires
First, match the dimmer switch wires with the house wires. Usually, black wires connect to black wires. The green or bare copper wire is for grounding. Use wire nuts to join the wires tightly. Make sure no copper is exposed outside the nuts. This keeps connections safe and secure.
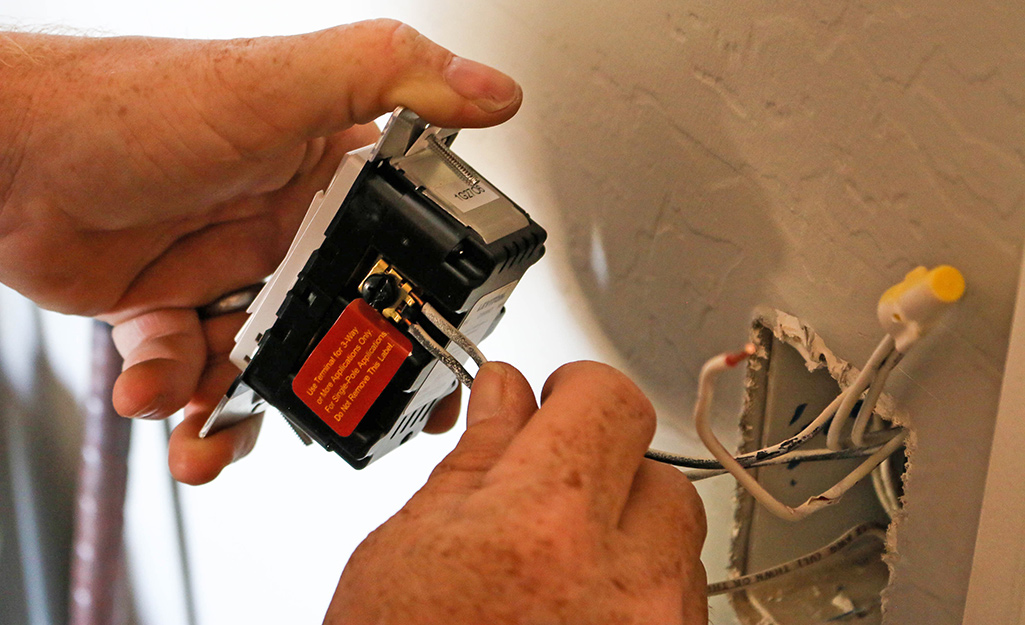
Secure Switch In Box
Push the wires gently back into the electrical box. Align the dimmer switch with the screw holes in the box. Use screws to fix the switch firmly. Do not overtighten, or the switch may crack. Attach the switch plate to finish the installation.
Test The New Switch
Testing the new dimmer switch is an important step after installation. It confirms the switch works correctly and safely. This step helps avoid issues like flickering lights or no response.
Take your time to check all functions of the switch. This ensures a smooth lighting experience in your room. Follow these simple steps below to test your new dimmer switch properly.
Turn On The Power
Restore electricity by turning the circuit breaker back on. This powers the dimmer switch and connected lights. Make sure the breaker is fully on before testing.
Check The Light Response
Use the dimmer switch to turn the light on. Notice if the light turns on immediately without delay. This shows the switch is connected correctly.
Adjust The Brightness
Slide or rotate the dimmer to change the brightness level. The light should smoothly brighten or dim. Watch for flickers or sudden changes.
Test The Full Range
Move the dimmer through its entire range. Check for consistent light output at all levels. The dimmer must work well from low to high brightness.
Listen For Unusual Sounds
Pay attention to any buzzing or humming noises. Some quiet sound is normal, but loud noises may signal a problem. If noisy, double-check wiring or switch model.
Turn Off The Switch
Finally, turn the dimmer switch off. Confirm the lights go completely dark. This confirms full control of the lighting with the new switch.
Credit: www.homedepot.com
Troubleshooting Tips
Troubleshooting a dimmer light switch can save time and prevent extra work. Simple checks help spot common problems fast. Knowing what to look for makes the replacement process smoother.
Check The Power Supply
Start by turning off the power at the circuit breaker. Use a voltage tester to confirm no electricity flows to the switch. No power means the problem is outside the switch itself.
Inspect The Wiring Connections
Look for loose or disconnected wires behind the switch. Tighten any loose screws holding wires. Damaged or frayed wires need replacement before installing the new switch.
Test The Dimmer Switch
Use a multimeter to test the switch’s function. A faulty dimmer switch often causes flickering or no light. Replace the switch if it shows no continuity or has internal damage.
Examine The Light Bulbs
Check the bulbs used with the dimmer. Not all bulbs work with dimmers. Use dimmer-compatible bulbs to avoid flickering or poor dimming performance.
Look For Overheating Issues
Dimmer switches can overheat if overloaded. Overheating causes the switch to fail early. Use a dimmer rated for the total wattage of your bulbs.
Frequently Asked Questions
How Do I Safely Replace A Dimmer Light Switch?
First, turn off the power at the circuit breaker. Use a voltage tester to confirm no power flows. Then, remove the old switch carefully and connect the new dimmer switch wires correctly. Secure the switch and restore power to test it.
What Tools Are Needed For Dimmer Switch Replacement?
You will need a screwdriver, wire stripper, voltage tester, and electrical tape. These tools help safely remove the old switch and install the new dimmer switch properly and securely.
Can I Replace A Dimmer Switch Without Electrician Help?
Yes, if you follow safety steps and have basic electrical knowledge. Always turn off power before starting. If unsure or uncomfortable, it’s best to hire a professional electrician.
Will The New Dimmer Switch Work With Led Bulbs?
Most modern dimmer switches are compatible with LED bulbs. Check the dimmer’s packaging to ensure it supports LED lighting for proper function and to avoid flickering or damage.
Conclusion
Replacing a dimmer light switch is simple and quick. Turn off the power first for safety. Remove the old switch carefully and connect the new one. Test the switch before closing the wall plate. This small task can improve your room’s lighting and control.
Take your time and follow each step clearly. You can do it with basic tools and little experience. Enjoy brighter, adjustable lights after the easy switch change.