Have you ever wished you could control your lights with a simple switch but didn’t know where to start? Adding a light switch to a light can seem tricky, but it’s easier than you think—and it can make a big difference in your home’s comfort and convenience.
In this guide, you’ll learn step-by-step how to add a light switch safely and quickly, even if you’re not an expert. By the end, you’ll have the confidence to take control of your lighting and create the perfect atmosphere with just a flick of a switch.
Keep reading, and let’s make your space brighter and smarter together.

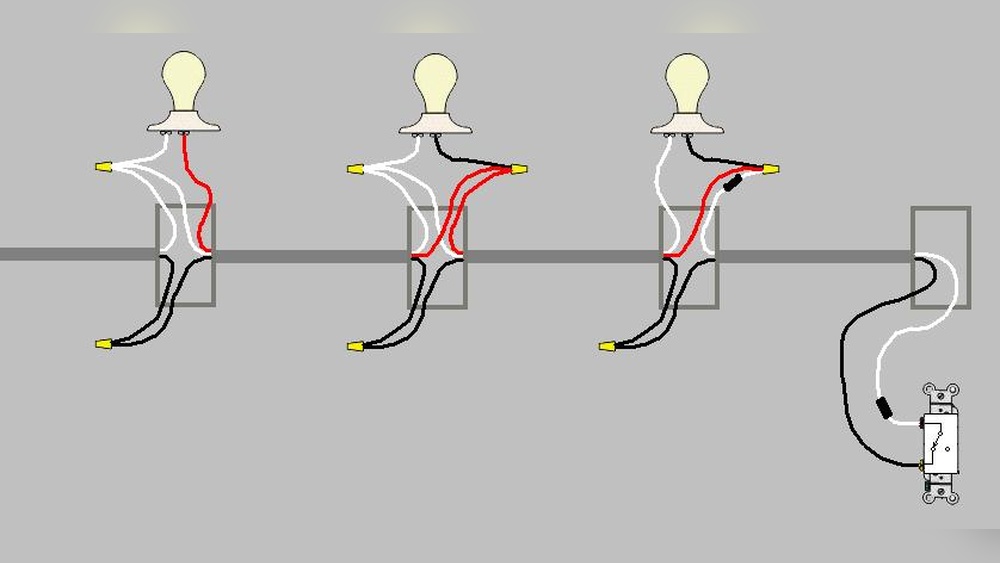
Credit: www.do-it-yourself-help.com
Tools And Materials Needed
Adding a light switch to a light requires the right tools and materials. Having these ready makes the job easier and safer. This section lists what you need before starting the work.
Essential Tools
- Screwdriver (flathead and Phillips)
- Wire stripper
- Voltage tester
- Drill with drill bits
- Pliers
- Measuring tape
- Level
Required Materials
- Light switch (single-pole recommended for beginners)
- Electrical box
- Electrical wire (14/2 or 12/2 gauge)
- Wire nuts
- Switch plate cover
- Electrical tape
Safety Gear
- Insulated gloves
- Safety glasses
- Rubber-soled shoes
- Flashlight or work light

Credit: diy.stackexchange.com
Planning The Installation
Planning the installation is the first step before adding a light switch. It helps avoid mistakes and saves time. Careful planning ensures the switch works safely and correctly. This section guides you through important points to consider before starting.
Choosing The Switch Location
Pick a spot that is easy to reach. Usually, switches go near doorways. Think about how people will use the light. Avoid placing switches too high or too low. Make sure the location fits the room’s layout. Proper placement makes the switch convenient and safe.
Understanding Your Wiring
Know what wires you have before installation. Identify the power source, load, and ground wires. Use a voltage tester to check if wires are live. Different homes have different wiring systems. Correct wiring prevents shocks and switch failure. Always turn off power at the breaker box first.
Checking Electrical Codes
Follow local electrical rules and safety standards. Codes protect you and your home from hazards. Check if a permit or inspection is needed. Use approved switches and materials. Ignoring codes can cause fines or danger. Consult a professional if unsure about the rules.
Turning Off The Power
Turning off the power is the first and most important step before adding a light switch. It keeps you safe from electric shocks. Always take this step seriously to avoid accidents. Double-checking the power is off prevents damage and injury.
Locating The Circuit Breaker
Start by finding your home’s circuit breaker panel. It is usually in the basement, garage, or utility room. Open the panel door carefully. Look for the switch that controls power to the room where you will work. The breakers are often labeled, but labels can be unclear or missing. If unsure, turn off the main breaker to cut power to the whole house.
Verifying Power Is Off
After switching off the breaker, test the light fixture or outlet. Use a voltage tester or a simple lamp to check if power is off. Plug the lamp into the socket or turn on the light switch. If the lamp does not turn on, power is off. If it still works, switch the breaker off again and retest. Never touch wires unless you are sure there is no power.
Wiring The Light Switch
Wiring the light switch is a key step to control your light easily. This process involves handling wires safely and connecting them to the switch. Taking your time ensures the switch works correctly and keeps you safe.
Removing The Old Fixture
Start by turning off the power at the circuit breaker. Use a voltage tester to confirm no electricity flows. Unscrew the old light fixture carefully. Disconnect the wires by loosening the terminal screws. Remove the fixture from the wall or ceiling.
Running The Wires
Plan the path for the new wires from the power source to the switch. Use a fish tape to pull wires through walls or ceilings. Ensure the wires are long enough to reach the switch box. Avoid sharp bends to prevent wire damage. Secure the wires with staples or clips along the route.
Connecting The Switch
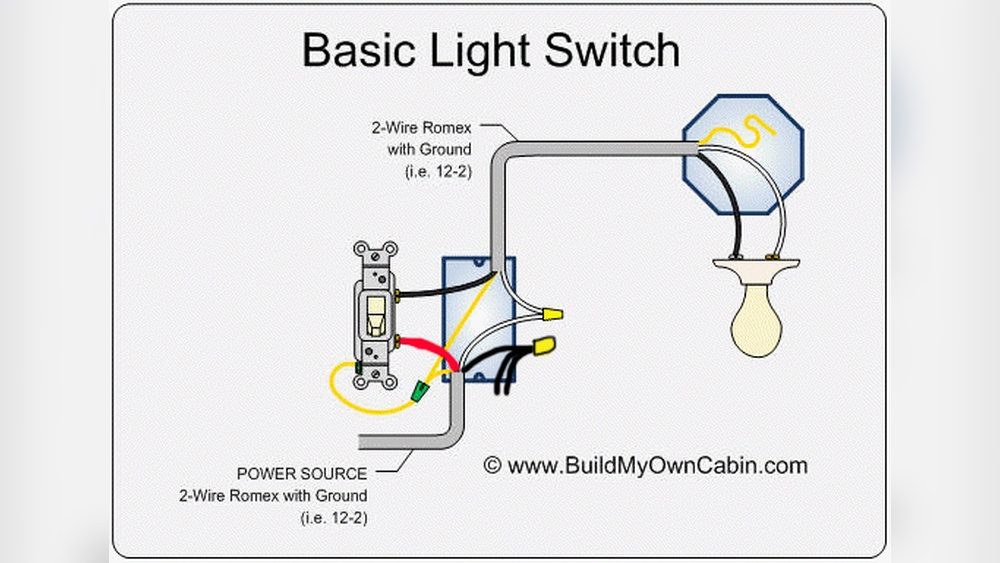
Strip about half an inch of insulation from each wire end. Connect the black (hot) wire to one switch terminal. Attach the other black wire to the second terminal. Connect the white (neutral) wires together with a wire nut inside the box. Attach the ground wire to the green screw on the switch. Tighten all connections firmly but avoid over-tightening.
Mounting The Switch And Fixtures
Mounting the switch and fixtures is a key step in adding a light switch to a light. This process ensures the switch stays secure and works properly. Proper mounting also protects the wiring and makes the installation safe and neat.
Securing The Switch Box
Start by placing the switch box into the wall opening. Align it with the studs or the mounting surface. Use screws to fix the box tightly. Make sure the box does not move. A stable box keeps the switch safe and easy to use.
Installing The Switch
Connect the wires to the switch terminals. Match the wires by color and function. Tighten the screws to hold the wires firmly. Push the switch gently into the box. Avoid pinching the wires. Secure the switch to the box with screws.
Attaching The Cover Plate
Place the cover plate over the switch. Line up the screw holes carefully. Insert the screws and tighten them evenly. The plate should sit flush against the wall. This step finishes the look and protects the switch.
Testing And Troubleshooting
After installing a light switch, testing and troubleshooting are important. They ensure the switch works well and the light turns on safely. This step helps avoid electrical problems and keeps your home secure.
Restoring Power Safely
Before testing, turn the main power back on. Use the circuit breaker to restore electricity. Stand clear of any exposed wires. Avoid touching the switch or wires until power is on.
Check that the switch plate is secure. If anything feels loose, turn the power off again. Tighten screws or fix the wiring before continuing.
Checking Switch Functionality
Flip the switch up and down slowly. The light should turn on and off each time. Listen for a clicking sound from the switch. This means it works mechanically.
If the light does not turn on, test the bulb. Replace it with a new one to be sure. Also, check the light fixture for damage or loose parts.
Common Issues And Fixes
The light may flicker or not respond. Loose wires often cause this problem. Turn off the power and tighten all wire connections.
Wrong wiring can stop the switch from working. Double-check the wiring diagram and match wire colors. Use a voltage tester to find power flow issues.
If the switch feels warm or burns out fast, it may be faulty. Replace it with a switch of the same rating. Always use parts that meet safety standards.
Tips For A Professional Finish
Adding a light switch to a light fixture needs care and attention. A professional finish makes your work safe and neat. Small details can change how your switch looks and works. Follow these tips to keep wiring clean, organized, and reliable.
Tidy Wiring Practices
Keep wires straight and avoid tangles. Use cable ties or clips to hold wires in place. Cut wires to the right length; avoid extra slack. This reduces clutter and prevents damage to wires. Neat wiring also helps if you need to fix or change anything later.
Labeling Circuits
Label each wire and circuit clearly. Use simple tags or colored tape to mark wires. This helps you know which wire connects to what. Labeling saves time in the future and keeps your work safe. It is especially useful if others work on your wiring.
When To Call A Professional
Some electrical jobs need expert help. If you feel unsure or face complex wiring, call a professional. Mistakes with electricity can cause shocks or fires. A licensed electrician ensures the job is done right and safe. Protect your home and family by asking for help when needed.
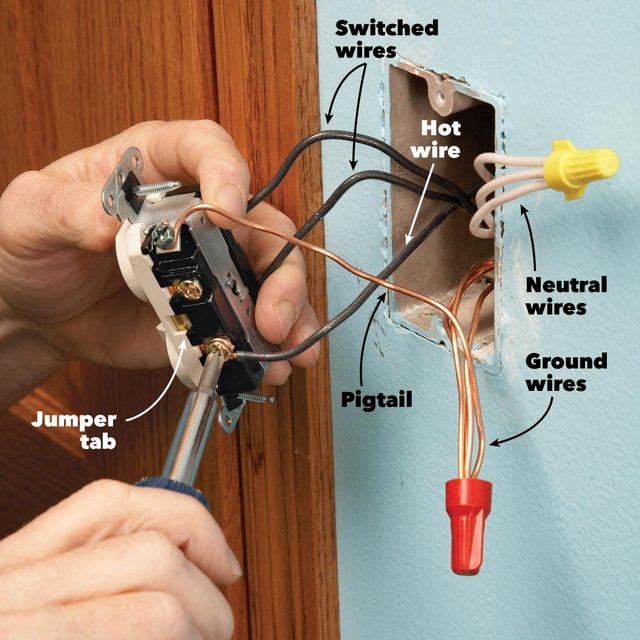
Credit: www.familyhandyman.com
Frequently Asked Questions
How Do I Safely Add A Light Switch To A Light?
Turn off power at the breaker before starting. Use a voltage tester to confirm no power. Follow wiring instructions carefully. Use proper tools and materials. If unsure, consult a licensed electrician to ensure safety and code compliance.
What Tools Are Needed To Install A Light Switch?
You will need a screwdriver, wire stripper, voltage tester, electrical tape, wire nuts, and a new switch. A drill may be required for mounting. Having all tools ready makes the installation faster and safer.
Can I Add A Light Switch Without Rewiring The Entire Circuit?
Yes, you can add a switch by tapping into the existing wiring. Use a switch loop or pigtail method. Ensure connections are secure and meet electrical codes to avoid hazards.
How Do I Identify The Correct Wires For A Light Switch?
Look for the live (hot) wire, neutral wire, and ground wire. Use a voltage tester to identify the hot wire. Typically, black is hot, white is neutral, and green or bare copper is ground.
Conclusion
Adding a light switch to a light can brighten any room easily. Follow each step carefully for safety and success. Take your time and double-check your work. You will feel proud once the switch works perfectly. Small projects like this build your confidence and skills.
Now, you can control your lights with ease every day. Keep learning and trying new home fixes. Simple changes make a big difference in your space. Enjoy the comfort and convenience you created yourself.