Are you tired of fumbling in the dark or struggling with complicated wiring when trying to connect a switch to your light? You’re not alone.
Understanding how to link a switch to a light can save you time, money, and frustration. Imagine flipping a switch and instantly brightening your room, all thanks to a simple, safe connection you made yourself. In this guide, you’ll discover clear, step-by-step instructions that anyone can follow—no technical jargon, no guesswork.
Ready to take control of your lighting and boost your DIY confidence? Let’s get started.
Credit: www.electricaltechnology.org
Tools And Materials Needed
Before connecting a switch to a light, gather the right tools and materials. This step is important for safety and success. Having everything ready helps the task go smoothly.
Essential Tools
A screwdriver is necessary for removing and securing screws. Use a flathead or Phillips screwdriver based on your switch type. Wire strippers help remove insulation from wires safely. A voltage tester checks if wires carry electricity. This tool keeps you safe. Pliers are useful for bending and holding wires. A drill may be needed to make holes or secure the switch box. Always choose tools in good condition.
Required Materials
You need a light switch that fits your setup. Electrical wires connect the switch to the light and power source. Use wires rated for your home’s electrical system. Wire nuts join wires securely and safely. An electrical box holds the switch in place. Electrical tape insulates wire connections to avoid shorts. A light fixture or bulb completes the circuit. Use materials that meet local safety codes.
Safety Precautions
Safety is the top priority when connecting a switch to a light. Electrical work can be risky without proper care. Follow safety steps to avoid shocks or damage. Small actions make a big difference in staying safe.
Simple precautions protect you and your home. Always respect electricity and work carefully.
Power Off Before Starting
Always turn off the power at the circuit breaker. Double check that the power is off using a tester. This step stops electric shocks. Never touch wires with power on. Safety begins with no electricity flowing.
Use Of Insulated Tools
Use tools with insulated handles to avoid shocks. Insulated tools block electricity from reaching your hands. Regular tools can conduct electricity and cause injury. Make sure your screwdriver and pliers have proper insulation.
Verify Wiring Compatibility
Check the switch and light wiring before connecting. Match wire types and sizes to avoid errors. Incorrect wiring can cause shorts or damage. Use wire labels or a guide to confirm compatibility. Proper wiring ensures a safe and working connection.
Types Of Switches
Switches control the flow of electricity to lights. Different types of switches serve various purposes. Knowing these types helps you pick the right one for your lighting needs.
Each switch type works differently to turn lights on or off. Some offer simple control, while others add more options like dimming or multiple controls.
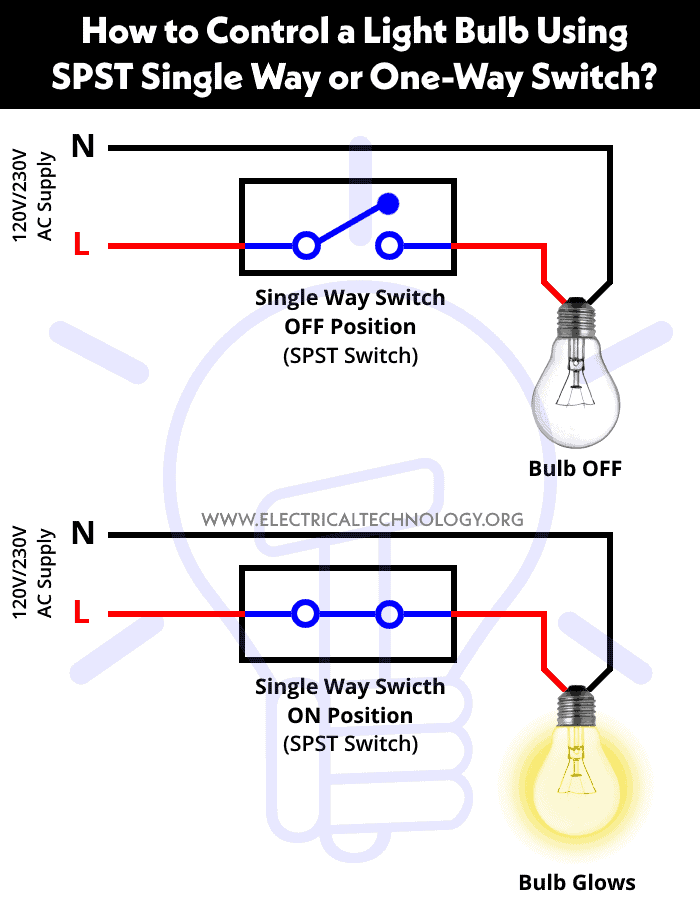
Single-pole Switch
This is the most common switch type. It controls one light or a group of lights from a single location. The single-pole switch has two terminals and a simple on/off function. It is easy to install and use.
Three-way Switch
This switch type allows control of one light from two different places. It is useful for hallways or large rooms with two entrances. Three-way switches have three terminals and work in pairs. They provide more convenience for lighting control.
Dimmer Switch
Dimmer switches adjust the brightness of a light. They replace regular switches and offer more mood control. You can make the light brighter or softer. Dimmers save energy and extend bulb life.
Identify Existing Wiring
Before connecting a switch to a light, identifying the existing wiring is crucial. This step helps ensure safety and proper function. It saves time and avoids electrical issues.
Understanding the wiring layout allows you to work confidently. Each wire has a specific role in the circuit. Knowing these roles makes the connection process clear and safe.
Locate Power Source
Start by finding the power source in the electrical box. This is usually where the main wires enter. The power source provides electricity to the switch and light.
Look for a bundle of wires with a black or red color. These wires carry current from the breaker panel. Identifying this source helps you know where the electricity flows.
Recognize Wire Colors
Wire colors tell you their function. Black or red wires are typically “hot” wires. They carry electricity to the switch and light.
White wires are neutral. They complete the electrical circuit. Green or bare copper wires are ground wires. They protect against electrical faults.
Recognizing these colors prevents mistakes and ensures proper wiring connections.
Check Circuit Breaker
Before touching any wires, turn off the circuit breaker. This stops electricity flow and protects you from shocks. The breaker controls power to the switch and light circuit.
Use a voltage tester to confirm the power is off. Never assume the circuit is safe without testing. Safety first, always.
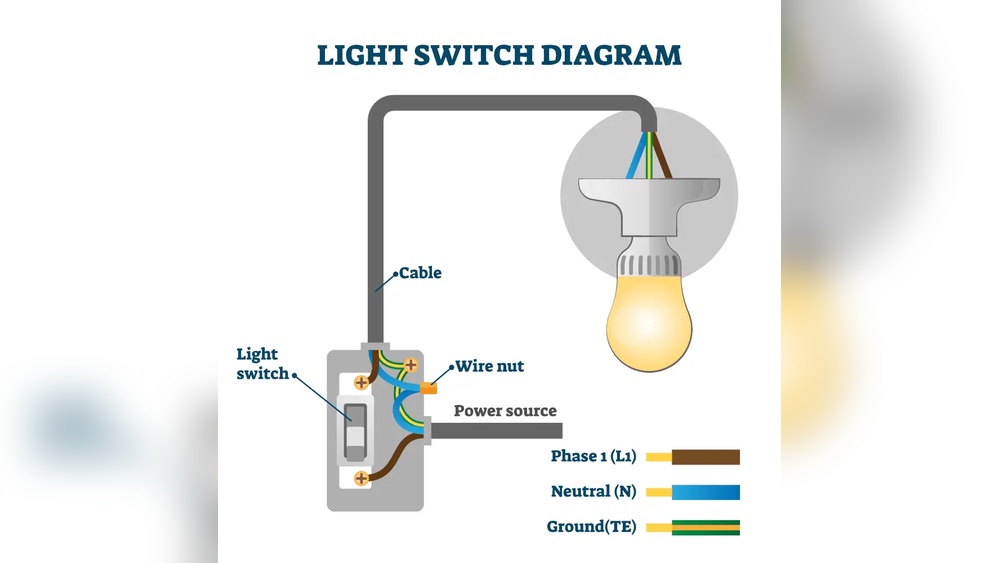
Wiring The Switch To The Light
Wiring the switch to the light is a key step in controlling your room’s lighting. This process involves connecting three important wires: hot, neutral, and ground. Each wire has a specific role and must be connected correctly for safety and functionality.
Before starting, turn off the power at the circuit breaker. Use a voltage tester to ensure no electricity flows in the wires. This step keeps you safe during the wiring process.
Connecting Hot Wire
The hot wire carries electricity from the power source to the switch. It is usually black or red. Connect this wire to the switch’s terminal marked “line” or “common.” Tighten the screw firmly to hold the wire. This connection allows the switch to control the light’s power.
Connecting Neutral Wire
The neutral wire completes the electrical circuit. It is usually white. In many switch setups, the neutral wire does not connect directly to the switch. Instead, it connects to the light fixture’s neutral wire. Use a wire connector to join these neutral wires together. This link helps the electrical circuit function properly.
Connecting Ground Wire
The ground wire ensures safety by directing electricity away during a fault. It is usually green or bare copper. Attach the ground wire to the switch’s green grounding screw. If the switch box has a grounding wire or metal box, connect them together. Proper grounding reduces the risk of electric shock.
Mounting The Switch
Mounting the switch is a crucial step in connecting a switch to a light. This process holds the switch firmly in place. Proper mounting ensures safety and smooth operation. It also gives a clean, finished look to your installation.
Securing Switch In Box
First, place the switch inside the electrical box. Align the switch screw holes with the box holes. Use a screwdriver to tighten the screws. Make sure the switch does not move or wiggle. Tighten screws evenly to avoid damaging the switch.
Attaching Faceplate
Next, position the faceplate over the switch. The faceplate covers the switch and electrical box edges. Insert the screws into the faceplate holes. Turn screws slowly to avoid cracking the plate. Tighten until the faceplate is flush with the wall.
Testing The Setup
Testing the setup is a key step after connecting your switch to the light. It ensures everything works safely and correctly. This process helps find any mistakes before you finish the job. Take your time to check each part carefully.
Restoring Power
First, turn the main power back on at the circuit breaker. Make sure the switch is off before you do this. This step is important for safety. Wait a moment for the electricity to stabilize. Avoid touching any wires during this process.
Checking Light Operation
Flip the switch to see if the light turns on. The light should come on immediately without flickering. If it does not light up, turn off the power and check your connections again. Test the switch several times to confirm steady operation. Ensure the light responds well to the switch each time.

Credit: www.youtube.com
Troubleshooting Common Issues
Troubleshooting issues when connecting a switch to a light can be simple. Many common problems have quick fixes. Understanding these issues helps save time and effort. Below are some frequent problems and how to address them.
Light Not Turning On
Check if the switch is properly connected to the power source. Loose wires often cause this issue. Make sure the light bulb is not burnt out. Test the bulb in another socket to be sure. Also, confirm the circuit breaker is not tripped. Reset it if needed. Finally, ensure the switch itself is working. Replace it if it feels faulty.
Switch Feels Hot
A hot switch can signal a wiring problem. Loose connections cause electrical resistance and heat. Turn off the power before checking the wires. Tighten any loose screws or wires carefully. Using a switch with a higher rating can help. Avoid using switches that feel warm for long periods. This issue can lead to electrical hazards.
Flickering Light
Flickering lights often come from loose wiring. Check all wire connections at the switch and light fixture. Replace any damaged wires. The light bulb might also be loose or defective. Tighten or replace the bulb. Sometimes, the problem comes from the dimmer switch. Use a compatible dimmer with your bulb type. Flickering can also indicate voltage issues.
Upgrading To Smart Switches
Upgrading to smart switches changes how you control your lights. These switches connect to Wi-Fi and let you use your phone or voice to turn lights on or off. Smart switches add convenience and save energy. They also let you set schedules for your lights. This upgrade suits modern homes and makes daily life easier.
Benefits Of Smart Switches
Smart switches offer many benefits. You can control lights remotely from anywhere. This helps to save electricity by turning off lights you forgot. Some smart switches work with voice assistants like Alexa or Google. They fit into most home systems easily. You can set timers to switch lights on or off automatically. These features improve security by making your home look occupied. Smart switches also add value to your home.
Installation Tips
Turn off the power before starting installation. Use a voltage tester to be sure wires are safe. Remove the old switch carefully. Note the wires’ positions to connect the smart switch correctly. Most smart switches need a neutral wire. Check your wall box for a neutral wire before buying. Follow the instructions that come with your switch. Use wire nuts to secure connections tightly. After installation, turn power on and test the switch. Connect the switch to your Wi-Fi and app. Update the app for better performance and security.

Credit: community.smartthings.com
Frequently Asked Questions
How Do I Connect A Switch To A Light Fixture?
Turn off power first. Connect the switch’s live wire to the light’s live wire. Use a neutral wire if needed. Secure all connections with wire nuts and mount the switch properly.
What Tools Are Needed To Connect Switch To Light?
You need a screwdriver, wire stripper, voltage tester, wire nuts, and electrical tape. These tools ensure safe and proper wiring when connecting a switch to a light.
Can I Connect Multiple Lights To One Switch?
Yes, you can connect multiple lights to one switch by wiring them in parallel. Ensure the switch and wiring can handle the total electrical load safely.
How To Identify Wires When Connecting Switch To Light?
Use a voltage tester to identify live, neutral, and ground wires. Live wires are usually black or red; neutral is white; ground is green or bare copper.
Conclusion
Connecting a switch to a light is simple and useful. Follow safety steps carefully to avoid problems. Use the right tools and check wires well. Test the connection before finishing the job. This helps you control your lights easily. Practice makes the task easier every time.
Keep learning and stay safe with electrical work. Small efforts bring bright results.