Are you tired of dealing with a faulty light switch or want to upgrade to a smarter one? Learning how to switch a light switch yourself is easier than you think.
Imagine saving money on electrician fees and gaining the confidence to handle simple home repairs on your own. In this guide, you’ll discover clear, step-by-step instructions that anyone can follow—no prior experience needed. Keep reading, and by the end, you’ll be ready to switch your light switch quickly and safely.

Credit: www.dummies.com
Tools And Materials Needed
Changing a light switch is a simple task with the right tools and materials. Having everything ready makes the process safe and quick. Prepare all items before starting the work.
Essential Tools For Switching A Light Switch
You need a screwdriver, either flathead or Phillips. A voltage tester helps check if the power is off. Wire strippers remove insulation from wires safely. Needle-nose pliers are useful for bending and holding wires. A flashlight can help if the area is dark.
Materials Required For A New Light Switch
Buy a compatible light switch for your home. Electrical tape is important to cover wire connections. Wire nuts secure wires together safely. You may need new screws if the old ones are worn out. A plastic wall plate completes the look and protects the wiring.
Safety Gear To Use
Wear insulated gloves to protect against electric shock. Safety glasses keep debris out of your eyes. Use rubber-soled shoes to reduce shock risk. Turn off the power at the breaker before starting work.

Credit: www.wikihow.com
Safety Precautions
Switching a light switch may seem easy. Safety must come first every time. Electricity can cause serious harm. Taking proper safety steps protects you and your home.
Follow the right precautions before starting. Prepare the workspace and use the right tools. Small actions can prevent big accidents.
Turn Off Power At The Circuit Breaker
Always cut power at the main circuit breaker. This stops electricity from flowing to the switch. Double-check by flipping the switch to see if the light goes off. Never rely only on the wall switch.
Use A Voltage Tester
Test the wires with a voltage tester before touching them. This tool shows if electricity is still present. It helps avoid shocks. Always check all wires connected to the switch.
Wear Insulated Gloves
Wear insulated gloves to protect your hands. These gloves reduce the risk of electric shocks. Use gloves made for electrical work only. Do not use gloves with holes or tears.
Work In A Dry Area
Make sure your hands and workspace are dry. Water conducts electricity and increases shock risk. Avoid working near wet surfaces or damp walls. Safety improves in dry conditions.
Use Proper Tools
Choose tools with insulated handles. These tools protect against electric shocks. Avoid metal tools without insulation. Keep tools in good condition for safe use.
Turning Off Power
Turning off the power is the first step before changing a light switch. It keeps you safe from electric shocks. Always treat electricity with respect. Never skip this step.
Power can be turned off at the main electrical panel. This stops electricity from flowing to the switch. You must know where your panel is. Usually, it is in the basement, garage, or a utility room.
Locate The Main Electrical Panel
Find the main electrical panel in your home. It looks like a metal box with a door. Inside, there are many switches or breakers. Each controls power to different parts of your house.
Identify The Correct Circuit Breaker
Look for the breaker that controls the light switch. It may be labeled with room names or numbers. If not labeled, you can turn breakers off one by one. Check if the light switch power is off after each.
Switch Off The Circuit Breaker
Flip the circuit breaker to the OFF position. This cuts power to the light switch. You should hear a click sound. After turning it off, test the light switch to confirm no power flows.
Use A Voltage Tester For Extra Safety
Use a voltage tester on the wires of the switch. It shows if electricity is still present. This step is important to avoid shocks. Never touch wires until you confirm no voltage.
Removing The Old Switch
Removing the old light switch is the first step in changing it. This task needs care and attention to keep you safe. Follow simple steps to take out the switch without any problem.
Before starting, make sure to turn off the power to the switch. This prevents any risk of electric shock. Use a voltage tester to confirm the power is off.
Gather Necessary Tools
Prepare tools like a screwdriver, voltage tester, and wire stripper. Having tools ready makes the job easier and faster.
Remove The Switch Cover Plate
Use a screwdriver to take off the cover plate. This exposes the screws that hold the switch in place.
Unscrew The Old Switch
Loosen the screws on the switch. Gently pull the switch out from the wall box to see the wires.
Disconnect The Wires
Note the wire positions. Unscrew or unclip the wires from the switch. Keep the wires safe for the new switch.
Identifying Wiring Types
Identifying wiring types is a key step before switching a light switch. Knowing the wiring helps avoid mistakes and keeps the job safe. Different homes may have different wiring setups. Recognizing each type makes the process easier and faster.
Understanding Single-pole Wiring
Single-pole wiring is the most common type. It has two wires: one hot and one neutral. The hot wire carries electricity to the switch. The neutral wire completes the circuit back to the power source. This wiring controls one light or set of lights from one switch.
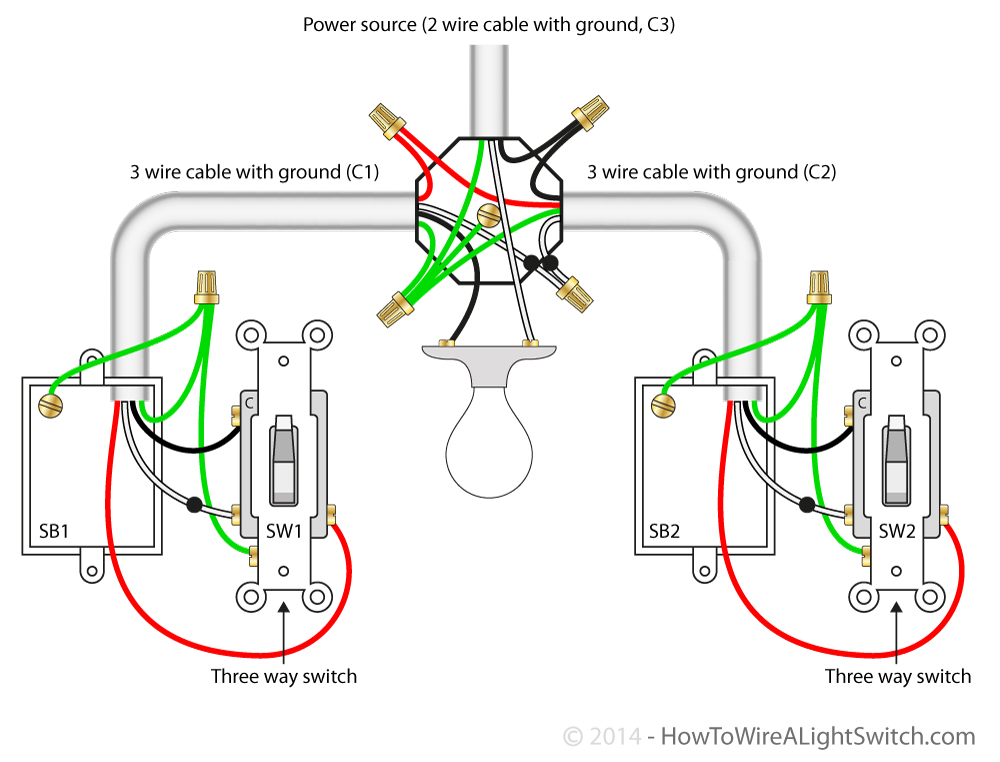
Recognizing Three-way Wiring
Three-way wiring controls a light from two switches. It has three wires: two traveler wires and one common wire. The traveler wires connect both switches. The common wire connects to the light. This setup allows turning lights on or off from two places.
Spotting Ground Wires
Ground wires are important for safety. They are usually green or bare copper wires. Ground wires protect against electric shock. Always make sure the ground wire is connected properly. Never ignore this wire while working on switches.
Connecting The New Switch
Connecting the new light switch is an important step. It controls the flow of electricity to the light. Correct connections ensure the switch works safely and properly.
Take your time to connect the wires carefully. Each wire has a specific place. Follow simple steps to avoid mistakes and keep safe.
Identify The Wires
Look at the wires coming from the wall box. Usually, you will see a black (hot) wire, a white (neutral) wire, and a green or bare copper (ground) wire. The black wire carries electricity. The white wire returns it. The ground wire protects you from shocks.
Attach The Ground Wire
First, connect the green or bare copper wire to the green screw on the switch. Tighten the screw to hold the wire firmly. This connection is important for safety. It helps prevent electric shocks.
Connect The Hot Wire
Find the black wire and wrap it around the brass or dark-colored screw. Tighten the screw well. This wire turns the switch on and off. Make sure it is tight to avoid loose connections.
Secure The Neutral Wire
Some switches do not use the neutral wire. If your switch has a white wire, connect it to the silver screw. If not, leave the white wires connected together in the box. Check your switch type before connecting.
Double-check All Connections
Look at each wire connection again. Make sure all screws are tight and wires are secure. Loose wires can cause problems or danger. A safe connection means your switch will work well.
Testing The New Switch
Testing the new switch is a key step after installation. It confirms the switch works properly and safely. This step helps avoid future electrical problems or hazards. Take time to check everything carefully before finishing your project.
Checking Power Supply
Turn the power back on at the circuit breaker. Switch the new switch on and off slowly. Watch if the connected light or device reacts. No light means no power or wrong wiring. If the light turns on, the power supply is good.
Observing Switch Function
Operate the switch several times. Each time, the light should turn on or off without flickering. Listen for any strange noises, like buzzing or crackling. Smooth clicks mean the switch is working well. Stop testing if any unusual signs appear.
Using A Voltage Tester
Use a voltage tester or multimeter for extra safety. Check if the switch is receiving the right voltage. Touch the tester probes to the switch terminals. The tester should show the expected voltage range. If not, the wiring needs to be checked again.
Ensuring Safety Measures
Keep your hands dry and avoid touching metal parts. Stand on a dry surface during testing. If unsure about any step, ask a professional. Safety always comes first with electrical work. Proper testing protects you and your home.
Finishing Touches
Finishing touches make your light switch look neat and work well. This step is important for safety and style. Take your time to get it right.
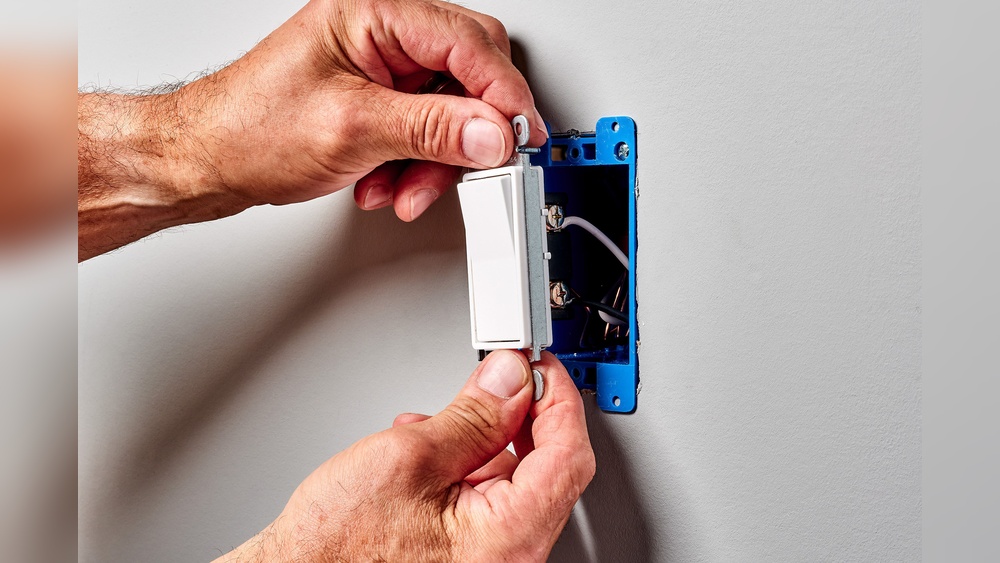
Secure The Switch Plate
Place the switch plate over the switch carefully. Use the screws to fix it tightly. Make sure it sits flat against the wall. Loose plates can cause problems or look bad.
Test The Light Switch
Turn the power back on at the breaker. Flip the switch to see if the light works. Check both on and off positions. If it does not work, turn off power and check connections again.
Clean The Area
Wipe away dust or fingerprints from the switch plate. Use a dry cloth or a mild cleaner. A clean switch looks fresh and new. Avoid wet cloths to prevent damage.
Check For Safety
Make sure no wires are exposed around the switch. Tighten any loose screws inside the box if needed. Proper installation avoids shocks and fire risks. Safety is key.
Troubleshooting Common Issues
Troubleshooting common issues with light switches saves time and effort. Simple problems often cause switches to stop working properly. Knowing how to identify these issues helps fix them quickly.
Many light switch problems relate to wiring or the switch itself. Checking these parts carefully is important. Safety comes first. Always turn off power before inspecting switches.
Checking For Loose Connections
Loose wires cause switches to fail or flicker lights. Remove the switch cover and inspect wires. Tighten any loose screws holding wires. Secure connections ensure proper switch function.
Testing The Switch With A Voltage Tester
A voltage tester helps find if the switch gets power. Touch the tester to the wires. If no power shows, the problem may be in the circuit or breaker. Replace the switch if it gets power but won’t work.
Replacing A Faulty Switch
Old switches wear out and stop working. Remove the old switch carefully. Match the new switch type and wire it the same way. Test the new switch before putting the cover back.
Inspecting The Circuit Breaker
Tripped breakers cut power to switches. Check your breaker box for any switches turned off. Reset the breaker by flipping it off and on. This often restores power to the light switch.
Credit: community.inovelli.com
Frequently Asked Questions
How Do I Safely Switch A Light Switch?
Turn off the power at the circuit breaker before starting. Use a voltage tester to confirm no power. Remove the switch cover and carefully disconnect wires. Connect the new switch wires accordingly and secure the cover. Restore power and test the switch.
What Tools Are Needed To Switch A Light Switch?
You need a screwdriver, voltage tester, wire stripper, and new switch. A flashlight may help if lighting is poor. These tools ensure safety and proper installation during the switch replacement process.
Can I Switch A Light Switch Without Turning Off Power?
No, always turn off power at the breaker first. Working on live wires risks electric shock or injury. Safety is crucial when handling electrical components.
How Long Does It Take To Switch A Light Switch?
Switching a light switch usually takes 15 to 30 minutes. This depends on your experience and switch type. Taking your time ensures safety and correct wiring.
Conclusion
Switching a light switch is easier than it seems. Turn off power first to stay safe. Use simple tools and follow steps carefully. Take your time and double-check each connection. A working switch helps control your home lighting. Try this guide to make the change smooth.
Small tasks like this build your confidence. Brighten your space with a properly working switch. Practice makes the process feel natural and quick. You can handle basic home repairs with care.