Are you looking to connect a single switch to a light but don’t know where to start? You’re not alone.
Many people want to handle simple electrical tasks themselves but feel unsure about the steps involved. Imagine being able to control your lights with just one easy switch—saving you time and money on repairs. In this guide, you’ll discover clear, step-by-step instructions that anyone can follow, even if you’re new to wiring.
By the end, you’ll have the confidence to make your home lighting work exactly the way you want. Ready to take control of your lighting? Let’s get started.
Tools And Materials Needed
Connecting a single switch to a light needs the right tools and materials. These items make the job easier and safer. Preparing everything before starting saves time and avoids problems.
Basic Tools
You will need a screwdriver to open switch covers and tighten screws. A wire stripper helps remove insulation from wires without damage. A voltage tester checks if wires are live for safety. Pliers assist in bending and holding wires firmly. Electrical tape secures wire connections and prevents shocks.
Electrical Components
The main component is the single-pole switch, which controls the light. Use electrical wires rated for your home’s voltage. Wire connectors, also called wire nuts, join wires safely. A light fixture or bulb fits the switch you install. An electrical box holds the switch and wires neatly in place.
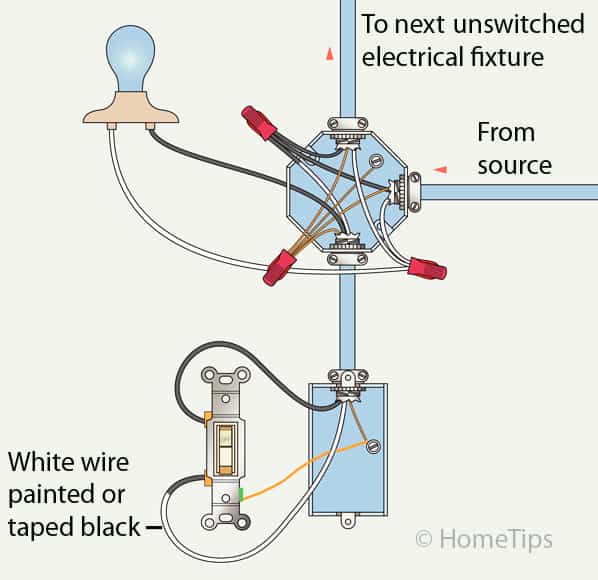
Credit: www.hometips.com
Safety Precautions
Safety is the top priority before connecting a single switch to a light. Electrical work can be dangerous without the right care. Taking simple safety steps protects you from shocks and injuries. Follow these key precautions to keep your work safe and smooth.
Turn Off Power
Always switch off the main power supply before starting. Use the circuit breaker or fuse box to cut the electricity. Confirm that no power flows to the wires you will handle. This step stops any accidental shocks or short circuits.
Use Insulated Tools
Use tools with insulated handles made for electrical work. These tools reduce the risk of electric shock. Avoid using metal or damaged tools without insulation. Insulated tools give you better control and safety.
Check For Live Wires
Test wires with a voltage tester before touching them. This check ensures no live current is present. Never assume wires are dead without testing. Confirming live wires keeps you safe from unexpected shocks.
Identify Wiring Types
Before connecting a single switch to a light, you must identify the wiring types. This step is crucial for safety and proper function. Each wire has a specific role in the electrical circuit. Knowing which wire is which helps avoid mistakes and electrical hazards.
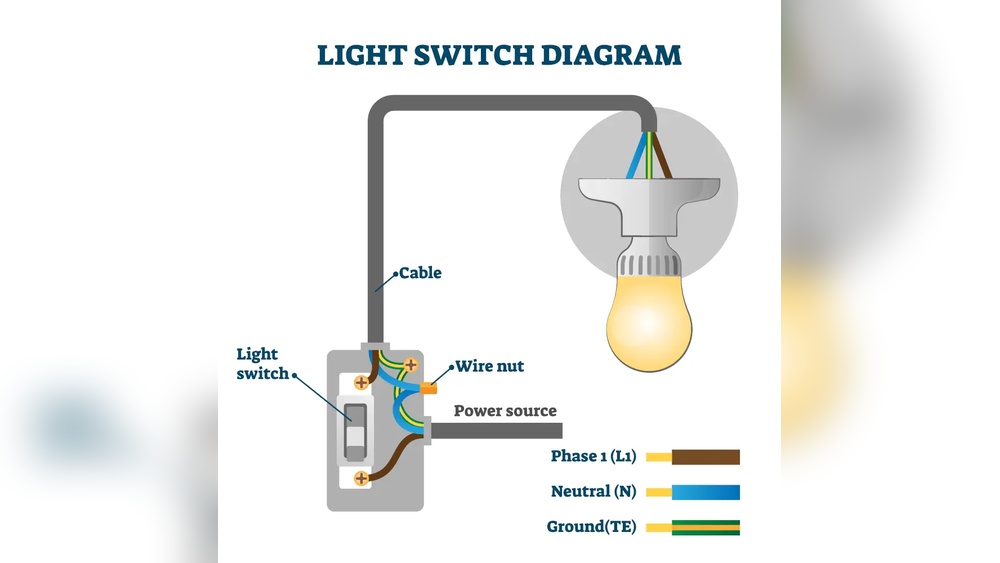
Live Wire
The live wire carries electricity from the power source. It is usually red or brown. This wire connects to the switch to control the light. Always handle the live wire with care. It can cause electric shock if touched directly.
Neutral Wire
The neutral wire completes the electrical circuit. It usually has a blue or black color. This wire carries current back to the power source. The neutral wire does not connect directly to the switch. It connects to the light fixture instead.
Ground Wire
The ground wire is a safety feature. It is often green or bare copper. This wire protects you from electric shocks. It connects to the metal parts of the switch and light. The ground wire directs electricity safely to the earth.
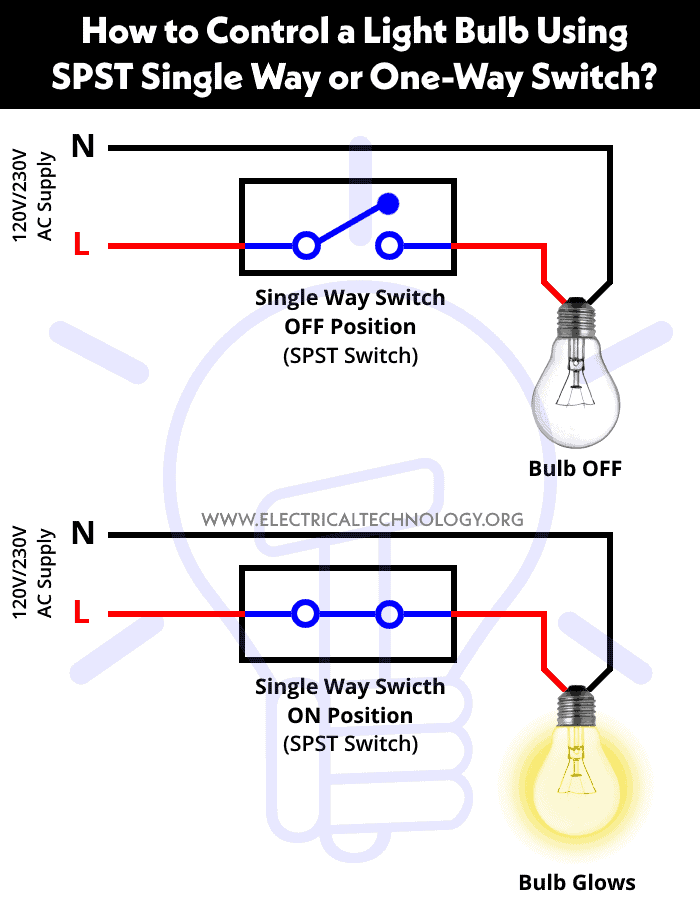
Credit: www.electricaltechnology.org
Prepare The Switch And Wires
Preparing the switch and wires is the first step in connecting a single switch to a light. It ensures safety and proper function. Taking time to prepare helps avoid mistakes and accidents.
Start with the switch and wires in good condition. Check for any damage or wear. Use proper tools for the task. Clean wires and switch terminals improve connection quality.
Strip Wire Insulation
Use a wire stripper to remove insulation carefully. Strip about half an inch from the wire ends. Avoid cutting the wire strands inside. Exposed wire helps make a solid electrical connection.
Do not strip too much insulation. Too much exposed wire can cause short circuits. Keep the exposed wire neat and tidy. This step is crucial for safety and function.
Arrange Wires Properly
After stripping, organize the wires by type and length. Separate live, neutral, and ground wires clearly. This makes connecting easier and safer.
Twist wire strands together for better contact. Use wire connectors or terminal screws to secure wires. Proper arrangement prevents loose connections or shorts.
Connect Wires To The Switch
Connecting wires to a single switch is a simple task with clear steps. Proper wiring ensures your light works safely and efficiently. Follow these steps carefully to attach the wires correctly.
Attach Live Wire
First, identify the live wire, usually black or red. This wire carries power to the switch. Strip about half an inch of insulation from the wire end. Insert the bare wire into the terminal labeled “live” or “L” on the switch. Tighten the screw firmly to hold the wire in place. Avoid loose connections to prevent sparks or shorts.
Secure Ground Wire
The ground wire is often green or bare copper. It protects against electrical shocks by directing power safely to the ground. Connect this wire to the green screw or ground terminal on the switch. Wrap the wire around the screw and tighten securely. A good ground connection adds safety to your electrical system.

Credit: www.youtube.com
Mount The Switch
Mounting the switch is a vital step in connecting a single switch to a light. This step secures the switch and makes sure it works safely. Proper mounting keeps the wiring neat and prevents accidents.
Follow clear steps to fix the switch firmly. Use the right tools to avoid damage. Careful mounting helps the switch last longer and function well.
Fix Switch To Wall Box
Start by placing the switch inside the wall box. Align the screw holes of the switch with those on the box. Use a screwdriver to tighten the screws. Make sure the switch sits flat and steady. Avoid over-tightening to prevent cracking the switch or box. Check that wires are not pinched or loose before securing.
Test The Connection
Turn on the main power supply. Flip the switch to see if the light turns on. If the light does not respond, turn off the power and check wiring again. Use a voltage tester to confirm power reaches the switch. Testing ensures the switch works correctly and safely. Fix any issues before finalizing the installation.
Frequently Asked Questions
How Do I Connect A Single Switch To A Light?
To connect a single switch to a light, turn off power first. Connect the live wire to the switch’s input terminal. Then, link the output terminal to the light fixture. Finally, connect the neutral wires directly at the light fixture and secure all connections.
What Tools Are Needed For Wiring A Single Switch?
You need a screwdriver, wire stripper, voltage tester, electrical tape, and wire nuts. These tools help you safely strip, connect, and secure wires for the switch installation.
Can I Install A Single Switch Without Professional Help?
Yes, if you follow safety precautions and basic wiring steps, you can install it yourself. Always turn off power at the breaker and test wires before starting work.
What Wire Colors Connect To A Single Switch?
Typically, the black or red wire is live and connects to the switch. White wires are neutral and bypass the switch. Ground wires are green or bare and connect to grounding points.
Conclusion
Connecting a single switch to a light is simple and safe. Always turn off the power before starting any work. Follow the steps carefully to avoid mistakes. Use the right tools and check your connections twice. A properly connected switch controls your light easily.
You can save time and money by doing it yourself. Take your time and work with care. This basic skill helps in many home projects. Try it today and enjoy the bright results.