Are you ready to brighten up your space with LED lights but unsure how to connect them to a switch? You’re in the right place.
Learning this simple skill not only saves you money but also gives you full control over your lighting. Imagine turning your lights on and off with ease, creating the perfect mood anytime you want. In this guide, you’ll discover clear, step-by-step instructions that anyone can follow—even if you’re not an expert.
Keep reading, and by the end, you’ll feel confident handling your LED lights like a pro.

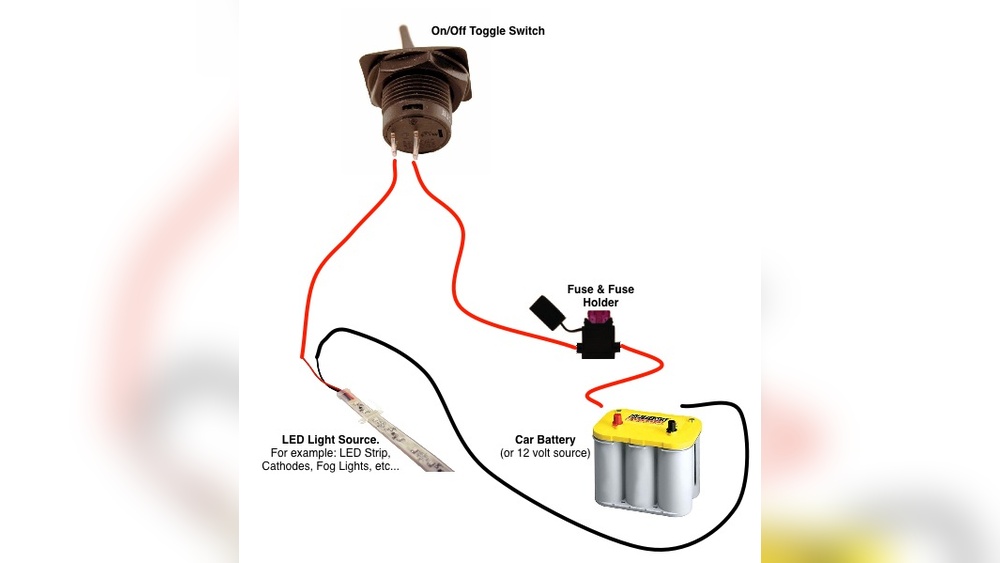
Credit: www.boogeylights.com
Choosing The Right Led Lights
Choosing the right LED lights is important for a smooth connection to a switch. The correct lights ensure safety and proper function. It also helps avoid flickering or damage. Understanding types, power needs, and switch compatibility is key. This guide breaks down these points clearly.
Types Of Led Lights
LED lights come in many forms. Common types include bulbs, strips, and panels. Bulbs fit most standard sockets. Strips offer flexible lighting for corners and edges. Panels provide broad, even light for rooms. Pick a type based on your lighting needs and space.
Power Requirements
LED lights need specific power to work well. Check the voltage and wattage on the packaging. Most home LEDs use 12V or 24V. Too much power can burn out the lights. Too little power causes dim or flickering light. Match the power supply to the LED’s needs.
Compatibility With Switches
Not all LED lights work with every switch. Some switches control only traditional bulbs. Look for LEDs labeled “dimmable” if you want a dimmer switch. Standard switches work for simple on/off LED lights. Confirm the switch type suits your LED’s features.

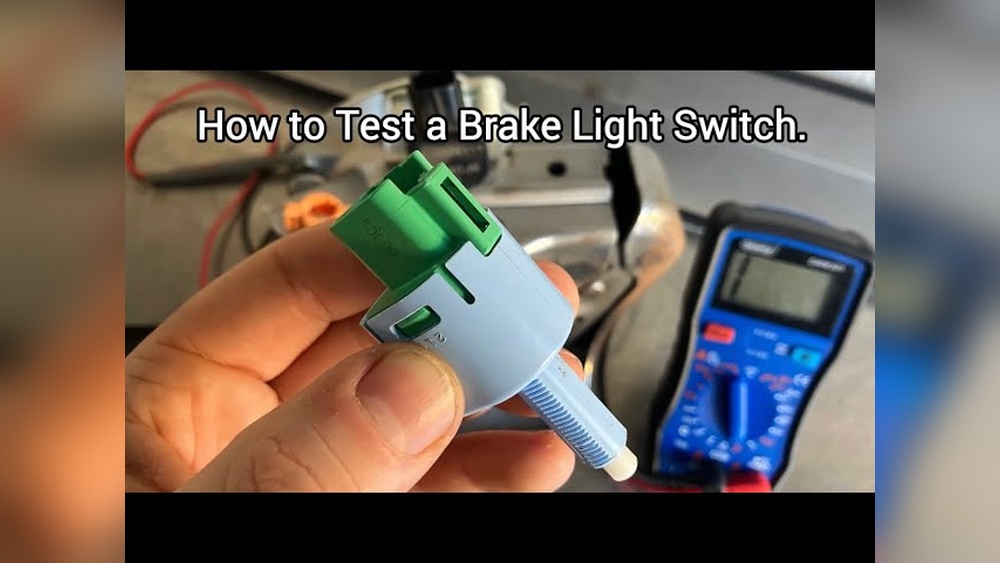
Credit: www.youtube.com
Selecting A Suitable Switch
Selecting the right switch for your LED lights is important. The switch controls the power and affects how the lights work. Different switches offer different features and benefits. Choosing the right type helps your lights last longer and work better. It also keeps the setup safe and easy to use.
Single-pole Vs. Double-pole Switches
A single-pole switch controls one light or a group of lights from one place. It has two terminals and is simple to install. This switch is common in many homes for basic lighting.
A double-pole switch controls two circuits at once. It has four terminals and can handle higher power loads. Use it for heavy-duty lighting or when controlling multiple circuits.
Smart Switch Options
Smart switches let you control LED lights with your phone or voice. They connect to Wi-Fi or Bluetooth. You can set schedules or adjust brightness remotely. Smart switches add convenience and save energy.
Many smart switches work with popular home systems like Alexa or Google Home. Choose one that fits your current devices and needs.
Safety Certifications
Check for safety certifications before buying a switch. Certifications like UL, ETL, or CE show the switch meets safety standards. Certified switches reduce risks of electrical problems.
Always pick switches tested for your country’s rules. This ensures your LED lights and switch setup are safe and reliable.
Gathering Necessary Tools And Materials
Before connecting LED lights to a switch, gather all tools and materials. Having everything ready makes the job easier and safer. Preparing in advance saves time and prevents frustration.
Basic Electrical Tools
Start with essential electrical tools. A screwdriver is needed to open switch plates and secure wires. Wire strippers help remove insulation from wires without damage. A voltage tester checks if wires carry current, ensuring safety. Pliers assist in bending and twisting wires for connections. A drill may be necessary for mounting the switch box.
Wiring Supplies
Use proper wiring supplies for a reliable connection. Choose the correct gauge wire for your LED lights and switch. Electrical tape helps insulate wire joints and prevents short circuits. Wire connectors secure wire ends together safely. A switch compatible with your lighting setup is crucial. Also, have a switch box to house the switch if needed.
Safety Gear
Protect yourself with safety gear. Insulated gloves reduce the risk of electric shock. Safety glasses shield your eyes from dust and sparks. Wear shoes with rubber soles to avoid grounding yourself. Work in a well-lit area to see clearly. Keep a first aid kit nearby for emergencies.
Preparing The Work Area
Preparing the work area is the first step to safely connect LED lights to a switch. A clean and safe space helps avoid accidents. It also makes the process smoother and faster. Follow basic safety steps before starting the wiring.
Turning Off Power
Turn off the power at the main circuit breaker. This stops electricity flow to the wires you will work on. Confirm the power is off to avoid electric shocks. Never skip this step.
Testing For Live Wires
Use a voltage tester to check if wires have power. Touch the tester to each wire carefully. If the tester lights up or beeps, the wire is live. Double-check to be sure all wires are safe to handle.
Clearing The Workspace
Remove objects around your work area. Clear away tools, boxes, and clutter. A clean space reduces trip hazards and distractions. Keep only the tools you need nearby. This helps you focus and work efficiently.
Wiring The Led Lights To The Switch
Wiring the LED lights to the switch is an important step in controlling your lighting setup. Proper wiring ensures your lights work safely and efficiently. This process involves identifying the right wires, connecting live and neutral wires correctly, and securing all connections firmly.
Identifying Wires
First, find the live, neutral, and ground wires. The live wire usually carries current to the switch. Neutral wires complete the circuit and return current. Ground wires provide safety by preventing shocks. Use a voltage tester to confirm which wire is live. Label each wire to avoid confusion during connection.
Connecting Live And Neutral Wires
Connect the live wire from the power source to the switch’s live terminal. Then, connect the live wire from the switch to the LED light’s live input. Join the neutral wire from the power source directly to the LED light’s neutral wire. Make sure wires are twisted together tightly to ensure good contact.
Securing Connections
Use wire nuts or terminal blocks to secure wire connections. Twist the wires together before applying the connector. Check that no bare wire is exposed outside the connector. Tight connections prevent shorts and flickering lights. Finally, gently push wires into the switch box to avoid damage.
Mounting And Installing Components
Mounting and installing components is a key step in connecting LED lights to a switch. Proper installation ensures safety and smooth operation. Follow clear steps to place your switch and LED fixtures correctly.
This section guides you through attaching the switch, installing the LED lights, and placing everything for the best results.
Attaching The Switch To The Wall
First, turn off the power from the main breaker. This keeps you safe during installation. Remove the old switch cover plate if there is one.
Use a screwdriver to fix the new switch box into the wall. Make sure it fits tightly and does not move. Connect the wires from the power source to the switch terminals. Tighten the screws firmly.
Place the switch back into the box and screw it in place. Attach the cover plate over the switch. Turn the power back on to check if the switch works properly.
Installing Led Fixtures
Choose the right LED fixture for your space. Turn off the power before starting installation. Remove any old fixtures carefully.
Connect the fixture wires to the house wiring. Match the colors: black to black, white to white, and green or bare wire to ground. Use wire nuts to secure connections.
Mount the fixture base to the ceiling or wall bracket. Tighten screws to hold it firmly. Attach the LED light cover or bulb as needed.
Ensuring Proper Placement
Place the LED lights where they provide the best illumination. Avoid placing them too close to walls or corners. Think about the room’s layout and furniture.
Make sure the switch is easy to reach. It should be at a comfortable height for all users. Avoid places where it can get wet or dirty.
Check that all components are secure and wires are not exposed. Proper placement helps the lights work efficiently and safely.
Testing And Troubleshooting
Testing and troubleshooting are key steps after connecting LED lights to a switch. These steps ensure the setup works correctly and safely. You can find any problems early and fix them before use. This saves time and avoids damage.
Restoring Power Safely
First, turn on the main power supply. Check that the circuit breaker is in the ON position. Use a voltage tester to confirm power is flowing to the switch. Avoid touching wires directly. Wear insulated gloves for extra safety.
Checking Light Operation
Flip the switch to see if the LED lights turn on. Test the switch multiple times. Look for flickering or dim lights. These signs may indicate wiring issues or faulty LEDs. Note any unusual behavior for further checks.
Common Issues And Fixes
Lights not turning on? Check if the bulbs are properly inserted. Loose connections can cause failure. Tighten all wire nuts and screws. Flickering lights often mean a bad connection or incompatible dimmer switch. Replace the dimmer if needed. If the switch feels warm, it may be overloaded. Use a switch rated for LED lights.
Safety Tips And Best Practices
Connecting LED lights to a switch can be simple and safe. Following safety tips and best practices keeps you and your home protected. Small steps make a big difference in avoiding accidents and ensuring long-lasting performance.
Avoiding Electrical Hazards
Always turn off the power at the breaker before starting. Use a voltage tester to confirm no electricity flows. Avoid working with wet hands or in damp areas. Keep wires away from sharp edges or heat sources. Use tools with insulated handles to reduce shock risk.
Using Proper Insulation
Cover all wire connections with electrical tape or wire nuts. Use insulation materials rated for electrical use. Avoid exposed wires to prevent shorts or shocks. Replace damaged insulation immediately. Proper insulation helps keep connections safe and secure.
Regular Maintenance
Check your LED lights and switches regularly. Look for loose wires, corrosion, or damage. Tighten any loose screws and connections. Clean dust and debris from switch plates and fixtures. Early maintenance prevents bigger problems and keeps lights working well.
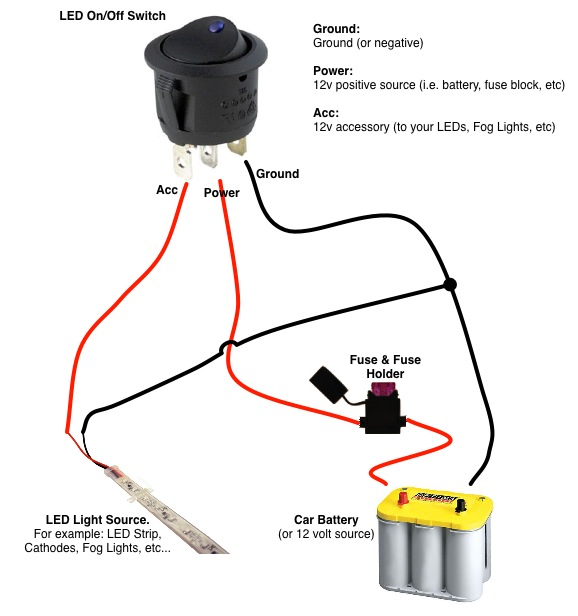
Credit: www.oznium.com
Frequently Asked Questions
How Do I Safely Connect Led Lights To A Switch?
Turn off power before wiring. Connect the switch to the live wire. Attach the LED lights to the switch’s output. Use proper insulation and secure connections for safety and performance.
Can I Use Any Switch For Led Lights?
Most standard switches work with LED lights. However, dimmer switches must be LED-compatible to avoid flickering or damage. Always check switch specifications before installation.
What Tools Are Needed To Connect Led Lights To A Switch?
You need a screwdriver, wire strippers, electrical tape, voltage tester, and wire connectors. These tools ensure safe and efficient installation of LED lights to a switch.
How Do I Troubleshoot Led Lights Not Working After Connecting?
Check power supply and switch connections. Ensure wires are properly connected and insulated. Test the switch and LED lights with a voltage tester for faults.
Conclusion
Connecting LED lights to a switch is simple and practical. Follow safety rules and use the right tools. Double-check your wiring to avoid mistakes. This setup saves energy and adds convenience to any room. You can control your lights with ease.
Enjoy bright, efficient lighting every day. Keep learning and improving your home projects step by step. Small changes make a big difference.