Have you ever flipped your light switch only to find it’s not working? A broken light switch can be frustrating and even a little scary.
But don’t worry—you don’t need to call an electrician right away. You can fix it yourself, even if you’re not a DIY expert. You’ll learn simple, step-by-step instructions to safely repair your broken light switch. By the end, your lights will be back on, and you’ll feel proud of handling the problem on your own.
Ready to bring the light back into your home? Let’s get started!
Tools And Materials Needed
Fixing a broken light switch needs the right tools and parts. Having these ready makes the job easier and safer. This section lists all you need before starting the repair.
Essential Tools
A flathead screwdriver is a must for removing the switch cover. A Phillips screwdriver helps with screws inside the switch. Use a voltage tester to check power is off. Wire strippers prepare wires for connection. Needle-nose pliers help bend or hold wires. Electrical tape secures wire connections. A flashlight aids visibility in dark spaces.
Replacement Parts
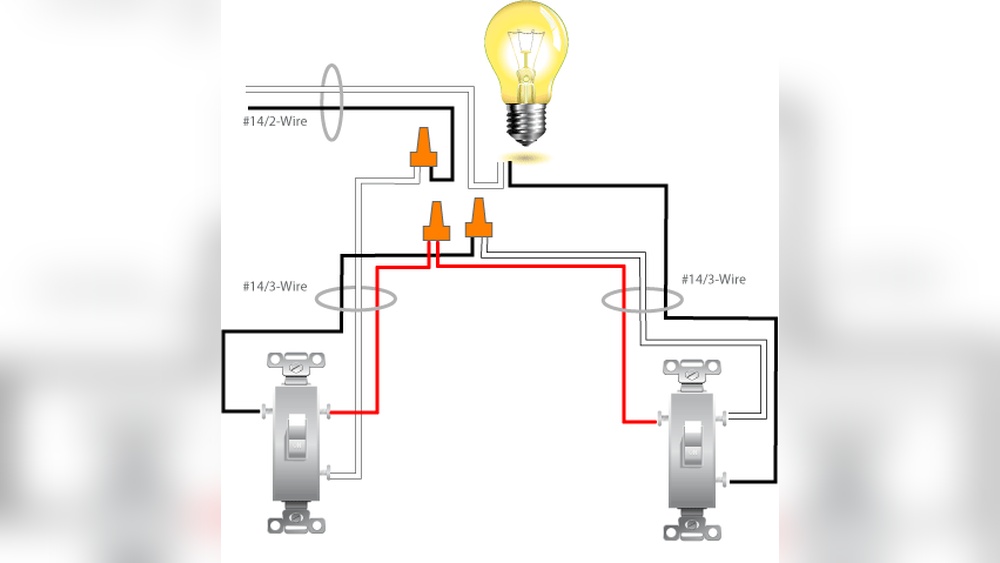
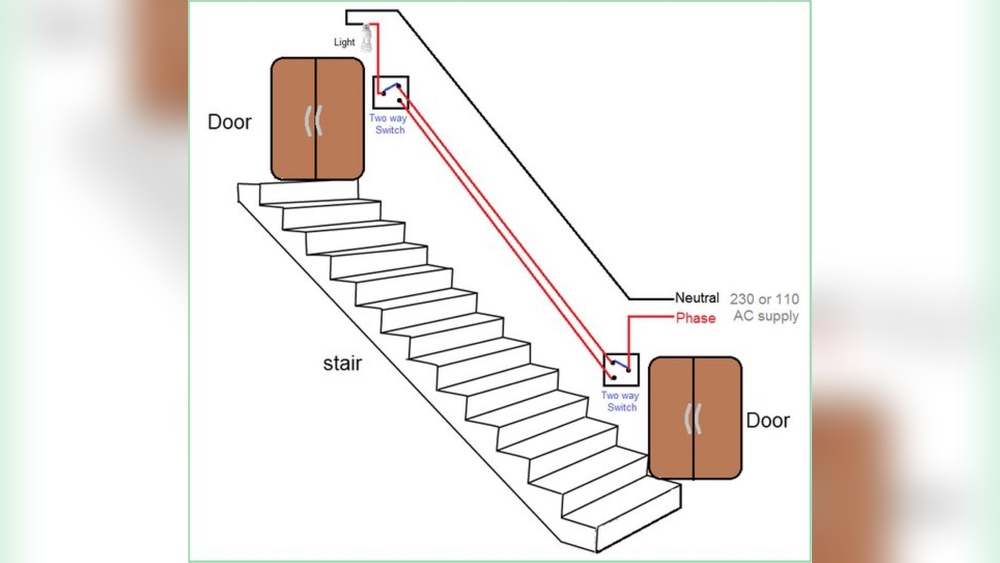
Buy a new light switch that matches your old one. Check the switch type: single-pole or three-way. Get wire nuts to join wires safely. If wires are damaged, buy replacement electrical wire. Use a new faceplate if the old one is cracked or dirty. Make sure parts are rated for your home’s voltage.

Credit: www.youtube.com
Safety Precautions
Fixing a broken light switch requires careful attention to safety. Electricity can cause serious harm. Taking the right precautions protects you from shocks and accidents. Always follow safety steps before starting any electrical work.
Turning Off Power
Start by turning off the power to the switch. Find the circuit breaker panel in your home. Switch off the breaker that controls the light switch. Do not rely on the switch itself to cut power. This step stops electricity from flowing to the wires. It keeps you safe while working.
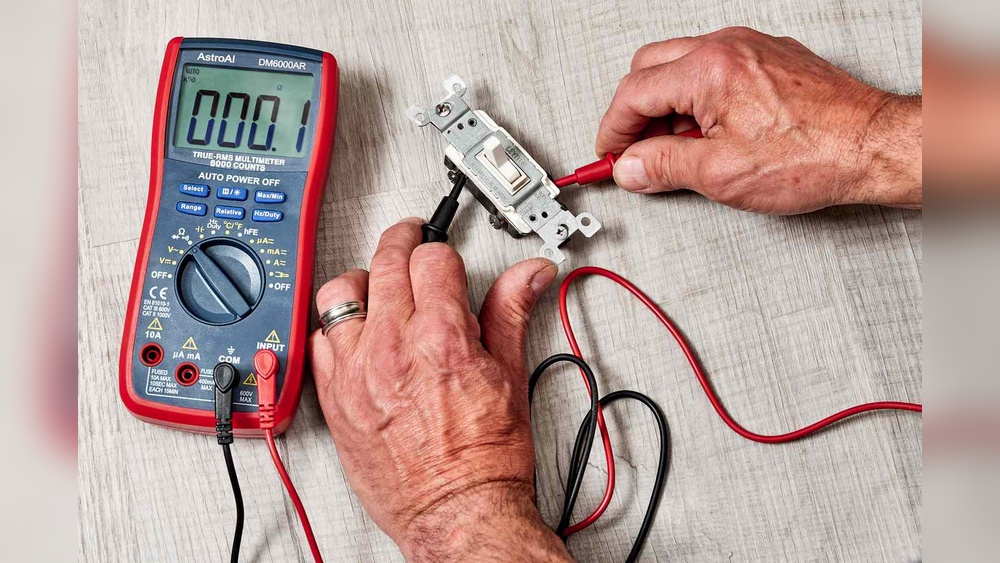
Using A Voltage Tester
Check that the power is really off with a voltage tester. This device detects live electricity in wires. Touch the tester’s tip to the switch’s wires. No light or sound means no power. If the tester shows power, turn off the breaker again. Never skip this step. It confirms the area is safe to handle.
Identifying The Problem
Identifying the problem is the first step to fixing a broken light switch. Knowing the exact issue saves time and effort. It also helps avoid unnecessary repairs or replacements. Pay close attention to how the switch behaves. Notice any unusual sounds or feelings when you use it.
Common Issues With Light Switches
Light switches can fail in many ways. Sometimes the switch feels loose or wobbly. Other times, it may not click properly. The switch might spark or make a buzzing sound. Wiring inside can become worn or broken over time. Dirt and dust can also cause problems. Moisture can damage electrical parts, especially in bathrooms or kitchens.
Signs Of A Faulty Switch
A faulty switch may not turn the light on or off. Flickering lights can point to switch problems. You might notice a burning smell near the switch. The switch plate can feel warm or hot to touch. Lights staying dim or flickering frequently indicate issues. Sudden trips in the circuit breaker can also signal a bad switch.

Credit: powertechteam.com
Removing The Old Switch
Removing the old light switch is the first step in fixing it. Take your time and follow each part carefully. Safety is important, so make sure the power is off before starting. This will prevent any shocks or accidents while working with wires.
Unscrewing The Cover Plate
Use a screwdriver to remove the screws holding the cover plate. These screws are usually small and found at the top and bottom of the plate. Keep the screws safe so you can reuse them later. Gently pull the cover plate off the wall to expose the switch and wires.
Disconnecting Wires
Look closely at how the wires connect to the switch. Each wire is attached to a screw or inserted into a slot. Use a screwdriver to loosen the screws and free the wires. If the wires are pushed in, press the release tab or pull them out carefully. Keep the wires from touching each other or the wall.
Installing The New Switch
Installing the new switch is the next key step after removing the old one. This process requires care to ensure safety and proper function. Follow each step carefully to install your new light switch without trouble.
Connecting Wires Correctly
First, identify the wires by color and function. Typically, black or red wires carry power, and white wires are neutral. Attach each wire to the correct terminal on the new switch. Use a screwdriver to tighten screws firmly. Loose connections can cause flickering or failure.
Securing The Switch And Plate
Push the wired switch gently into the wall box. Align it with the screw holes. Screw the switch securely to the box, but do not overtighten. Place the cover plate over the switch. Screw it in place evenly for a clean look. Ensure the switch moves smoothly without resistance.
Testing The Repair
Testing the repair is a key step after fixing a broken light switch. It ensures the switch works safely and correctly. This step helps avoid future problems and keeps your home safe. Follow each step carefully to check your repair.
Restoring Power
First, turn the power back on at the circuit breaker. This supplies electricity to the switch. Stand clear of the switch as you restore power. Watch for any sparks or unusual sounds. If you see or hear anything strange, turn the power off immediately.
Checking Switch Functionality
Flip the switch on and off several times. The light should turn on and off smoothly. Listen for any buzzing or crackling noises. These sounds may mean a loose connection. If the light does not work, check your wiring again. Make sure all wires are tight and connected properly.
Troubleshooting Tips
Troubleshooting a broken light switch helps find the problem fast. Start by checking simple things. This saves time and effort. It also keeps you safe. Follow easy steps to see what went wrong. Many issues come from loose wires or power problems. Knowing what to check makes fixing easier.
What To Do If Switch Still Doesn’t Work
First, make sure the power is off before touching anything. Use a voltage tester to check the wires. Tighten any loose connections inside the switch box. Clean any dirt or dust around the switch. Replace the switch if it looks damaged or old. Test the switch again after fixing these issues. Sometimes, the problem hides inside the wall or circuit.
When To Call A Professional
Call a professional if the switch still does not work. If you see sparks or burn marks, stop immediately. Electrical work can be dangerous without the right tools. A licensed electrician knows how to fix complex problems safely. They can check the wiring and circuit breaker. Avoid risks by getting expert help when needed.
:max_bytes(150000):strip_icc()/wall-switch-troubleshooting-and-repair-1824662-03-a1ccda0cf1fa4683b714801ae678b90c.jpeg)
Credit: www.thespruce.com
Frequently Asked Questions
How Do I Safely Turn Off Power Before Fixing A Switch?
Always switch off the circuit breaker connected to the light switch. Use a voltage tester to confirm no power flows. This ensures your safety while repairing or replacing the switch.
What Tools Are Needed To Fix A Broken Light Switch?
You need a screwdriver, voltage tester, wire stripper, and replacement switch. These tools help you safely remove and install the new switch efficiently.
How Can I Tell If A Light Switch Is Broken?
Signs include flickering lights, no response when toggled, or a burning smell. These indicate the switch may be faulty and needs repair or replacement.
Can I Fix A Broken Switch Without Electrical Experience?
Basic repairs can be done by beginners if safety steps are followed. However, complex issues should be handled by a licensed electrician for safety.
Conclusion
Fixing a broken light switch is easier than you think. Safety comes first—always turn off the power before starting. Use simple tools and follow clear steps carefully. Taking your time helps avoid mistakes and keeps things safe. A working switch brings light and comfort back to your home.
Small repairs like this save money and build your confidence. Try it yourself and see how satisfying it feels. Light up your space with a quick, safe fix.