Are you tired of your motion sensor light staying on too long or turning off too quickly? Adjusting the timer on your motion sensor light switch can save you energy and make your home more convenient.
In this guide, you’ll learn simple steps to customize the timer settings so your lights work exactly how you want. Keep reading, and you’ll be able to take full control of your motion sensor lights in no time.
Types Of Motion Sensor Switches
Motion sensor light switches come in different types. Each type offers different features and settings. Knowing the type helps to adjust the timer correctly. This section explains the main types of motion sensor switches.
Basic Vs Advanced Models
Basic models detect motion and turn lights on or off. They have simple timer settings. Usually, the timer can be set from a few seconds to several minutes.
Advanced models offer extra features. They may include daylight sensors to avoid turning lights on during the day. Some allow precise timer adjustments and sensitivity controls. These models fit better in places needing custom settings.
Common Features
Most motion sensor switches share key features. They detect movement using infrared or ultrasonic sensors. They turn lights on automatically and off after no motion is detected.
Timers are adjustable in almost all models. Some switches allow setting the light-off delay from 10 seconds up to 30 minutes. Many include manual override options to keep the light on if needed.
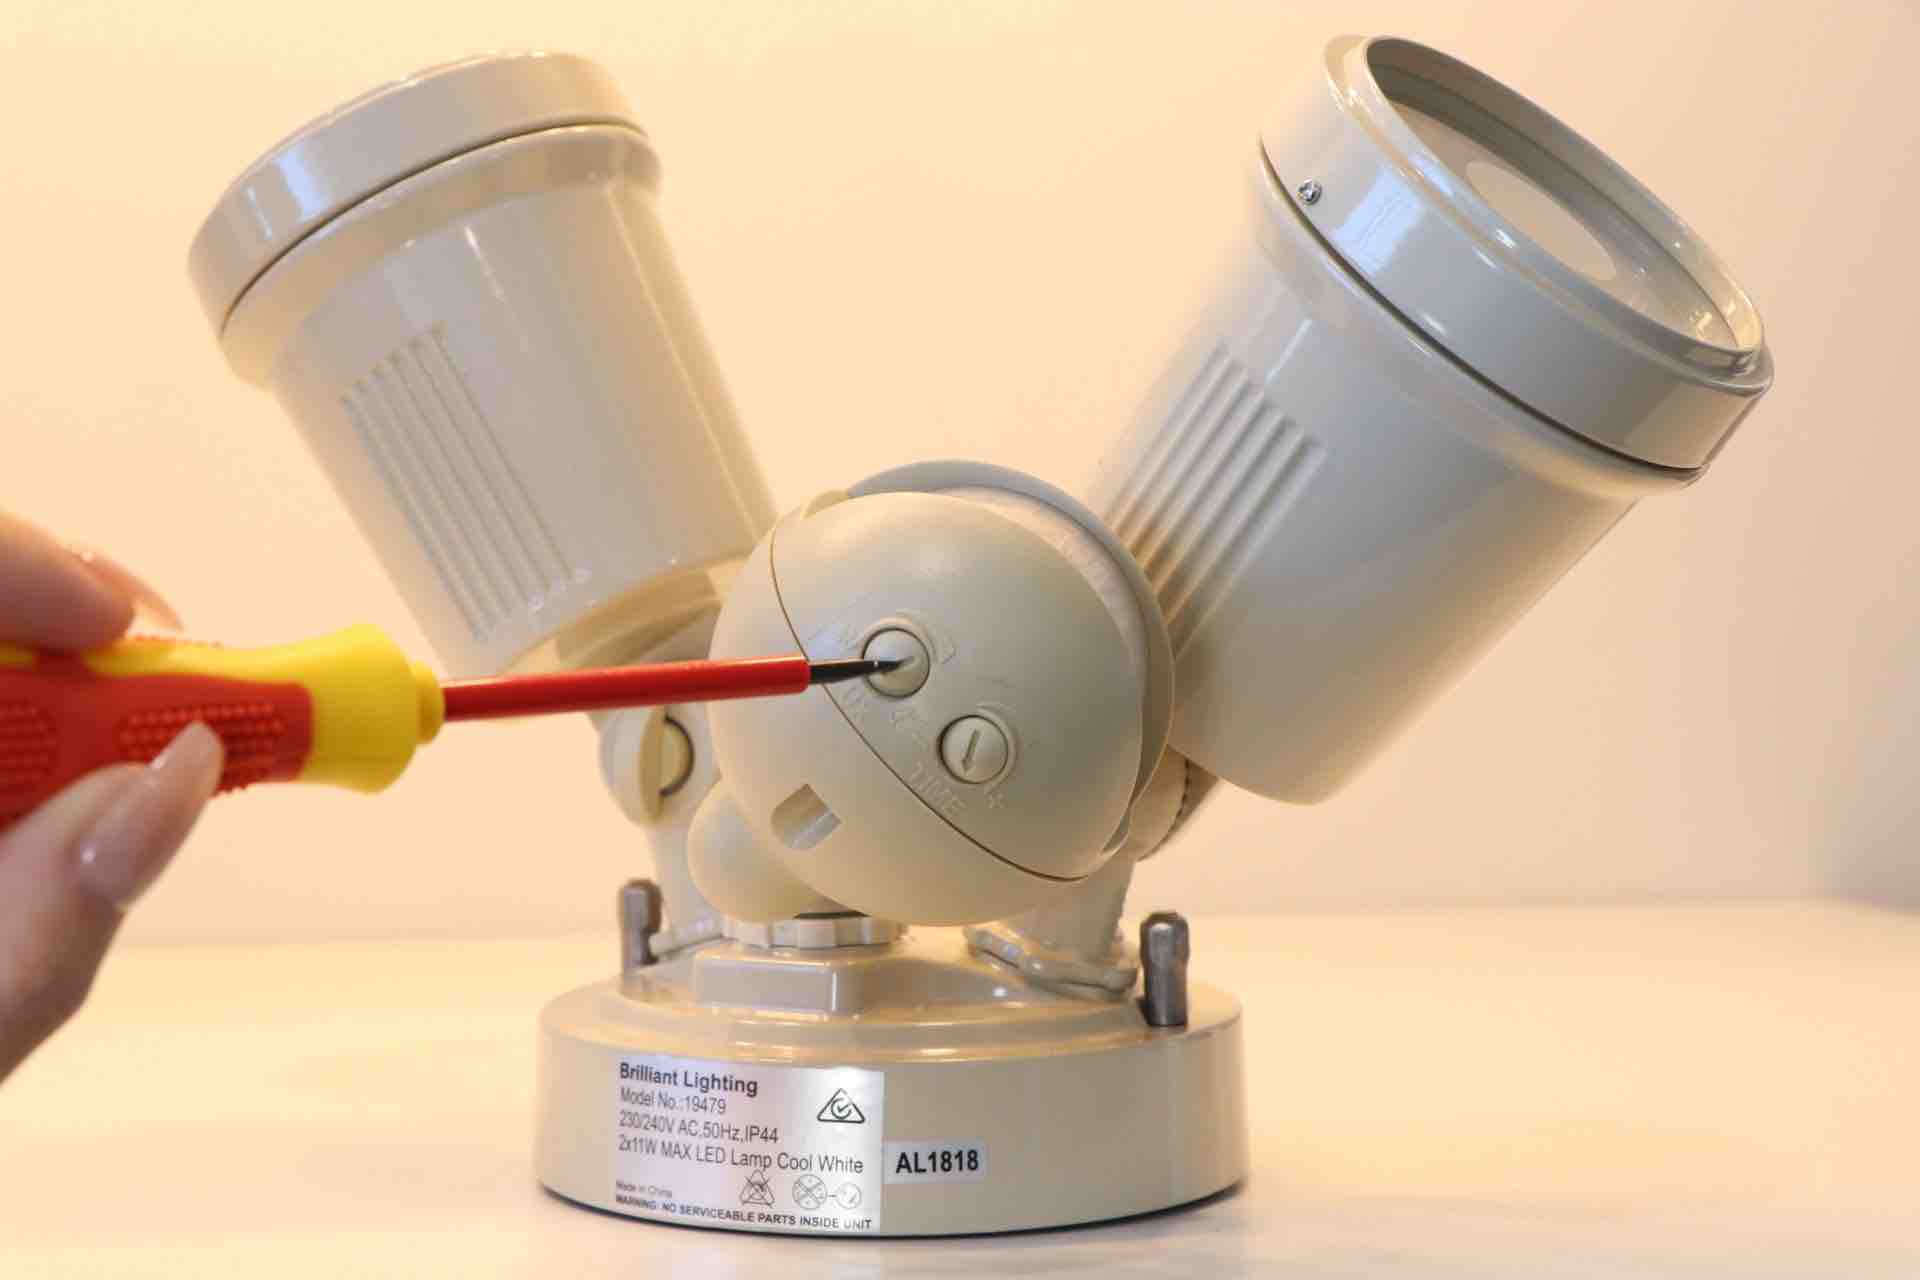
Credit: metro-electrical.com.au
Tools Needed For Adjustment
Adjusting the timer on a motion sensor light switch requires some basic tools. Having the right tools makes the process easier and safer. Preparing these tools before starting saves time and avoids frustration.
Essential Tools
You will need a flathead screwdriver to open the switch cover. A Phillips screwdriver might also be necessary for some models. A small flashlight helps to see inside dark electrical boxes. A voltage tester is important to check if the power is off. Finally, having a pair of insulated gloves adds extra protection during the work.
Safety Precautions
Always turn off the power at the circuit breaker before working on the switch. Use the voltage tester to confirm no electricity flows to the switch. Wear insulated gloves to avoid electric shocks. Work in a well-lit area to see clearly. Never touch wires with wet hands or tools.
Locating Timer Controls
Finding the timer controls on your motion sensor light switch is the first step to adjusting how long the light stays on. These controls allow you to set the delay time after motion stops. Knowing where to find them helps you change settings quickly and easily.
Timer controls vary by model, but most are easy to spot once you know where to look. Some are dials, others are buttons, and a few have small switches. Understanding their locations saves time and avoids guesswork.
Typical Control Positions
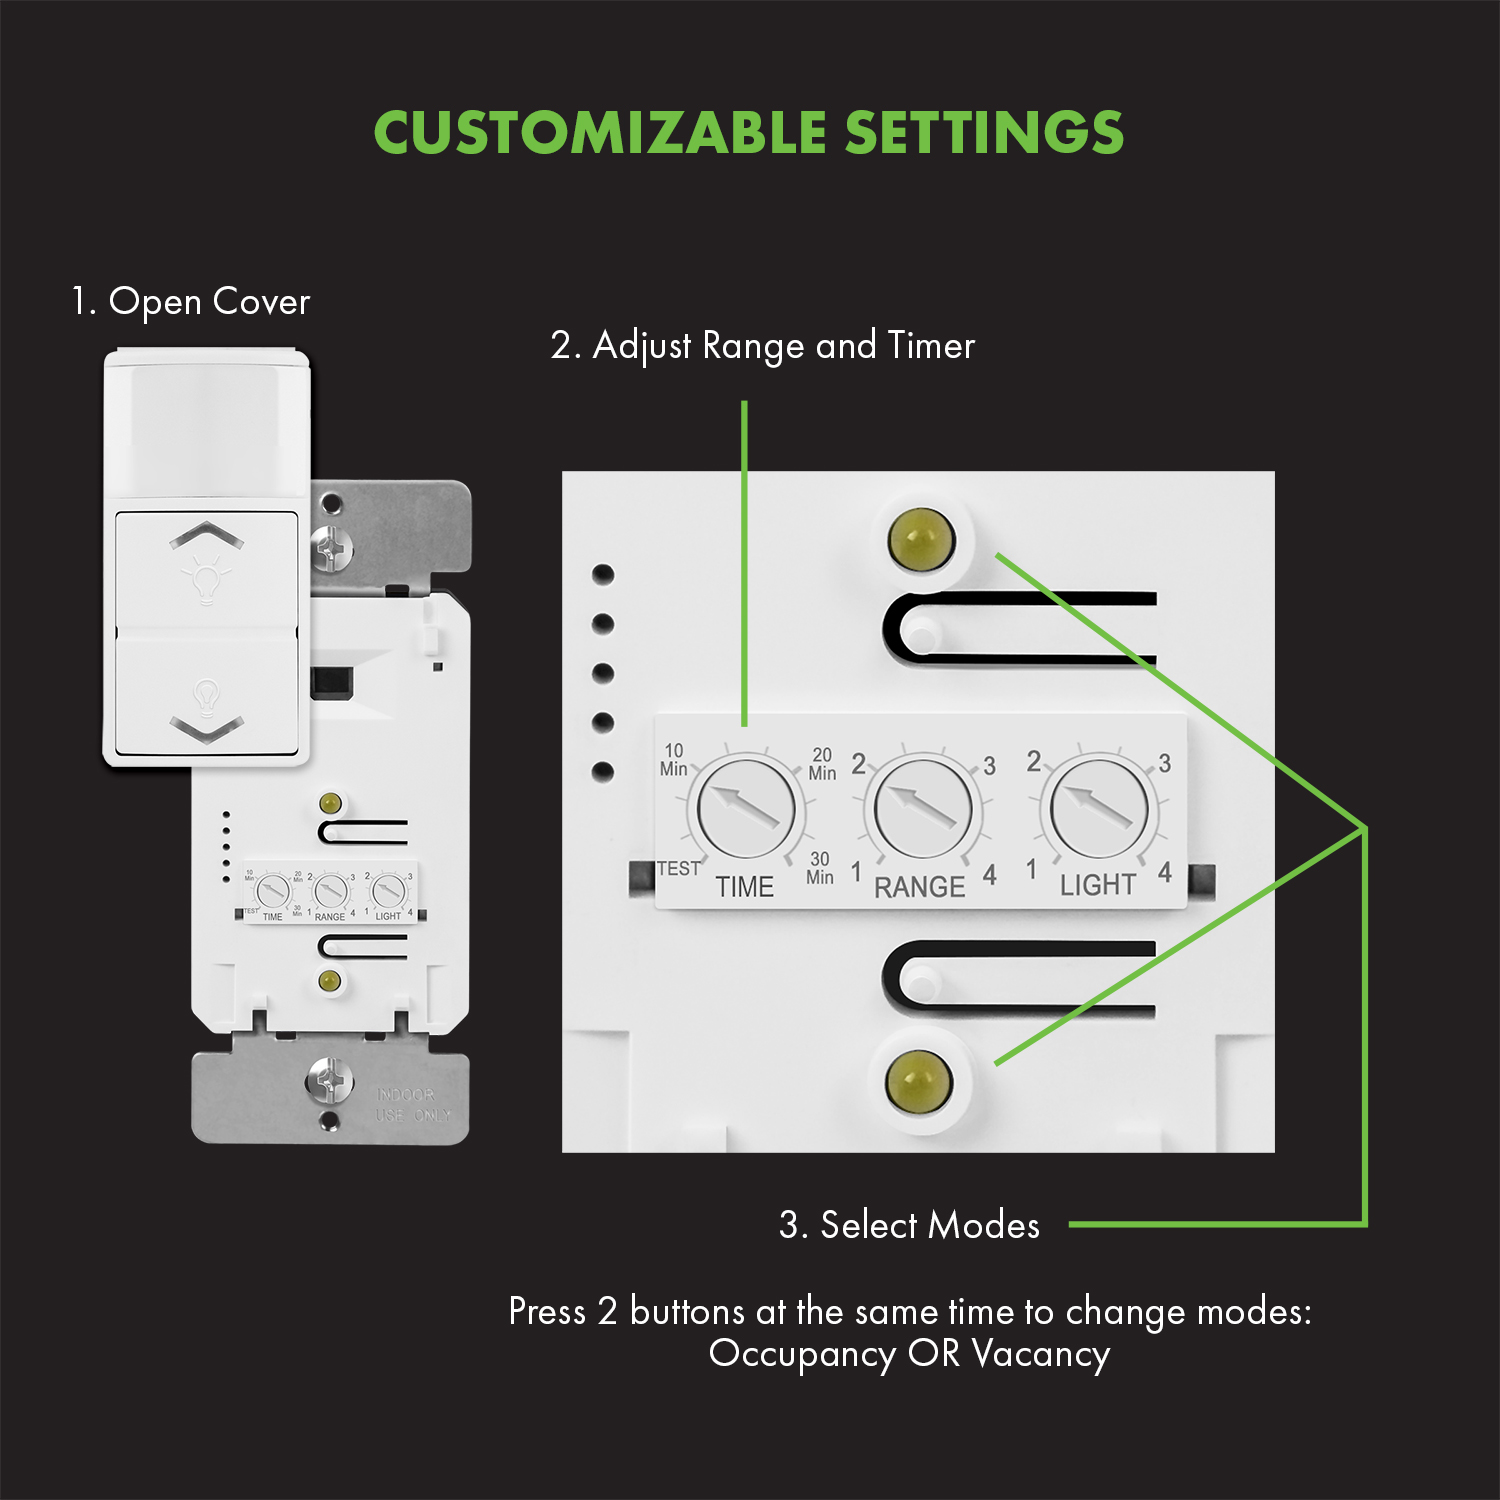
Timer controls often sit behind the switch cover plate. You might need to remove the plate to see them. Look inside the switch’s body or around its edges.
Sometimes, controls are on the front face of the switch. They appear as small knobs or buttons near the sensor. Other times, you may find them on the side or bottom of the switch unit.
Identifying Timer Dials And Buttons
Timer dials usually have numbers or time intervals marked around them. Turn the dial clockwise or counterclockwise to change the time. The scale might range from seconds to several minutes.
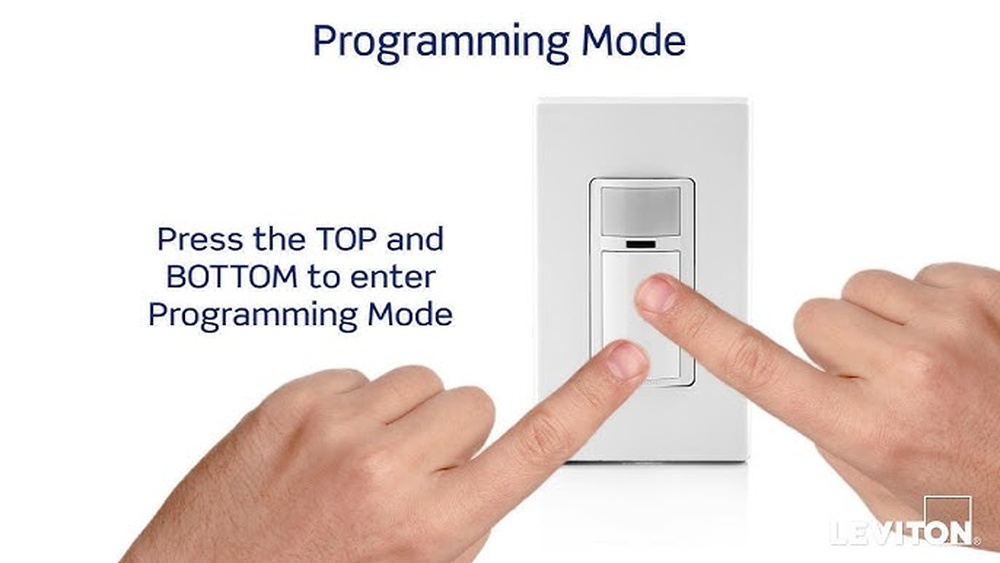
Buttons for timers often have labels like “Time,” “Delay,” or icons showing a clock. Press these buttons to cycle through preset time options. Some switches let you hold a button to set a custom timer.
Adjusting Timer Settings
Adjusting the timer settings on your motion sensor light switch helps control how long the light stays on. This saves energy and ensures the light works just the way you want. Understanding the timer settings allows you to customize the light duration for different needs.
Step-by-step Timer Adjustment
Start by locating the timer dial or buttons on the motion sensor switch. Some models have a small dial, while others use digital controls. Turn the dial or press the buttons to enter the timer setting mode. Adjust the timer by moving the dial or pressing the buttons until you reach the desired time. Test the light by triggering the sensor and watching how long the light stays on. Make small changes if the duration is too short or too long. Lock the setting by pressing the save or confirm button if your model requires it.
Setting Desired Duration
Choose the timer duration based on your space and use. For hallways, a shorter time like 30 seconds works well. For outdoor areas, set a longer duration around 5 minutes or more. Avoid setting the timer too short; the light may turn off before you finish moving. Too long a duration can waste energy. Adjust the timer to match your daily needs and activity patterns. This simple change improves safety and convenience in your home or office.
Testing The New Timer
Testing the new timer on your motion sensor light switch is important. It ensures the light stays on for the right amount of time. A proper test helps avoid wasting energy or leaving the light off too soon.
Follow these simple steps to check if your timer setting works well.
Simulating Motion Activation
Walk in front of the sensor to activate the light. Move slowly to let the sensor detect your motion. The light should turn on immediately after sensing you.
Stay in front of the sensor for a few seconds. Then, step away and watch the light. This simulates real use and helps test if the timer starts correctly.
Verifying Timer Accuracy
Use a stopwatch or timer on your phone. Start timing when the light turns on. Count the seconds until the light switches off.
Compare this time with your timer setting. They should match closely. Repeat the test several times to be sure the timer is reliable.

Credit: www.youtube.com
Troubleshooting Common Issues
Troubleshooting common problems with your motion sensor light switch can save time and effort. Most issues relate to timer settings or sensor sensitivity. Understanding these issues helps fix them quickly. This section covers two frequent problems and easy ways to solve them.
Timer Not Responding
Sometimes the timer does not change when you adjust it. First, check if the switch has power. A loose wire or tripped breaker may cause this.
Next, try resetting the switch. Turn off the power, wait a few seconds, then turn it on again. This can clear minor glitches.
Make sure you follow the instructions for setting the timer. Some switches require a button press or hold for several seconds.
If the timer still does not respond, the switch might be faulty. Contact the manufacturer or consider replacing the switch.
Light Stays On Too Long
The light staying on longer than desired is a common complaint. This often happens if the timer is set too high. Adjust the timer to a shorter time.
Check the sensor’s sensitivity. High sensitivity can cause the light to stay on after no movement is detected.
Clean the sensor lens. Dirt or dust can confuse the sensor and keep the light on.
Make sure no objects block the sensor or cause false triggers. Curtains or plants nearby may affect its operation.
Tips For Optimal Timer Use
Using the timer on your motion sensor light switch correctly helps save energy and adds convenience. Setting the timer right means the light stays on just long enough. Not too short, not too long. This section offers simple tips to get the best use from your timer settings.
Small changes to the timer can make a big difference in how well your light switch works for you. Adjustments depend on the room and your daily routines. Read on for easy ways to improve your timer use.
Adjusting For Different Environments
Rooms vary in size and use. A hallway needs a shorter timer than a living room. Set a short timer for small spaces to avoid wasting energy. For large rooms, increase the timer so the light stays on while you move around.
Consider how often people use the area. For busy rooms, a longer timer prevents the light from turning off too soon. In quiet spaces, keep the timer short. This saves power when no one is there.
Energy Saving Suggestions
Turn the timer down during daylight hours. Natural light reduces the need for artificial lighting. Use a lower timer setting at times when you use the room less.
Regularly check and adjust the timer as seasons change. Longer days mean less lighting is needed. Shorter days require a longer timer.
Combine your motion sensor light switch with energy-efficient bulbs. This lowers electricity use and extends bulb life. Together, they help reduce your energy bills.
Credit: topgreener.com
Frequently Asked Questions
How Do I Set The Timer On A Motion Sensor Switch?
To set the timer, locate the adjustment dial or buttons on the switch. Turn the dial or press buttons to increase or decrease the time duration. Most models allow timer settings from 10 seconds to 30 minutes or more. Refer to your switch’s manual for specific instructions.
Why Won’t My Motion Sensor Light Timer Adjust?
If the timer won’t adjust, check if the switch is locked or defective. Ensure power is on and the sensor is clean. Resetting the switch by turning off power temporarily may help. If problems persist, consult the manufacturer or replace the unit.
Can I Customize The Timer Duration For Different Rooms?
Yes, most motion sensor switches allow individual timer settings. Adjust the timer based on room usage and lighting needs. For example, set shorter times in bathrooms and longer times in hallways for optimal energy efficiency.
What Is The Typical Timer Range On Motion Sensor Switches?
Most motion sensor switches offer timer ranges from 10 seconds to 30 minutes. Some advanced models provide settings up to 1 hour. This flexibility helps conserve energy by tailoring light duration to user preferences.
Conclusion
Adjusting the timer on your motion sensor light switch is simple and quick. You control how long the light stays on after motion stops. This helps save energy and adds convenience to your space. Just follow the steps carefully, and test the settings to fit your needs.
Regularly checking the timer keeps your light working well. Enjoy the comfort and security your motion sensor light provides every day.