Is your front door deadbolt stuck, broken, or just in need of an upgrade? Removing it might seem tricky, but you don’t need to call a locksmith right away.
With the right steps, you can take it off yourself quickly and safely. In this guide, you’ll discover exactly how to remove your front door deadbolt without any hassle. Keep reading, and you’ll save time, money, and avoid frustration—all while gaining a useful skill for your home.
Ready to get started?
Tools Needed
Removing a front door deadbolt requires some basic tools. Having the right tools makes the job easier and faster. Gather these tools before you start. This way, you avoid delays or frustration during the process.
Screwdriver
A screwdriver is the main tool needed for this task. Most deadbolts use screws that a Phillips or flathead screwdriver can remove. Check the screws on your deadbolt to choose the correct type. A screwdriver with a comfortable handle helps with better grip and control.
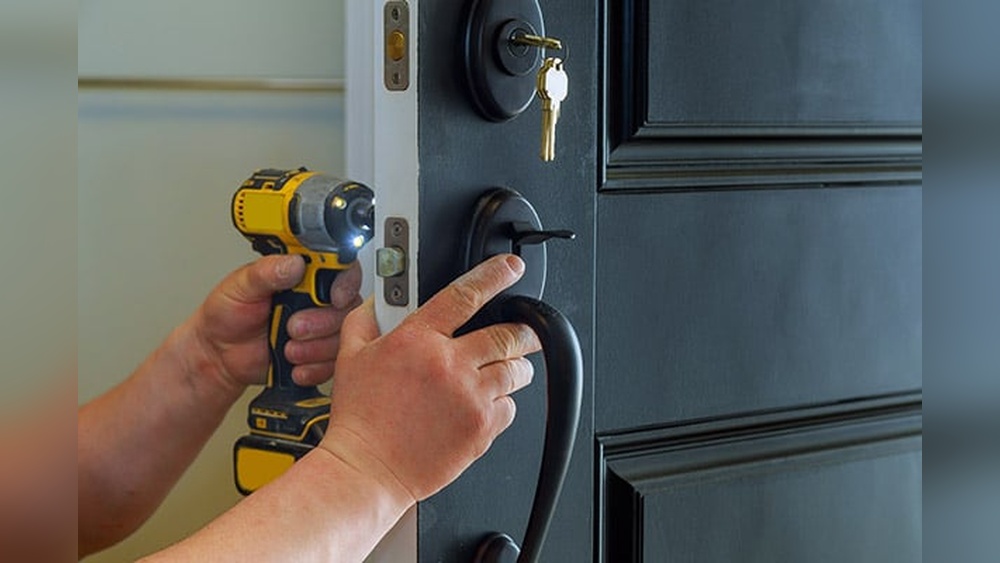
Drill
A drill can speed up the removal process. Use it to remove screws quickly or to drill out damaged screws. Choose a drill bit that fits the screw heads to avoid stripping them. A cordless drill offers more flexibility and ease of use.
Pliers
Pliers help grip and pull out stubborn parts. Use them to hold small pieces or to twist off stuck components. Needle-nose pliers are useful for tight spaces around the lock. They provide good control and leverage during removal.
Utility Knife
A utility knife helps cut through paint or caulk around the deadbolt. This makes removing the lock easier without damaging the door. Use it carefully to avoid scratches. Replace the blade if it becomes dull for clean cuts.
Safety Glasses
Safety glasses protect your eyes from metal shavings or dust. Wearing them prevents injury during drilling or prying. Choose glasses that fit comfortably and offer clear vision. Safety should always come first in any home project.

Credit: diy.stackexchange.com
Prepare The Door
Preparing the door is the first step in removing a front door deadbolt. It makes the process smooth and safe. Taking time to get the door ready helps avoid damage. This section explains how to prepare your door before starting.
Clear The Area Around The Door
Move any objects near the door. This gives you space to work freely. A clear area prevents accidents and allows easy tool access. Keep the floor free of clutter to avoid tripping.
Gather Necessary Tools
Collect tools like a screwdriver, drill, and flashlight. Having tools ready saves time. Check tool conditions to ensure they work well. Use the right size screwdriver for screws on the deadbolt.
Inspect The Door And Lock
Look closely at the door and deadbolt. Notice the type of screws used. Check if the lock is stuck or rusty. This helps plan the removal steps carefully.
Remove Nearby Decorations Or Fixtures
Take off wreaths, doorbells, or mats near the door. These items can get in the way. Removing them prevents damage during removal. Keep the workspace simple and clear.
Locate And Remove Screws
Locating and removing screws is the first important step to take out a deadbolt from your front door. The deadbolt is held tightly by screws on both sides of the door. These screws keep the lock secure and working well.
Finding these screws can be simple if you know where to look. Usually, the screws are under the thumb turn or the key cylinder. Removing them carefully will help you take off the deadbolt without damaging the door.
Identify Screw Locations On The Deadbolt
Look closely at both sides of the deadbolt. You will see small screws on the faceplates or the lock housing. These screws often sit near the edges of the lock. Sometimes, you may need to remove a cover plate first to see the screws clearly.
Use The Right Tools For Screw Removal
A screwdriver is needed to remove the screws. Most deadbolts use Phillips head screws. Use a screwdriver that fits the screw head well. This prevents slipping and damage to the screw or door.
Remove Screws Carefully And Keep Them Safe
Turn the screwdriver counterclockwise to loosen the screws. Remove each screw slowly to avoid stripping the heads. Place the screws in a small container to keep them safe for later use or replacement.
Remove The Interior Plate
Removing the interior plate is a key step to take out your deadbolt. This plate holds the lock mechanism on the inside of your door. Taking it off gives you access to the screws and parts that keep the deadbolt in place.
Handle the plate gently to avoid damage. This process is simple and takes only a few minutes. Follow the steps carefully to make sure you do it right.
Locate The Screws On The Interior Plate
First, find the screws holding the plate. They are usually visible on the inside part of the door. Use a flashlight if the area is dark. These screws keep the plate firmly attached.
Use The Right Screwdriver
Choose a screwdriver that fits the screws well. A wrong size can strip the screw head. Most deadbolts use a Phillips head screwdriver. Check the screws before starting.
Remove The Screws Carefully
Turn the screwdriver counterclockwise to loosen the screws. Remove each screw one by one. Keep the screws in a safe place for later use. Avoid dropping them inside the door.
Gently Pull Off The Interior Plate
Once screws are out, pull the plate away from the door. It may need a little wiggle to come off. Do not force it hard to avoid damage. Set the plate aside safely.
Extract The Deadbolt Mechanism
Extracting the deadbolt mechanism is the key step in removing your front door deadbolt. This part controls the locking and unlocking action. Removing it lets you replace or fix the lock easily.
Work slowly and carefully to avoid damaging the door or lock. Tools like a screwdriver and pliers may help. Follow the simple steps below to get the deadbolt mechanism out.
Remove The Screws Holding The Deadbolt
Find the screws on the edge of the door where the deadbolt sits. Use a screwdriver to take out all screws. Keep the screws safe for later use.
Pull Out The Deadbolt From The Door Edge
Once screws are removed, gently pull the deadbolt out of the door. Wiggle it slightly if stuck. Avoid using too much force to protect the door frame.
Detach The Interior And Exterior Parts
Separate the inside and outside lock components. They usually come apart easily after removing the deadbolt. Check for any hidden screws and remove them if needed.
Inspect The Deadbolt Mechanism
Look at the mechanism for dirt or damage. Clean it if dirty or replace it if broken. This ensures smooth operation when you reinstall or replace the lock.

Credit: www.reddit.com

Credit: www.reddit.com
Frequently Asked Questions
How Do I Remove A Front Door Deadbolt Lock?
To remove a front door deadbolt, first unscrew the interior plate. Next, pull out the lock cylinder and latch mechanism carefully. Finally, remove the screws holding the latch in place and take out the deadbolt.
What Tools Are Needed To Remove A Deadbolt Lock?
You will need a screwdriver (usually Phillips), a flathead screwdriver, and optionally pliers. These tools help remove screws, pry off plates, and extract the lock components safely.
Can I Remove A Deadbolt Without The Key?
Yes, but it is harder. Remove the interior screws and the lock cylinder carefully. Use a flathead screwdriver to disengage the latch. This method works if you don’t have the key but access the lock from inside.
How Long Does It Take To Remove A Front Door Deadbolt?
Removing a deadbolt typically takes 10 to 20 minutes. Time depends on your experience and the lock type. Proper tools and clear steps make the process quicker and easier.
Conclusion
Removing a front door deadbolt is easier than it seems. Follow the steps carefully and take your time. Use simple tools and keep safety in mind. You can do it yourself without extra help. After removal, check the door for any damage.
This way, your door stays secure and looks good. Try these tips for a smooth deadbolt removal experience. You will feel confident with your new skills.


