Are you tired of struggling to find a nearby outlet for your devices? Adding an outlet next to a light switch can be a game-changer for your room’s convenience.
Imagine plugging in your phone charger, lamp, or other gadgets without hunting for an available socket. In this guide, you’ll discover simple, step-by-step instructions to safely install an outlet right where you need it. Keep reading, and you’ll be surprised how easy it is to upgrade your space and make your daily life smoother.
Tools And Materials Needed
Adding an outlet next to a light switch needs the right tools and materials. Having everything ready makes the task easier and safer. Below is a list of items you will need.
Essential Tools
- Voltage tester to check power safety
- Wire stripper to remove insulation
- Screwdriver set for screws and terminals
- Drill with bits for making holes
- Measuring tape to measure distances
- Utility knife for cutting wires and drywall
- Level to ensure straight installation
- Fish tape to pull wires through walls
Required Materials
- Electrical outlet (receptacle) suitable for your needs
- Outlet wall box for mounting the outlet
- Electrical wire, typically 14/2 or 12/2 gauge
- Wire nuts for safe wire connections
- Electrical tape for extra insulation
- Wall plate cover for a clean finish
- Cable clamps to secure wires inside the box
Credit: www.reddit.com
Safety Precautions
Working with electricity can be risky. Safety must be the first step before adding an outlet next to a light switch. Follow these safety precautions to protect yourself and your home.
Turning Off Power
Turn off the power at the main breaker panel. This stops electricity from flowing to the switch and outlet area. Double-check that the breaker for the room is off. Never work on live wires. This simple step prevents serious shocks and injuries.
Using A Voltage Tester
Use a voltage tester to check if wires still carry electricity. Test all wires in the box before touching them. The tester lights up or beeps if voltage is present. This tool confirms the power is off. Always trust the tester over your eyes or guesses.
Planning The Outlet Location
Planning the outlet location is a key step before starting any electrical work. It ensures safety and convenience. This step helps avoid costly mistakes and saves time. Careful planning also ensures the outlet meets your needs and local codes.
Choosing The Spot
Pick a spot near the light switch that is easy to reach. The outlet should not block any switches or doors. Make sure it fits well with your room layout. Avoid placing the outlet too close to water sources. Keep a safe distance from sinks and bathtubs. Think about what devices you will plug in. The spot should be handy for everyday use.
Checking Wiring Accessibility
Check if wires are easy to access behind the switch. This reduces the need to cut walls or use extra materials. Use a voltage tester to find live wires safely. Make sure the existing wiring can handle the extra outlet. Avoid overloading circuits to prevent hazards. Plan how to run wires neatly and safely. Confirm that the wiring meets local electrical codes. This step helps ensure your work is safe and legal.
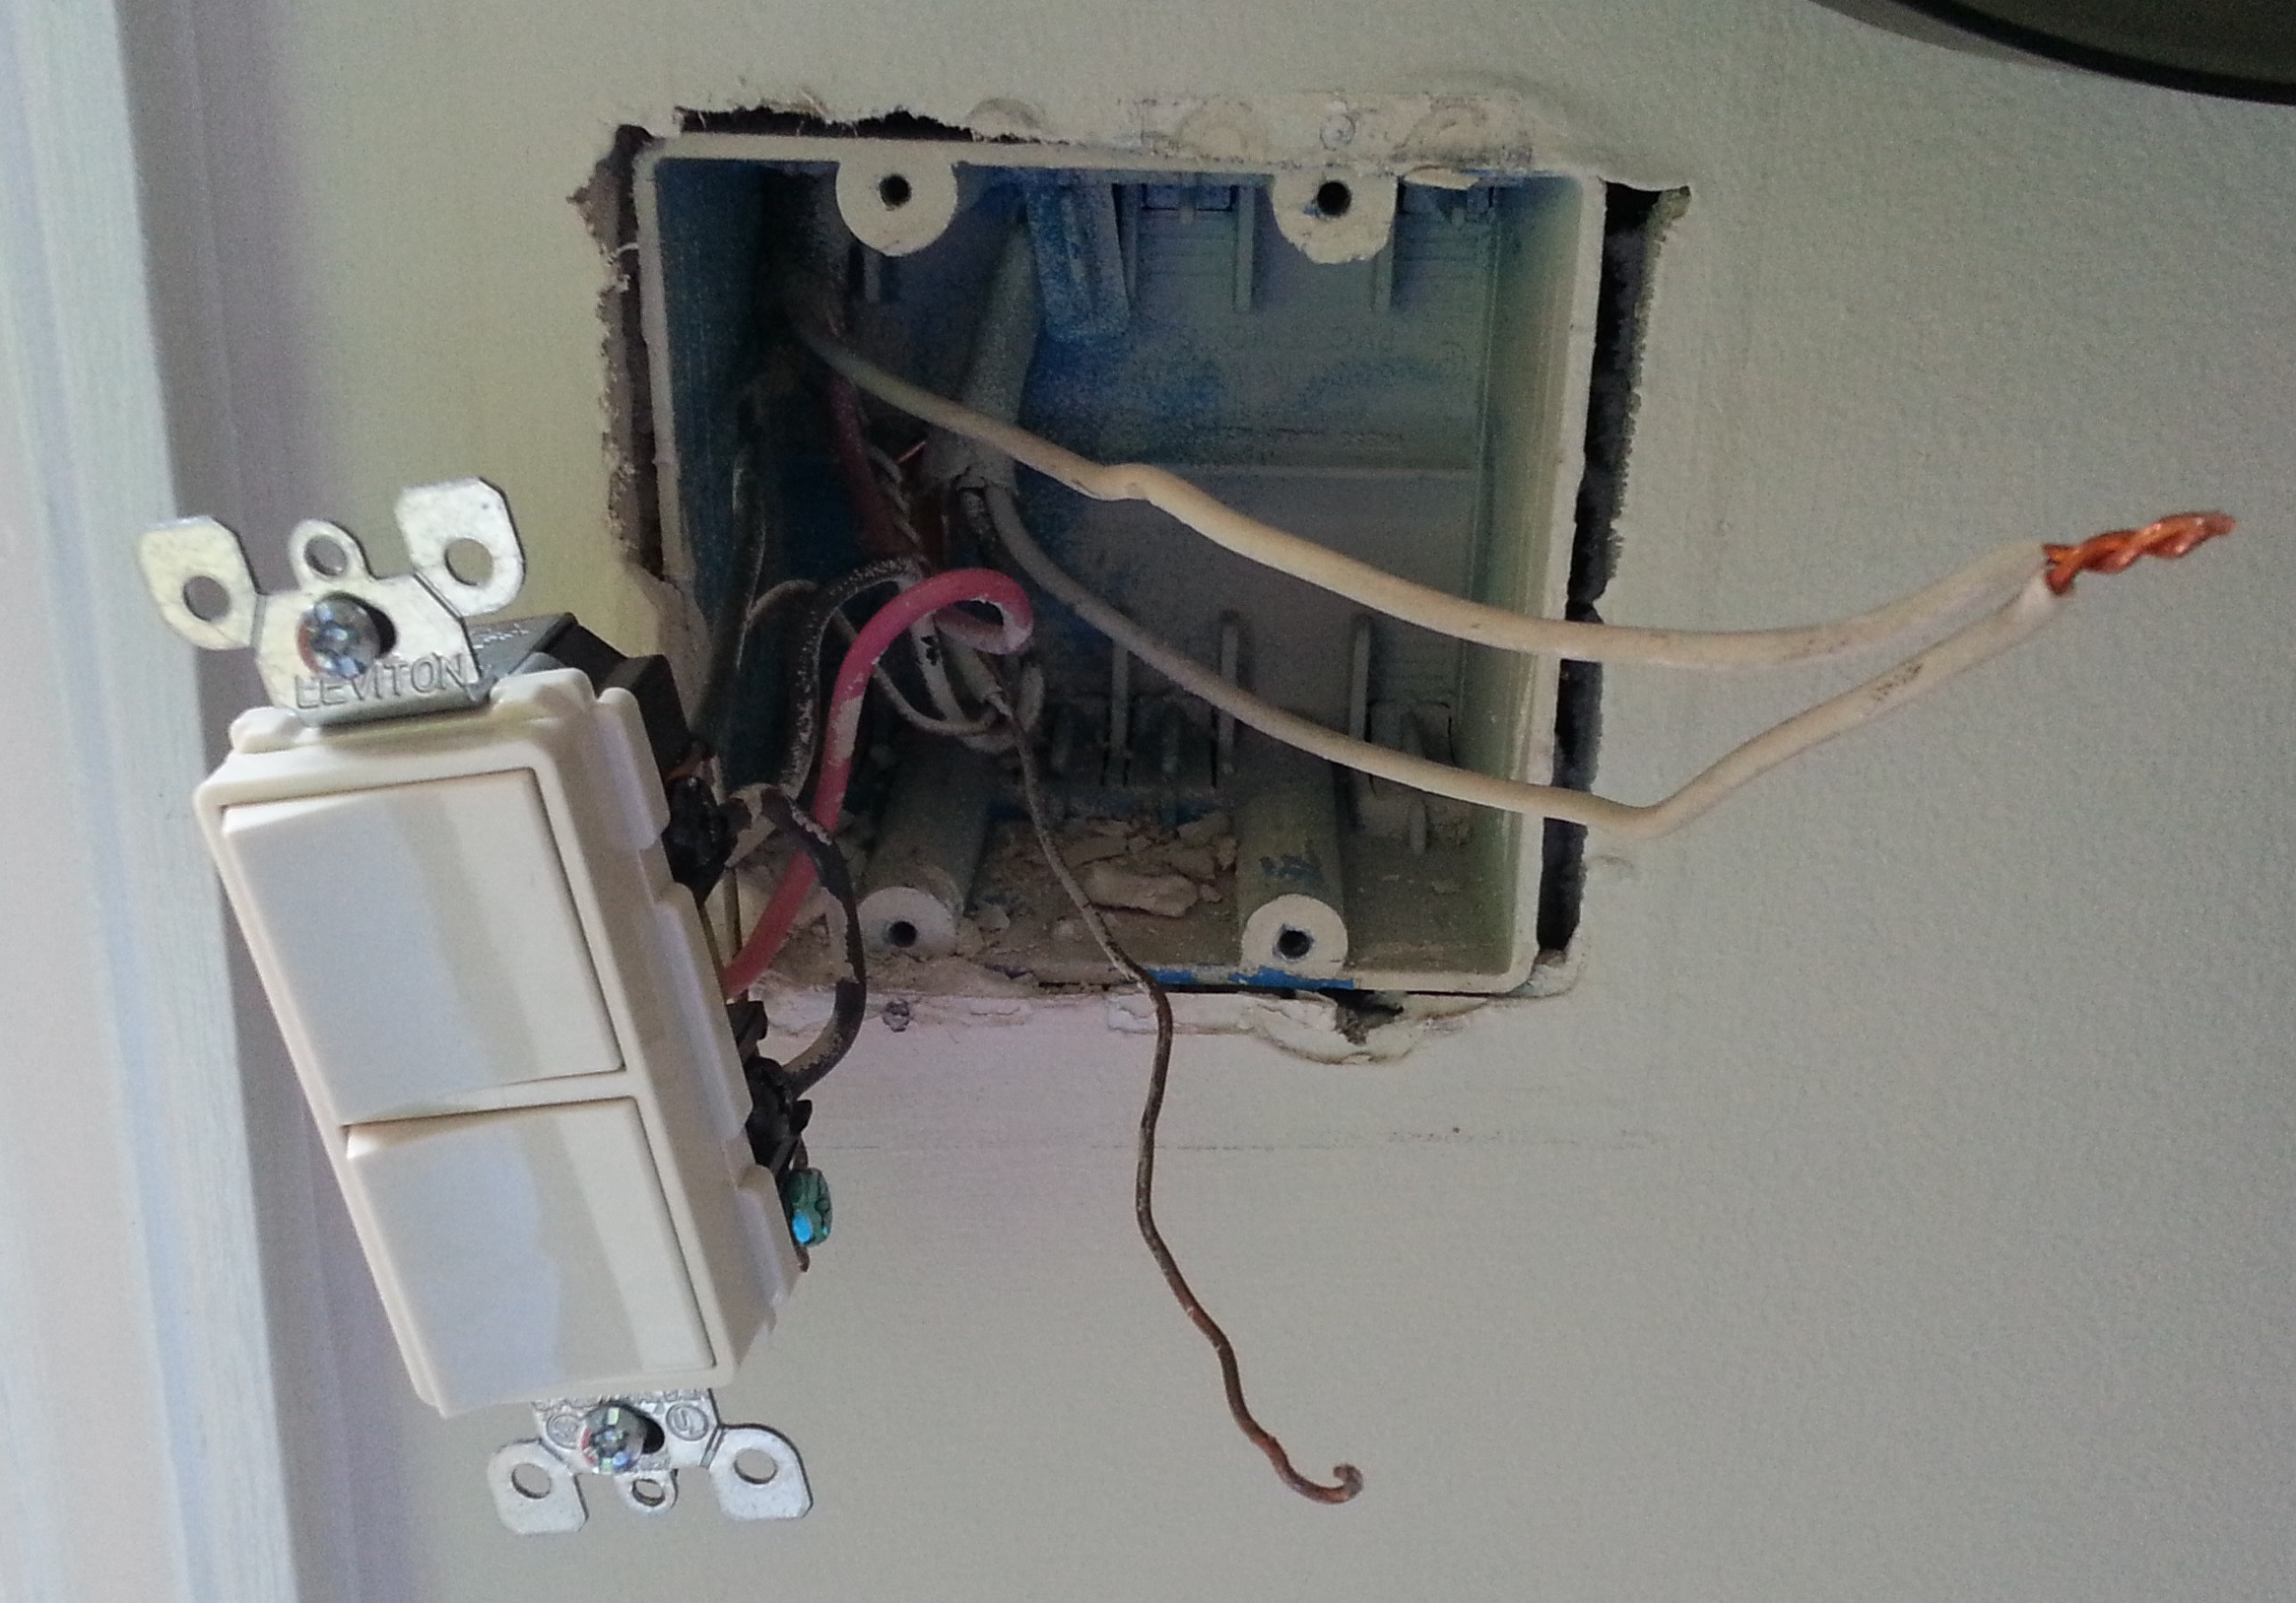
Removing The Light Switch Cover
Removing the light switch cover is the first step in adding an outlet next to a switch. This step lets you see the wiring behind the switch. It also makes the area safe to work on. Always turn off the power from the breaker before starting. This prevents electric shocks and keeps you safe.
Gather The Right Tools
Start by collecting tools you need. Usually, a screwdriver works best. Most switch covers use a flathead or Phillips screwdriver. Having a flashlight helps if the area is dark. Keep a small container for screws. This stops losing them during work.
Unscrew The Cover Plate
Use the screwdriver to remove screws on the cover plate. Turn screws counterclockwise. Keep gentle pressure to avoid stripping the screws. Remove all screws before pulling the cover. If screws are stuck, apply slight extra force carefully.
Remove The Cover Plate
After unscrewing, pull the cover plate away from the wall. It should come off easily. If it sticks, wiggle it gently. Do not force it hard to avoid damage. Set the cover plate and screws aside safely.
Inspect The Switch And Wiring
With the cover removed, check the switch and wires. Look for loose or damaged wires. Make sure the wires are connected tightly. Tight connections help prevent electrical problems. This step prepares you for installing the new outlet.
Running The Electrical Wire
Running the electrical wire is a key step in adding an outlet next to a light switch. This process allows power to flow safely to the new outlet. Careful handling of the wire protects your home and ensures the outlet works well. Understanding how to run the wire inside the wall is important. It takes patience and the right tools.
Fishing Wire Through The Wall
Start by turning off the power to the circuit. Use a fish tape or a wire coat hanger to guide the wire. Insert the tape through the hole in the switch box. Push the tape carefully through the wall cavity toward the outlet box location. Pull the electrical wire through the wall using the tape. Avoid sharp bends or kinks to keep the wire intact. Make sure the wire reaches both the switch and outlet boxes easily.
Securing The Wire
Once the wire is in place, secure it to the wall studs. Use wire staples or cable clamps every 12 to 16 inches. Do not pinch or damage the wire insulation. Leave some slack near the boxes for easy connections. Securing the wire prevents movement and reduces wear over time. This step helps keep your wiring safe and code compliant.
Installing The New Outlet Box
Installing the new outlet box is a key step to add an outlet next to a light switch. It requires careful work to ensure safety and proper function. This step includes cutting the drywall and mounting the box securely.
Cutting The Drywall
Start by marking the spot for the new outlet box. Use the old switch box as a guide for height and alignment. Trace the outline of the new box on the drywall. Use a drywall saw or utility knife to cut along the lines. Cut carefully to avoid damaging wires behind the wall. Remove the drywall piece gently to make space for the box.
Mounting The Box
Choose a box that fits the outlet and the wall thickness. Insert the box into the cut hole. Use the built-in clamps or screws to secure the box to the wall studs. Make sure the box sits flush with the wall surface. Tighten the screws firmly but avoid cracking the drywall. Check if the box is stable and does not move.
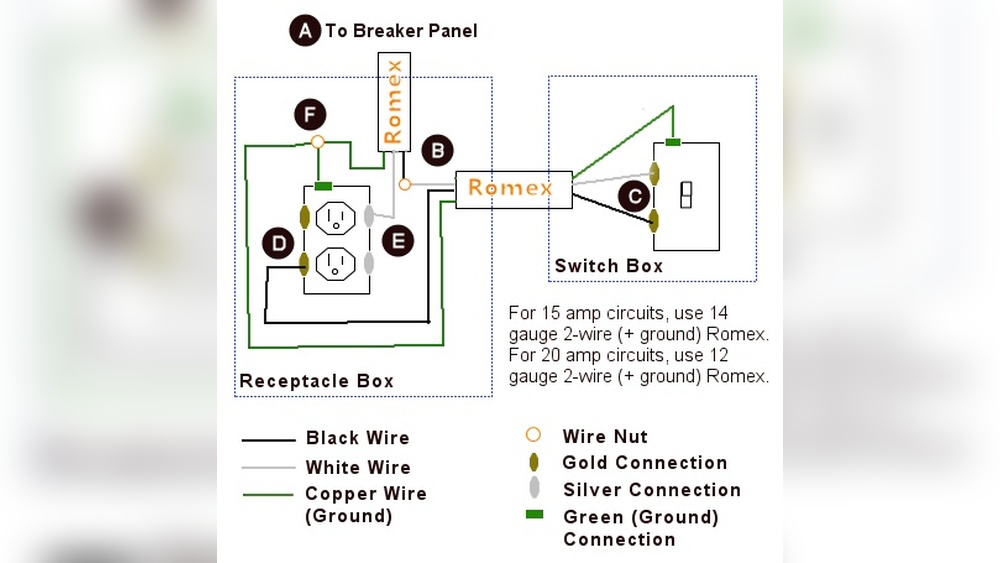
Wiring The Outlet
Wiring the outlet is a key step to safely add power next to your light switch. This process involves connecting the wires properly and making sure the outlet is grounded. Correct wiring ensures the outlet works well and prevents electrical hazards.
Take your time and follow each step carefully. Double-check every connection before finishing. Safety is the top priority when working with electricity.
Connecting Wires To The Outlet
Start by identifying the wires: hot, neutral, and ground. The hot wire is usually black or red. The neutral wire is white. The ground wire is green or bare copper.
Attach the hot wire to the brass-colored screw on the outlet. Connect the neutral wire to the silver-colored screw. Tighten the screws securely. Avoid loose connections to prevent sparks or shorts.
Use wire strippers to expose about half an inch of wire. Make sure no insulation is under the screw. Wrap the wire clockwise around the screw for a tight grip.
Grounding The Outlet
Grounding is vital for safety. It helps prevent electric shocks and protects your devices. Connect the ground wire to the green grounding screw on the outlet.
If your outlet box is metal, also attach the ground wire to the box. Use a grounding clip or screw for this. Check that all ground connections are firm and secure.
Ground wires carry electricity safely into the earth during faults. Never skip grounding when wiring an outlet.
Reassembling And Testing
After wiring the new outlet next to the light switch, the next step is reassembling and testing. This step ensures the outlet works safely and correctly. Take your time to follow each task carefully.
Replacing Covers
First, place the outlet and switch back into the electrical box. Use a screwdriver to secure them tightly. Then, attach the cover plates over the outlet and switch. This protects the wiring and gives a clean look. Make sure the covers fit well and do not move.
Turning Power Back On
Go back to the circuit breaker panel. Switch the breaker back on to restore power to the outlet and switch. Check that the correct breaker is on. Never skip this step before testing the outlet.
Testing The Outlet
Use a plug-in outlet tester or a small device like a lamp to check the outlet. Plug the device into the outlet. If it powers on, the outlet works. If not, turn off the breaker again and check wiring. Testing confirms your work is safe and functional.
Troubleshooting Common Issues
Adding an outlet next to a light switch can be very useful. Sometimes, small problems can stop your work. This section helps you fix common issues easily. Follow simple steps to solve these problems fast.
Check Power Supply To The Outlet
First, make sure power is off before testing. Use a voltage tester to check wires. No power means a loose connection or tripped breaker. Reset the breaker or tighten wires to restore power.
Identify Incorrect Wiring
Incorrect wiring causes the outlet not to work. Match wire colors: black or red for hot, white for neutral, green or bare for ground. Reconnect wires correctly for safe operation.
Replace Faulty Switch Or Outlet
Sometimes, the switch or outlet is damaged. Look for cracks or burn marks. Replace any broken parts with new ones. Use matching voltage and amperage ratings.
Check For Loose Connections
Loose wires cause flickering or no power. Tighten all screws and wire nuts. Make sure wires are secured under terminal screws.
Test The Gfci Or Circuit Breaker
A tripped GFCI or breaker stops power flow. Press the reset button on the GFCI outlet. Flip the breaker off and on again. This often restores power to the new outlet.
Credit: diy.stackexchange.com

Credit: www.youtube.com
Frequently Asked Questions
How Do I Safely Add An Outlet Next To A Light Switch?
Turn off power at the breaker before starting. Use a voltage tester to confirm no electricity flows. Follow local electrical codes and use proper tools. If unsure, hire a licensed electrician to ensure safety and compliance.
Can I Use The Existing Switch Box For A New Outlet?
Yes, if the box is large enough to fit additional wiring and the outlet device. Check local codes for box size requirements. Use a combination switch/outlet device if space is limited.
What Wiring Is Needed To Add An Outlet Next To A Switch?
Typically, use 14/2 or 12/2 NM cable with ground. Connect black (hot), white (neutral), and bare copper (ground) wires properly. Ensure the circuit can handle the added load to avoid tripping breakers.
Do I Need A Permit To Add An Outlet Next To A Switch?
Permit requirements vary by location. Many areas require permits for electrical modifications. Check with your local building department before starting. Obtaining a permit ensures work meets safety standards.
Conclusion
Adding an outlet next to a light switch can be simple and useful. Always turn off power before starting work. Use the right tools and follow safety steps closely. Check local rules to stay safe and legal. This small upgrade adds convenience to any room.
Take your time and work carefully. Soon, you will have a new outlet ready to use.