Have you ever wished you could replace that switched outlet with a ceiling light to brighten up your room? Converting a switched outlet to a ceiling light might sound tricky, but with the right steps, you can do it yourself—and save both time and money.
Imagine turning that unused outlet switch into a stylish overhead light that transforms your space instantly. In this guide, you’ll discover exactly how to make this change safely and easily. Keep reading, and by the end, you’ll have the confidence to upgrade your lighting like a pro.
Tools And Materials Needed
Before starting to convert a switched outlet to a ceiling light, gather the right tools and materials. Having everything ready saves time and makes the work safer. This project needs some basic electrical tools and parts. Knowing what to use helps avoid mistakes and ensures a smooth process.
Essential Tools
You will need a voltage tester to check power. A wire stripper helps remove insulation from wires. Screwdrivers, both flathead and Phillips, are required for screws. Pliers help bend and twist wires easily. A drill might be necessary to make new holes for mounting.
Required Materials
Get a ceiling light fixture that fits your room style. Use electrical wire rated for lighting circuits. Wire nuts connect wires safely. Electrical tape adds extra protection to wire joints. A new ceiling electrical box may be needed to hold the light fixture securely.
Safety Gear
Wear insulated gloves to protect from electric shocks. Safety goggles prevent debris from entering your eyes. Use a sturdy ladder to reach the ceiling safely. Have a flashlight ready in case of power off. Make sure the power is off before starting any work.
Safety Precautions
Always turn off the power at the breaker before starting any electrical work. Use a voltage tester to make sure wires are not live. Wear gloves and follow local electrical codes for safety.
Turn Off Power At The Circuit Breaker
Safety starts with cutting off electricity. Switch off the power at the circuit breaker. Do not rely on the outlet switch alone. Use a voltage tester to confirm no power flows to the outlet. This step prevents electrical shocks and accidents.
Use Proper Tools And Equipment
Select insulated tools designed for electrical work. Avoid using damaged or worn tools. Wear rubber-soled shoes to reduce shock risk. Have a flashlight ready to see clearly in dark spaces. Prepare all materials before starting the job.
Understand Wiring And Connections
Know the difference between live, neutral, and ground wires. Label wires before disconnecting to avoid confusion. Follow wiring diagrams specific to your home setup. Never guess the wire function. Mistakes can cause short circuits or fires.
Work In A Dry Environment
Wet conditions increase electric shock danger. Ensure the work area is dry and well-lit. Avoid working during rain or high humidity. Keep your hands dry at all times. Safety improves with a clean, dry workspace.
Ask For Help If Unsure
Electrical work can be risky. If unsure, consult a licensed electrician. Do not proceed with tasks beyond your skills. Safety depends on knowledge and caution. Professional help prevents costly mistakes and injuries.
Locate The Switched Outlet Wiring
Locating the switched outlet wiring is the first important step. You must find the wires controlling the outlet before changing it to a ceiling light. This helps ensure safety and a smooth installation process.
Knowing where the wires connect helps you understand how power flows. It also shows how the switch controls the outlet. Careful checking prevents mistakes and damage to your home wiring.
Turn Off The Power
Always turn off the power at the circuit breaker. This stops electricity from flowing while you work. Use a voltage tester to confirm the outlet is not live.
Remove The Outlet Cover And Outlet
Unscrew the outlet cover plate carefully. Then, pull the outlet out of the box gently. This reveals the wires connected to the outlet.
Identify The Switched Wires
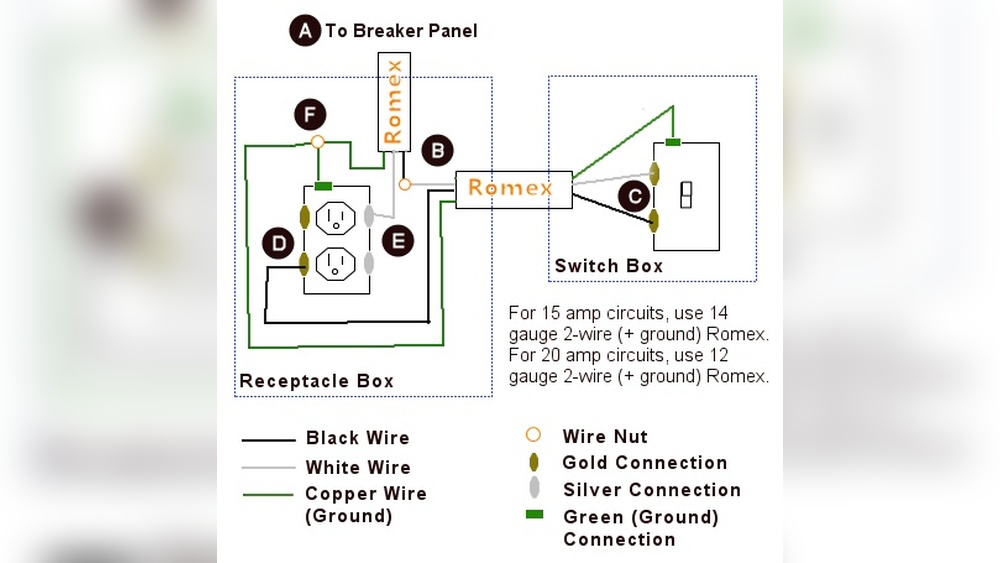
Look for the black (hot) wire controlled by the switch. Usually, it is connected to a screw on the outlet. The white wire is neutral, and the ground wire is bare or green.
Trace Wires To The Switch
Open the switch box to check wiring. Confirm which wire runs from the switch to the outlet. This confirms the switch controls the outlet power.
Label The Wires
Use tape and a marker to label each wire. This helps during the new light fixture installation. Clear labels prevent confusion and wiring errors.

Credit: www.reddit.com
Turn Off Power And Test
Turning off power and testing is the first step before any electrical work. This step keeps you safe from electric shocks. It also prevents damage to your home’s wiring.
Never start without cutting the electricity at the breaker box. This stops current flow to the outlet you want to change. Safety is the top priority in this project.
Turn Off Power At The Circuit Breaker
Find your home’s circuit breaker panel. Switch off the breaker that controls the outlet. This stops electricity from reaching the outlet. Double check you turned off the right breaker.
Use A Voltage Tester To Confirm
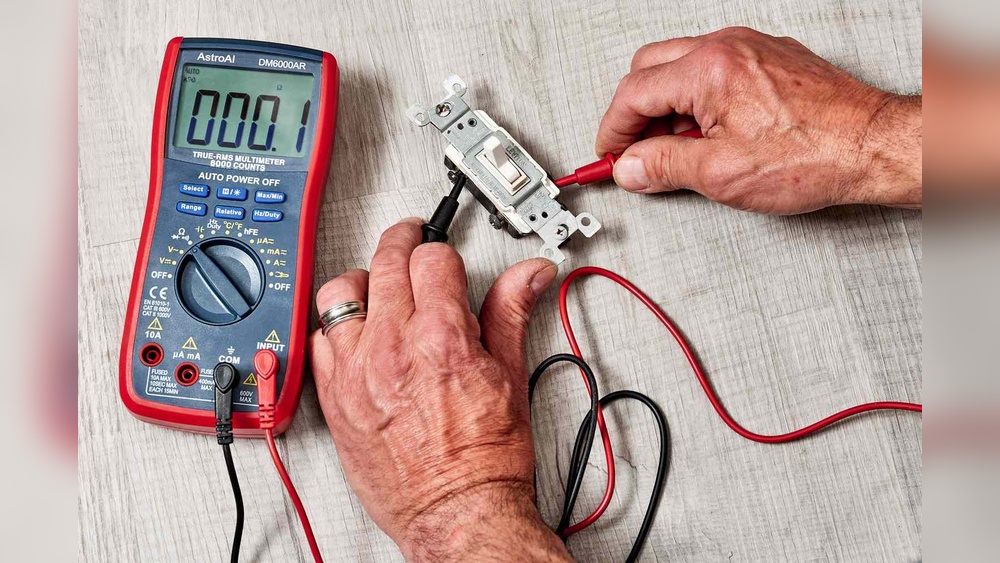
Pick up a non-contact voltage tester. Place it near the outlet wires. If the tester does not light up, power is off. Test all wires to be sure. This step ensures your safety.
Double Check Before You Begin
Plug in a lamp or device to the outlet. Turn on the wall switch for the outlet. The device should not work. This final check shows no power flows to the outlet.
Remove The Switched Outlet
Removing the switched outlet is the first step to convert it into a ceiling light. This step prepares the wiring and space for the new fixture. Proper removal ensures safety and a smooth installation process.
Turn Off The Power
Switch off the circuit breaker that controls the outlet. Confirm the power is off with a voltage tester. Never work on live wires to avoid electric shock.
Remove The Outlet Cover
Use a screwdriver to take off the outlet cover plate. Set the screws and cover aside safely. This exposes the outlet and wiring.
Unscrew And Pull Out The Outlet
Unscrew the outlet from the electrical box. Gently pull the outlet out to see the wires behind. Be careful not to damage the wires.
Note The Wiring Setup
Look closely at how the wires connect to the outlet. Take a photo or draw a sketch for reference. This helps during the ceiling light installation.
Disconnect The Wires
Loosen the screws holding the wires on the outlet. Carefully remove each wire from the terminals. Keep the wires separate and untangled.
Remove The Electrical Box (if Needed)
Some setups require removing the outlet box. Unscrew the box from the wall or ceiling frame. Ensure the box suits the ceiling light fixture.
Plan The Ceiling Light Installation
Planning the ceiling light installation is an important step before starting any electrical work. It helps avoid mistakes and saves time. Understanding the space and wiring setup makes the process smoother. Taking time to plan ensures safety and a neat finish.
Assess The Current Wiring Setup
Check the existing switched outlet and its wiring. Identify the live, neutral, and ground wires. Use a voltage tester to confirm power is off before touching wires. Note how the switch controls the outlet. This helps in connecting the ceiling light correctly.
Choose The Right Ceiling Light Fixture
Pick a light fixture that fits the room size and style. Consider the light’s weight and mounting type. Ensure it matches the voltage and wiring setup. A fixture that is too heavy needs special support. Choose energy-efficient bulbs for better lighting.
Locate The Best Position For The Light
Find a central spot on the ceiling for even light spread. Avoid placing the light near obstructions like beams or vents. Mark the position for the fixture bracket. Check if the ceiling has space for wiring and support. Good placement improves room brightness.
Gather Necessary Tools And Materials
Collect tools like wire strippers, screwdrivers, and a voltage tester. Get electrical boxes and wire connectors ready. Use a sturdy ladder for safe ceiling access. Having all items before starting saves trips and delays. Safety gear like gloves and goggles is essential.
Run Wiring To The Ceiling
Running wiring to the ceiling is a key step in converting a switched outlet to a ceiling light. This process allows you to bring power from the switch to the new light fixture. It involves careful planning and safe handling of electrical wires.
Start by turning off the power at the circuit breaker. Safety is the top priority when working with electricity. Next, locate the path from the switched outlet to the ceiling where the light will be installed. This path often goes through the wall and attic space.
Locate The Studs And Joists
Use a stud finder to locate wall studs and ceiling joists. Drilling holes through these structures helps run the wiring neatly. Avoid large holes that weaken the wood. Mark the spots to drill for a clear path.
Drill Holes For Wiring
Drill holes carefully through the marked studs and joists. Use a drill bit sized for the electrical cable. Make sure holes are centered to protect the wire from damage. Keep the holes in a straight line for easier wiring.
Feed The Electrical Cable
Push the electrical cable through the drilled holes. Pull enough cable to reach the switch and the new ceiling light box. Use fish tape to guide the wire if needed. Leave some slack for connections at both ends.
Secure The Wiring
Staple the cable to the studs and joists using cable staples. Space staples every 12 inches to keep the wire secure. Avoid stapling too tightly to prevent wire damage. Proper securing reduces the risk of loose wires later.
Install The Ceiling Light Fixture
Installing the ceiling light fixture is the key step after wiring is ready. This step brings the light to life and finishes the project. Proper installation ensures safety and a neat look. Follow these steps carefully for a secure and stylish fixture.
Turn Off Power At The Circuit Breaker
Safety first. Switch off the power at the breaker box. Use a voltage tester to confirm the wires have no electricity. Never skip this step to avoid electric shock.
Attach The Mounting Bracket
Find the mounting bracket in your light fixture kit. Screw it firmly to the electrical box on the ceiling. This bracket will hold the fixture in place securely.
Connect The Wires
Match the wires by color: black to black, white to white, and green or copper to ground. Twist the wire ends together and secure with wire nuts. Double-check all connections are tight and neat.
Secure The Ceiling Light Fixture
Lift the fixture and align it with the mounting bracket. Attach it using the screws provided. Tighten the screws until the fixture feels stable and flush with the ceiling.
Install Bulbs And Test The Light
Screw in the correct light bulbs. Restore power at the circuit breaker. Flip the wall switch to test the light. It should turn on without flickering or issues.
Reconnect The Switch Wiring
Reconnecting the switch wiring is a key step to convert a switched outlet to a ceiling light. This step lets the switch control the new ceiling fixture instead of the outlet. You must handle the wiring carefully to ensure safety and proper function.
Turn off power at the breaker before touching any wires. Use a voltage tester to confirm no electricity flows. Label wires if needed to avoid confusion.
Identify The Switch Wires
Open the switch box and look at the wires inside. Usually, you will find a black (hot) wire and a white (neutral) wire. The black wire carries power to the switch. The white wire completes the circuit back to the power source. Sometimes a red wire is present as a traveler wire. Note where each wire connects.
Disconnect Old Outlet Wires
Remove the wires from the switched outlet. Keep the wires separated and straight. This step prevents short circuits and helps in reconnecting. Cover wire ends with wire nuts or electrical tape to avoid contact.
Connect Switch To Ceiling Light Wires
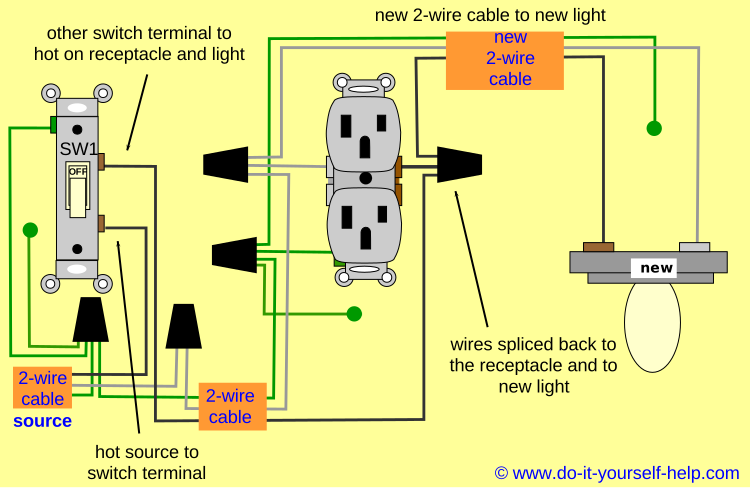
Run new wiring from the switch box to the ceiling light location. Connect the black wire from the switch to the black wire of the ceiling light. Join the white wires from the switch box and ceiling light together. Connect the ground wires to ensure safety.
Secure All Wire Connections
Use wire nuts to join wires firmly. Tug gently on each wire to test the connection. Wrap electrical tape around the wire nuts for added security. Push wires carefully back into the switch box to avoid damage.
Restore Power And Test The Light
After installing your new ceiling light, restoring power is the next step. This step ensures your wiring is safe and your light works correctly. Testing the light confirms the success of your conversion from a switched outlet. Follow each step carefully to avoid electrical hazards and enjoy your new lighting.
Turn The Circuit Breaker Back On
Go to your home’s electrical panel. Find the breaker that controls the room where you worked. Switch it back to the “on” position. This action restores power to the wiring. Never skip this step before testing the light.
Test The Light Switch
Stand near the new ceiling light. Flip the light switch on and off slowly. Watch the light carefully for any flickering or failure to turn on. A steady light means the wiring is correct. Flickering or no light means a wiring check is needed.
Check For Safety And Function
Look around the ceiling light for loose wires or sparks. Make sure the light fixture is secure. If you smell burning or see sparks, turn off the breaker immediately. Call a professional electrician if any safety issues appear. Otherwise, enjoy your new ceiling light.
Troubleshooting Common Issues
Troubleshooting common issues helps avoid delays and frustration. Converting a switched outlet to a ceiling light can cause problems. Identifying these problems fast allows for quick fixes. This section covers typical issues and easy ways to solve them.
Check For Power Supply Problems
No power means no light. Confirm the circuit breaker is on. Use a voltage tester to check the outlet. Make sure the switch controls the correct wire. Loose connections often cause power loss.
Identify Incorrect Wiring
Wiring mistakes stop the light from working. Double-check the wires in the switch box and outlet box. Match black wires to black, white to white, and ground to ground. Use wire nuts tightly. Wrong wiring may cause the light to flicker or stay off.
Test The Light Fixture And Bulb
The problem might be the light fixture or bulb. Use a new bulb to test. Try the fixture in another room. Faulty fixtures or bulbs will not light up. Replace them if needed.
Inspect The Switch Functionality
The switch might be broken. Flip the switch and listen for a click. Use a tester to check if it passes current. Replace the switch if it does not work properly. A bad switch stops power to the ceiling light.
Secure All Connections
Loose wires cause intermittent light. Tighten all wire nuts and screws. Ensure wires are fully inserted into connectors. Wobbly wires can create sparks or stop the light. Safety first: turn off power before tightening.
Credit: www.do-it-yourself-help.com

Credit: www.reddit.com
Frequently Asked Questions
How Do I Convert A Switched Outlet To A Ceiling Light?
Turn off power, remove outlet, run wiring to ceiling box, install light fixture, and connect wires properly. Ensure the switch controls the new ceiling light. Always follow electrical codes and safety guidelines during the process.
What Tools Are Needed For This Electrical Conversion?
You will need a screwdriver, wire stripper, voltage tester, drill, electrical tape, wire nuts, and a ceiling light fixture. These tools help safely remove the outlet and install the ceiling light.
Is It Safe To Convert A Switched Outlet Myself?
Yes, if you have basic electrical knowledge and follow safety precautions. Always turn off power at the breaker, test wires, and follow local electrical codes. If unsure, hire a licensed electrician to avoid hazards.
Can I Use The Existing Switch For The New Ceiling Light?
Yes, the existing switch can control the ceiling light by redirecting the wiring. Ensure the switch wiring matches the new fixture setup for proper operation.
Conclusion
Converting a switched outlet to a ceiling light can improve room lighting. The process is simple when you follow the right steps carefully. Always turn off the power before starting any electrical work. Use the correct tools and materials to stay safe.
This change adds convenience and a cleaner look to your space. Take your time and check all connections twice. Enjoy the new lighting once the job is done. Small upgrades like this make a big difference at home.