Are you facing flickering lights or a switch that just won’t work? Before calling an electrician, you can check if your light switch is the problem—all by yourself.
Testing a light switch with a multimeter is simpler than you think. With just a few easy steps, you’ll know exactly what’s going on inside that switch. Keep reading, and you’ll gain the confidence to fix the issue quickly and safely, saving time and money.
Let’s get started!

Credit: www.youtube.com
Tools Needed
Testing a light switch with a multimeter requires a few basic tools. These tools help you check if the switch works properly. Having the right equipment makes the process safe and easy. Below are the main tools you need to get started.
Choosing The Right Multimeter
Select a multimeter that measures voltage, resistance, and continuity. Digital multimeters are easier to read and more accurate. Look for one with a clear display and simple controls. Make sure it has a range suitable for household electrical testing. A reliable multimeter ensures accurate results when testing switches.
Safety Gear Essentials
Safety gear protects you from electric shocks. Use insulated gloves to avoid direct contact with wires. Safety glasses shield your eyes from sparks or debris. Wear rubber-soled shoes to reduce the risk of electric shock. Always turn off the power before starting any electrical work. Safety gear keeps you safe during the testing process.
Preparing For The Test
Preparing for the test is a key step to check a light switch safely. Taking simple precautions can prevent accidents and ensure accurate results. Follow these easy steps before using a multimeter on a light switch.
Turning Off Power
Safety starts by cutting off the power to the switch. Find the correct circuit breaker in your main panel. Flip the switch to the off position. Double-check that the light switch no longer controls the light. This step stops electric shocks during the test.
Removing The Switch Cover
After turning off the power, remove the cover plate. Use a screwdriver to take out the screws carefully. Keep the screws safe for reassembly. Gently pull the cover away from the wall. This exposes the switch and wiring for testing.
Setting Up The Multimeter
Setting up the multimeter correctly is crucial before testing a light switch. It ensures accurate readings and safe handling of the device. This section guides you through selecting the right mode and calibrating the multimeter for the task.
Selecting The Correct Mode
Turn on the multimeter and check its dial or screen. Choose the mode that measures voltage, usually marked as “V” with a straight or wavy line. For testing a light switch, use the AC voltage mode since home electricity is alternating current. Setting the correct mode prevents wrong readings and protects the multimeter.
Calibrating The Device
Calibration means making sure the multimeter shows zero or the correct baseline before use. Touch the two test probes together. The display should read zero or close to it. If not, adjust the dial or use the reset function. Proper calibration ensures reliable and safe measurements while testing the light switch.
:max_bytes(150000):strip_icc()/testing-single-pole-switches-1152811-03-8b89394a236d499ebee520df31a0ce27.jpg)
Credit: www.thespruce.com
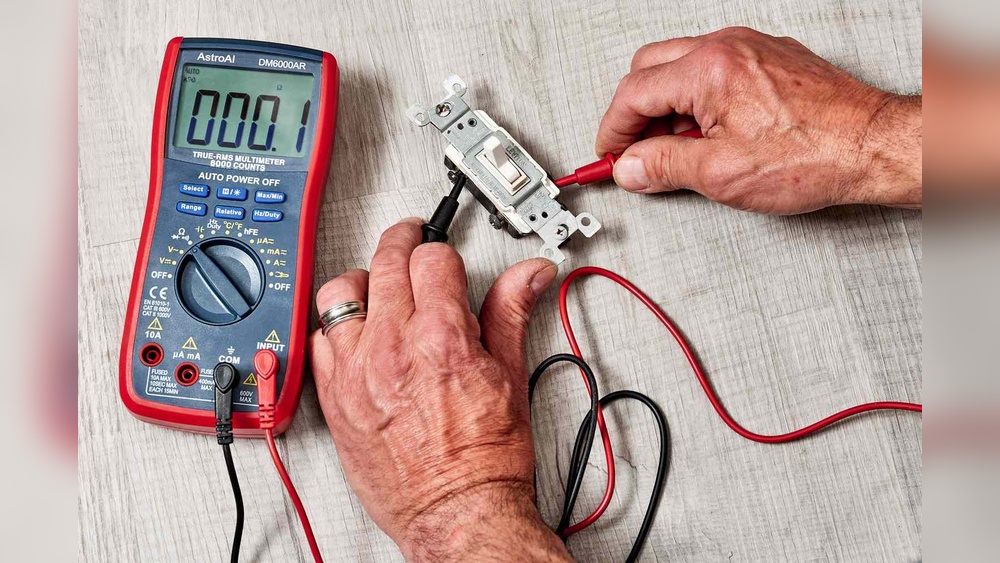
Testing The Switch
Testing the switch is a key step in finding electrical problems. A multimeter helps check if the switch works right. This step involves measuring electrical signals inside the switch. It shows if the switch allows electricity to pass or stops it as it should. Follow these simple tests to check your light switch with a multimeter.
Checking Continuity
Continuity test shows if the switch connects the circuit. Set your multimeter to continuity mode. Touch the probes to the switch terminals. If the meter beeps or shows zero resistance, the switch is good. No beep means the switch may be broken or off. This test works best with the switch in the ON position.
Measuring Voltage
Voltage test checks if power reaches the switch. Set the multimeter to measure AC voltage. Place the probes on the input terminals of the switch. The meter will show the voltage level. A normal reading means power is present. No voltage means a wiring problem or no power supply.
Interpreting Multimeter Readings
Reading the multimeter right is important. A low or zero resistance shows good continuity. High or infinite resistance means no continuity. For voltage, a normal reading matches your home supply (usually 120 or 240 volts). Zero or very low voltage means no power at the switch. Use these readings to decide if the switch is faulty or wiring needs fixing.
Common Issues And Fixes
Light switches can stop working for many reasons. Knowing common problems helps fix them fast. Testing a switch with a multimeter shows if it works well. This section covers how to find faulty switches and tips to solve issues easily.
Identifying Faulty Switches
A faulty switch often feels loose or does not click. Use a multimeter to check if electricity flows through the switch. Set the multimeter to continuity mode. Touch the probes to the switch terminals. No beep or reading means the switch is bad. Look for burnt marks or corrosion on the switch. These signs mean the switch needs replacement.
Troubleshooting Tips
Turn off power before testing the switch. Check the multimeter battery if readings seem wrong. Clean dirty contacts gently with sandpaper or a cloth. Tighten loose wires connected to the switch terminals. Replace the switch if it shows no continuity. Test the wall outlet or bulb socket if the switch is fine. This helps find other problems in the circuit.

Credit: www.youtube.com
Final Steps
After testing the light switch with your multimeter, the final steps are important. These steps ensure safety and proper function. Taking your time here prevents damage and keeps you safe.
Reassembling The Switch
Start by carefully placing the switch back into its box. Make sure no wires get pinched or loose. Tighten the screws to hold the switch firmly in place. Attach the cover plate over the switch. Check that the switch moves smoothly without resistance.
Restoring Power Safely
Turn the power back on at the circuit breaker. Do this slowly to avoid sparks or shocks. Test the switch by turning it on and off. Confirm the light responds correctly. If the switch does not work, turn off the power and recheck your work.
Frequently Asked Questions
How Do I Test A Light Switch With A Multimeter?
Set the multimeter to continuity mode. Turn off power and remove the switch cover. Place probes on switch terminals. If the multimeter beeps or shows zero resistance when toggled, the switch works correctly.
What Multimeter Setting Is Best For Light Switch Testing?
Use the continuity or resistance (ohms) setting. Continuity mode quickly checks if current flows through the switch. Resistance mode measures the switch’s internal resistance, indicating if it’s open or closed.
Can I Test A Light Switch Without Removing It?
No, always turn off power first. Then remove the switch cover for safe access. Testing without removal risks electric shock and inaccurate readings. Safety first when using a multimeter.
Why Does My Multimeter Show No Continuity On The Switch?
No continuity means the switch is open or faulty. Ensure the switch is toggled on during testing. If still no continuity, the switch may need replacement.
Conclusion
Testing a light switch with a multimeter is simple and safe. Always turn off the power before starting. Use the multimeter to check for continuity and voltage. This helps find faulty switches quickly. Understanding these steps saves time and money on repairs.
Practice these tests to feel confident handling basic electrical issues. Stay careful and follow safety rules every time. Now, you can check light switches like a pro.

