Are you tired of coming home to a dark porch or worrying if you left your outdoor lights on all night? Learning how to program a timer switch for your outdoor lights can solve these problems easily.
It gives you control over when your lights turn on and off, saving you money and adding security to your home. You’ll discover simple steps to set up your timer switch quickly—no technical skills needed. Keep reading to make your outdoor lighting smarter and hassle-free.
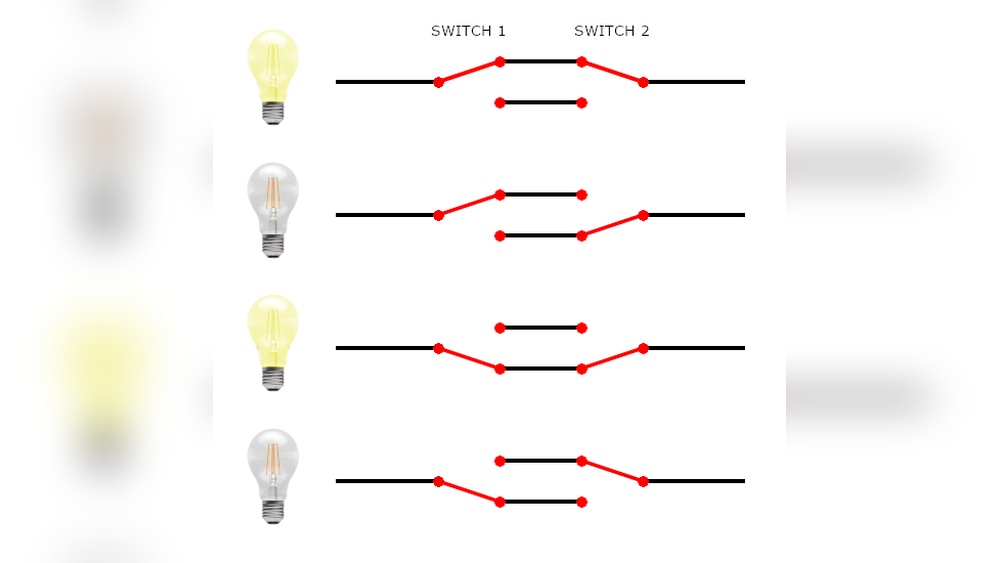
Choosing The Right Timer Switch
Choosing the right timer switch is important for outdoor lighting. It helps save energy and makes your home safer. The right timer switch controls your lights automatically. This means your lights will turn on and off at set times without you doing anything.
Different timer switches offer different features. Picking one that fits your needs is key. Consider the types, compatibility with your lights, and weatherproof features. This guide will explain these points clearly.
Types Of Timer Switches
Mechanical timers are simple to use. They have dials and pins to set times. Digital timers offer more precision and options. You can set multiple on and off times. Some digital timers even have a random mode to mimic presence.
Photocell timers turn lights on at dusk and off at dawn. They work well for outdoor lights. Smart timers connect to your phone. They let you control lights remotely and set schedules easily.
Compatibility With Outdoor Lights
Check if the timer switch matches your light’s power type. Most outdoor lights use either LED or incandescent bulbs. Some timers work only with certain bulbs. Make sure the timer can handle the wattage of your lights.
Also, check the voltage rating. Outdoor lights usually run on 120 volts, but some low-voltage setups exist. The timer must support the correct voltage to function safely and properly.
Weatherproof Features
Outdoor timers must withstand rain, heat, and cold. Look for timers with weatherproof covers or sealed enclosures. These protect the timer from water and dust.
Timers with an IP rating offer good protection. IP44 or higher is best for outdoor use. Make sure the timer is rated for outdoor installation to avoid damage and ensure durability.

Credit: www.youtube.com
Tools And Materials Needed
Preparing to program a timer switch for outdoor lights requires the right tools and materials. Having everything ready saves time and prevents frustration. Each item plays a role in making the task smooth and safe. Below is a list of what you need before starting.
Essential Tools
- Screwdriver set: flathead and Phillips
- Wire strippers for clean wire ends
- Voltage tester to check power status
- Drill with bits for mounting
- Adjustable wrench for tightening bolts
- Electrical tape for insulating wires
Safety Equipment
- Insulated gloves to protect from electric shock
- Safety goggles to shield your eyes
- Non-slip shoes for stable footing
- Flashlight for working in low light
Additional Supplies
- Outdoor-rated timer switch suitable for your lights
- Weatherproof electrical box to house connections
- Wire connectors for secure joins
- Extension cords or additional wiring if needed
- Zip ties for organizing cables
Preparing For Installation
Preparing for installation is the first step to program your timer switch for outdoor lights. It sets the stage for a smooth and safe process. Taking time now saves trouble later.
Follow these simple steps carefully. Safety is important. Being organized helps you finish faster.
Turning Off Power
Start by turning off the power to the outdoor light circuit. Find the correct breaker in your electrical panel. Switch it off to stop the electricity flow.
Use a voltage tester to confirm the power is off. This step prevents shocks or injury. Never skip this safety check.
Locating The Switch Box
Find the switch box that controls your outdoor lights. It is usually inside your home near the entrance or garage. Look for a light switch labeled for outside lights.
Clear the area so you can work easily. Good lighting helps you see wires and screws clearly.
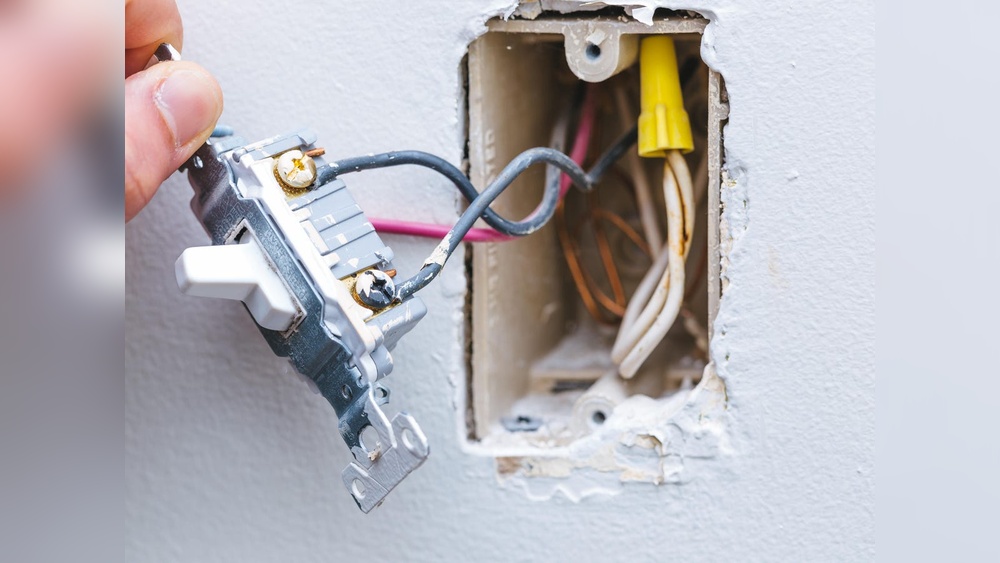
Removing The Old Switch
Remove the cover plate by unscrewing it. Keep the screws safe for later use. Unscrew the switch from the box carefully.
Take a photo of the wiring before disconnecting wires. This helps during installation of the new timer switch. Gently pull the switch out without damaging wires.

Credit: www.amazon.com
Wiring The Timer Switch
Wiring the timer switch is a key step in setting up your outdoor lights. Proper wiring ensures the timer works safely and effectively. This step requires care and attention to detail.
Understanding the wires and connecting them correctly will keep your lights running on schedule. Let’s break down this process into easy parts.
Identifying Wires
First, identify the wires in your switch box. Usually, you will see three types: live (hot), neutral, and ground. The live wire carries power. The neutral wire completes the circuit. The ground wire is for safety.
Use a voltage tester to confirm the live wire. This step prevents accidents. The wires may have different colors, but check your local code. Common colors are black for live, white for neutral, and green or bare for ground.
Connecting Wires Correctly
Match the timer switch wires to the wires in your box. Connect the live wire from the timer to the live wire in the box. Do the same for the neutral wires. Connect the timer’s ground wire to the ground wire in the box.
Twist the wire ends together and use wire nuts to secure them. Check the timer’s instructions for any special wiring needs. Proper connections avoid short circuits and keep the timer working well.
Securing Connections
After connecting the wires, tighten the wire nuts firmly. Tug each wire gently to ensure they do not come loose. Wrap electrical tape around the wire nuts for extra security.
Push the wires neatly back into the box. Avoid pinching or bending them sharply. Finally, attach the timer switch to the wall box with screws. A solid connection prevents electrical hazards and keeps the timer switch stable.
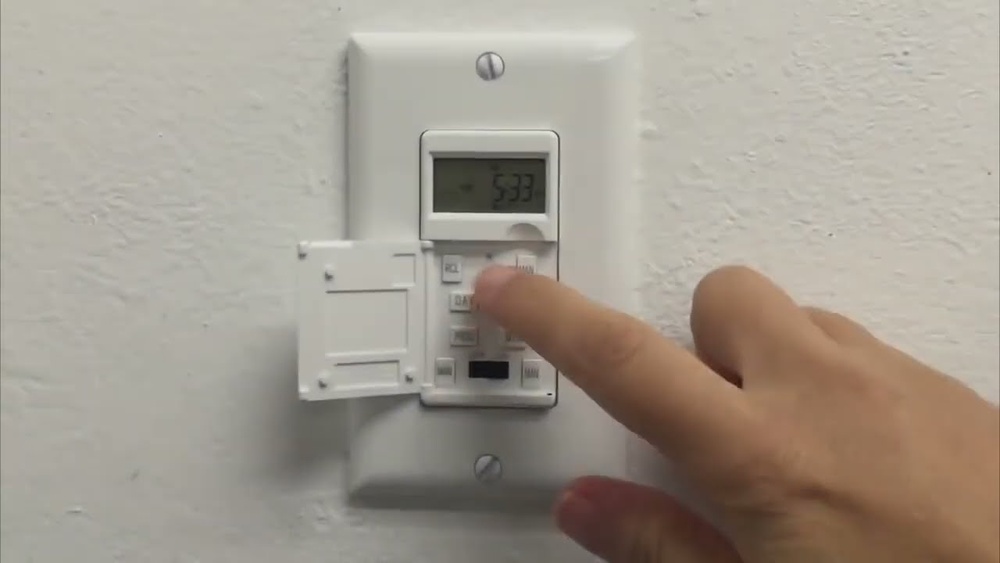
Programming The Timer
Programming the timer for outdoor lights helps save energy and keeps your home safe. This process is simple and can be done in a few steps. You will learn how to set the current time, choose when the lights turn on and off, and adjust for daylight savings. Follow these clear instructions to make your outdoor lighting work automatically.
Setting Current Time
Start by finding the clock setting on your timer switch. Press the button labeled “Clock” or “Time.” Use the arrow keys to set the correct hour and minute. Make sure to select AM or PM if your timer uses a 12-hour format. Confirm the time by pressing the “Clock” button again. This step ensures your timer works on the correct schedule.
Configuring On And Off Times
Next, set when your outdoor lights should turn on and off. Press the button marked “Program” or “Set.” Choose the first on-time by adjusting the hour and minute. Press “Set” again to save. Then, set the off-time the same way. Some timers allow multiple on/off settings for different days. Check your model’s instructions for extra programs.
Adjusting For Daylight Savings
Daylight savings can change your timer’s schedule. To adjust, find the daylight savings switch or button. Switch it on during spring and off in fall. If your timer has no switch, manually reset the clock. Change the current time by one hour forward or backward. This keeps your outdoor lights on the right schedule year-round.
Testing And Troubleshooting
Testing and troubleshooting your outdoor light timer switch ensures it works correctly. This step helps catch errors early and saves you time. Follow the steps below to check the setup and fix common problems.
Restoring Power
Turn the power back on at the circuit breaker. Make sure the timer switch is receiving electricity. Check that the breaker is fully switched to the ON position. If unsure, use a voltage tester to confirm power flow.
Verifying Timer Operation
Set the current time on the timer accurately. Program the on and off times according to your needs. Watch the lights during the set times to see if they respond. Adjust the settings if the lights do not turn on or off as planned.
Common Issues And Fixes
Timer not turning the lights on? Check for loose wiring connections. Reset the timer switch and reprogram the schedule. Lights flickering? Replace old bulbs or check for voltage issues. Timer display blank? Replace the internal battery or verify power supply.
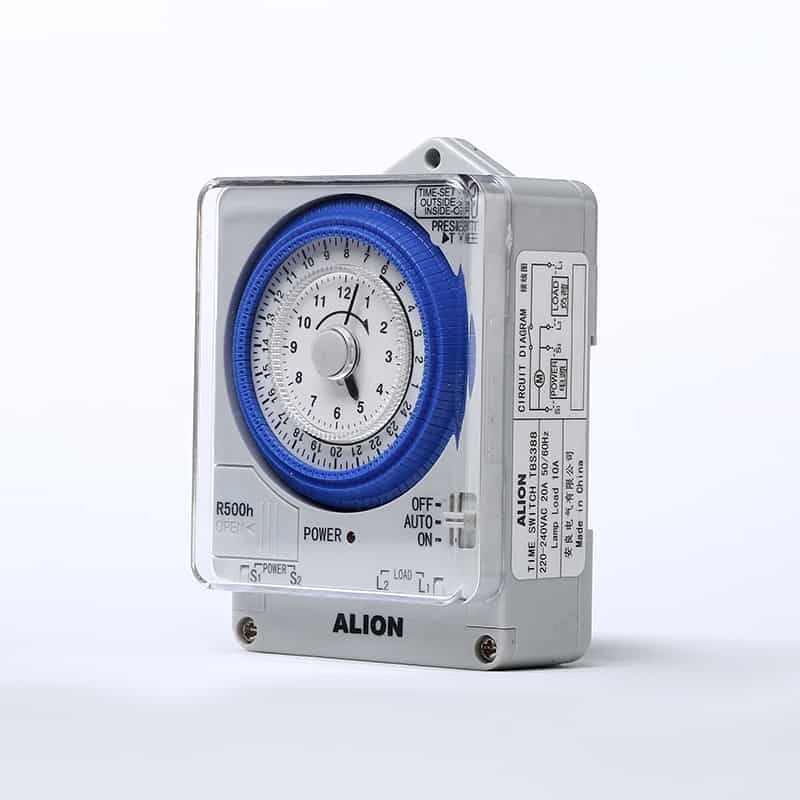
Maintenance Tips
Maintaining your timer switch for outdoor lights helps it work well for a long time. Simple care keeps the timer accurate and prevents light problems. Follow these easy tips to keep your timer switch in top shape.
Regular Checks
Check your timer switch often to ensure it runs smoothly. Look for any damage or loose wires. Test the timer by turning your lights on and off. Catching small issues early saves time and money.
Cleaning The Timer
Keep the timer clean from dirt and dust. Use a soft, dry cloth to wipe the surface. Avoid water or harsh chemicals that can harm the timer. Clean timers work better and last longer.
Replacing Batteries If Needed
Some timer switches use batteries to keep settings during power loss. Check battery life regularly and replace old batteries. Use the correct battery type for your timer. Fresh batteries keep the timer running without interruptions.
Credit: www.aliontimer.com
Frequently Asked Questions
How Do I Set A Timer Switch For Outdoor Lights?
To set a timer switch, first turn off power to the circuit. Then, follow the timer’s instructions to set the current time and desired on/off periods. Finally, restore power and test the settings to ensure the lights operate as programmed.
Can I Program Outdoor Lights To Turn On At Sunset?
Yes, many timer switches have a dusk-to-dawn feature. This automatically turns lights on at sunset and off at sunrise. Check if your timer supports this function and follow the manual to activate it for outdoor lighting.
What Tools Do I Need To Program A Timer Switch?
You typically need a flathead screwdriver, the timer switch manual, and possibly a voltage tester. The screwdriver helps install and adjust settings, while the manual guides programming. A voltage tester ensures safety by confirming power is off before installation.
How Long Does It Take To Program An Outdoor Timer Switch?
Programming an outdoor timer switch usually takes about 5 to 15 minutes. It depends on the timer’s complexity and your familiarity with the device. Most digital timers offer quick setup with clear instructions for easy programming.
Conclusion
Programming a timer switch for outdoor lights saves energy and adds convenience. Set the times clearly, and your lights will turn on and off automatically. This simple step keeps your home safe and well-lit at night. Enjoy the ease of controlled lighting without daily effort.
Try it yourself and see the difference it makes.