Have you ever wished you could control one light from two different switches? Maybe you want to turn on a hallway light from both ends or add a switch to a room without rewiring everything.
Adding a light switch from another existing switch might sound tricky, but it’s easier than you think. In this guide, you’ll discover simple, step-by-step instructions to make your lighting more convenient and functional. Keep reading, and you’ll soon have the power to control your lights exactly how you want.
Tools And Materials Needed
Adding a light switch from another switch requires specific tools and materials. Having the right items makes the job safer and easier. Prepare everything before starting the work.
Essential Tools For The Job
A screwdriver set is needed for removing and installing screws. Wire strippers help remove insulation from wires without damage. Use a voltage tester to check if wires have power. Pliers assist in bending and twisting wires. A drill with bits may be necessary for new holes. Electrical tape secures wire connections. A flashlight or headlamp improves visibility in dark spaces.
Materials Required
Get a new light switch that matches your existing one. Use electrical wire to connect the switches, usually 14 or 12 gauge. Wire connectors, or wire nuts, join wires safely. An electrical box holds the new switch in place. Faceplates cover the switch and give a clean look. Use screws to mount the switch and box securely.
Safety Gear
Wear insulated gloves to protect against electric shocks. Safety glasses shield your eyes from debris. Use a dust mask if drilling or working in dusty areas. Keep a fire extinguisher nearby for emergencies. Never work on live wires; always turn off the power first.
Safety Precautions
Safety is the first step before starting any electrical work. Working with electricity can be dangerous if you do not take the right precautions. Protect yourself and your home by following safety rules carefully.
Always prepare well. Check the tools and materials you will use. Make sure everything is in good condition. Safety helps avoid accidents and keeps the project smooth.
Turn Off The Power
Switch off the main power at the breaker box. Do not rely only on the wall switch. Use a voltage tester to confirm no electricity flows. This step prevents shocks and serious injuries.
Use Proper Tools And Equipment
Choose insulated tools made for electrical work. Use a sturdy ladder if needed. Wear safety gloves and glasses to protect hands and eyes. Good tools help you work safely and efficiently.
Understand Wiring And Codes
Learn the wiring system before starting. Follow local electrical codes and rules. Incorrect wiring can cause fires or damage. Take time to study and plan your work well.
Work In A Safe Environment
Keep your work area dry and clean. Remove any clutter that may cause accidents. Avoid working in wet or damp places. A safe space reduces the risk of slips and falls.
Planning The Wiring Layout
Planning the wiring layout is the first step to add a light switch from another light switch. This step ensures safety and functionality. A clear plan helps avoid mistakes and saves time.
Start by understanding the existing wiring setup. Identify the power source, the current switch, and the light fixture. This knowledge guides the new wiring path.
Consider the distance between the switches. The wiring length affects the type and amount of wire needed. Measure carefully to buy the right materials.
Think about the switch type. Choose between a single-pole or three-way switch based on your needs. This choice affects the wiring connections.
Check local electrical codes. Follow rules to keep the installation safe and legal. Use proper wire gauges and connectors.
Mapping Existing Circuits
Locate the circuit breaker for the light switch. Turn off power to avoid shocks. Trace wires from the breaker to the switch and the light fixture.
Draw a simple diagram showing wire colors and connections. This map helps visualize the wiring path. It also guides the new connections.
Selecting Wire Types And Lengths
Use wires rated for lighting circuits, usually 14-gauge or 12-gauge. Match wire colors: black for hot, white for neutral, green or bare for ground. Add extra length for flexibility and future changes.
Planning Switch Box Placement
Choose a switch box that fits the new switch and wiring. Place it near the existing switch or at a convenient location. Ensure easy access and compliance with height standards.

Credit: www.youtube.com
Turning Off The Power
Turning off the power is the first and most important step before starting any electrical work. It keeps you safe from electric shocks and accidents. Never skip this step. It protects you and your home.
Always treat electricity with respect. Even if you think the power is off, double-check. Safety is key in every DIY electrical project.
Locate The Circuit Breaker
Find your home’s circuit breaker panel. It is usually in the basement, garage, or utility room. Look for a box with switches or levers inside. This panel controls the electricity in your house.
Identify The Correct Breaker
Check the labels next to each breaker switch. They often say what area or room they control. Find the breaker for the light switch you want to work on. If no label exists, turn off breakers one at a time and test the light switch.
Switch Off The Power
Flip the correct breaker switch to the “off” position. This cuts power to the light switch and wiring. It stops any current from flowing and keeps you safe during installation.
Verify The Power Is Off
Use a non-contact voltage tester or a simple light bulb tester. Check the wires or the switch to confirm no electricity is flowing. Never touch wires without checking first. This step ensures safety before you start wiring.
Removing The Existing Switch
Removing the existing light switch is the first step in adding a new switch. This step requires care and attention to safety. Always turn off the power at the breaker box before touching any wires. This prevents electrical shocks and accidents.
Gather basic tools like a screwdriver and voltage tester. These help you work safely and efficiently. Take your time to avoid damaging the wires or the wall.
Turn Off The Power
Locate the correct circuit breaker for the switch you want to remove. Flip the switch to turn off the power. Use a voltage tester to confirm no electricity flows to the switch. This step is crucial for your safety.
Remove The Switch Cover Plate
Use a screwdriver to remove the screws holding the cover plate. Carefully take off the plate to expose the switch and wires. Keep the screws safe for later use.
Unscrew The Existing Switch
Unscrew the mounting screws that hold the switch to the electrical box. Gently pull the switch out to see the wires connected to it. Avoid pulling too hard to prevent wire damage.
Identify And Disconnect The Wires
Notice how the wires connect to the switch terminals. Use a screwdriver to loosen the screws holding the wires. Carefully disconnect the wires and keep them separate to avoid confusion.
Running New Wiring
Running new wiring is a key step when adding a light switch from another switch. It means pulling electrical cables between the existing switch and the new one. This process allows both switches to control the same light or different lights.
Wiring must be done safely and follow electrical codes. Use the right tools and materials to avoid issues. The wiring path should be clear and accessible for easier installation and future repairs.
Planning The Wiring Route
Choose a path that is short and straight. Avoid sharp bends or obstacles like pipes and beams. Plan the route inside walls or ceilings where wires stay hidden. Mark the start and end points clearly before drilling holes.
Turning Off Power
Switch off power at the circuit breaker. Test with a voltage tester to ensure no electricity flows. This step is vital for safety during wiring. Never work on live wires to avoid shocks.
Running The Cable
Use electrical cable rated for lighting circuits. Pull the cable gently through holes or conduits. Secure the cable with clamps or staples every few feet. Leave extra length at both switches for connections.
Connecting Wires At Switches
Strip wire ends to expose copper. Connect wires to the correct terminals on each switch. Typically, black wires go to the switch terminals, white wires connect together, and green or bare wires connect to ground. Tighten screws firmly but do not damage wires.
Testing The New Wiring
Turn power back on at the breaker. Test the new switch to confirm it controls the light. Check for any flickering or unusual behavior. Fix any loose connections before closing walls or switch boxes.
Connecting The New Switch
Connecting the new switch is a key step in adding a light switch from another switch. It involves linking wires correctly to ensure the new switch controls the light properly. Careful attention to wire colors and connections keeps everything safe and working well.
Identify The Wires
First, find the wires in the existing switch box. Usually, there are black (hot), white (neutral), and ground wires. The black wire carries power. The white wire completes the circuit. The ground wire protects from electrical shocks.
Use a voltage tester to check if the power is off before touching any wires. Safety first.
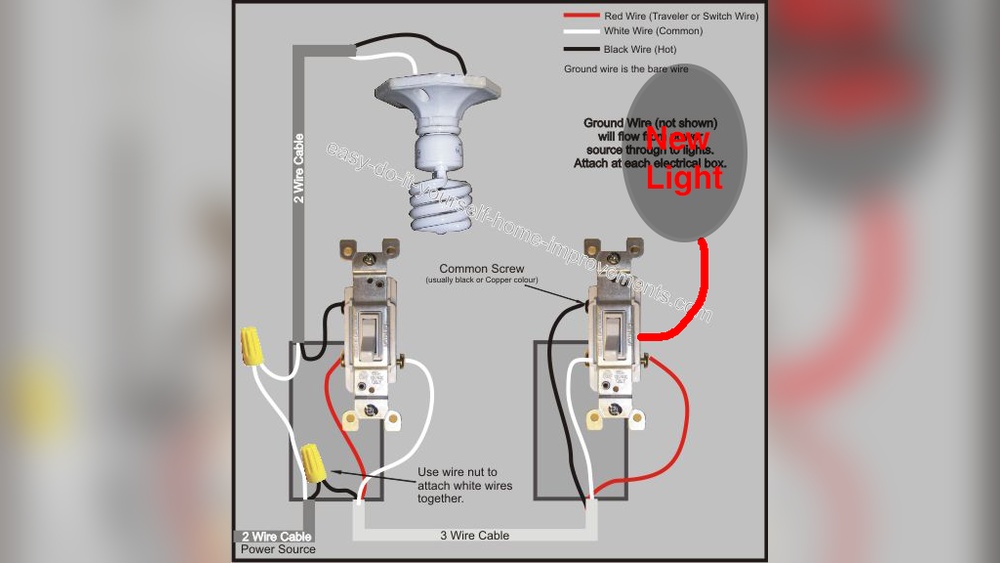
Connect The Traveler Wires
Traveler wires connect two switches in a multi-way setup. They carry current between switches. Usually, these are red and black wires. Attach the traveler wires to the new switch terminals. Match the wires from the old switch to the new one.
Secure each wire with a screwdriver. Loose wires cause flickering or failure.
Attach The Ground Wire
The ground wire is green or bare copper. Connect it to the green screw on the new switch. This step is vital for safety. Grounding helps prevent electrical shocks and fires.
Connect The Neutral Wire
Some switches need the neutral wire. It is usually white. Connect the neutral wire to the silver terminal or the neutral wire bundle. If unsure, check the switch instructions. Not all switches require this connection.
Double-check Your Connections
Review every wire connection before closing the switch box. Tighten all screws. Make sure no wires touch each other. Use electrical tape if needed. A solid connection ensures the switch works smoothly.
Testing The Switches
Testing the switches is a key step after wiring a new light switch from an existing one. It ensures that all connections work correctly and the lights respond as expected. Skipping this step may cause safety issues or malfunctioning lights.
Check each switch carefully. Confirm that the light turns on and off smoothly from both switches. Testing helps catch wiring mistakes early. It saves time and prevents future problems.
Testing Power Supply To The Switches
Start by turning the main power back on. Use a voltage tester to check if electricity reaches both switches. The tester should show power at the terminals. No power means a wiring problem. Double-check the circuit breaker if needed.
Verifying The Function Of Each Switch
Flip the first switch. Observe if the light turns on or off correctly. Repeat with the second switch. Both switches should control the light independently. If either switch does not work, check the wiring connections again.
Checking For Loose Or Faulty Connections
Loose wires can cause flickering or no light at all. Inspect wire nuts and terminal screws. Tighten any loose connections carefully. Replace damaged wires to ensure safety and reliability.
Troubleshooting Common Issues
Troubleshooting is key when adding a light switch from another switch. Many problems can stop your new switch from working right. Knowing what to check saves time and keeps you safe. Below are common issues and easy ways to fix them.
Check The Power Supply
First, ensure the power is off before testing wires. Use a voltage tester to confirm no electricity flows. If the new switch does not get power, check the circuit breaker. A tripped breaker or blown fuse can stop power flow. Reset or replace them as needed.
Verify Wiring Connections
Loose or wrong wiring causes most switch problems. Double-check each wire matches the original switch setup. Tighten any loose screws on terminal points. Look for damaged wires or poor splices and fix them. Correct color coding helps avoid errors.
Test The Switch Functionality
Sometimes the new switch itself is faulty. Swap the new switch with the old one to see if the problem continues. If the old switch works, replace the new switch with a better one. Use a multimeter to test switch continuity for accuracy.
Inspect The Light Fixture
The problem may lie with the light fixture, not the switch. Check the bulb is not burned out or loose. Look for broken sockets or wiring inside the fixture. Test the fixture with a known working switch to confirm.
Look For Grounding Issues
Proper grounding is vital for safety and functionality. Ensure the ground wire connects to the switch box and switch. Missing or bad grounding can cause flickering or non-working lights. Use a tester to check grounding status.

Credit: www.do-it-yourself-help.com

Credit: www.youtube.com
Frequently Asked Questions
How Do I Add A Light Switch From Another Switch?
To add a light switch from another switch, first turn off the power. Run new wiring from the existing switch to the new switch location. Connect the wires properly and install the new switch. Always follow electrical codes and safety guidelines.
Can I Control One Light From Two Switches?
Yes, you can control one light from two switches using a three-way switch setup. This requires special wiring that connects both switches to the light. It allows you to turn the light on or off from either switch location.
What Tools Are Needed To Add A New Light Switch?
You need a voltage tester, wire stripper, screwdriver, drill, electrical tape, and new switch. These tools help you safely handle wiring and install the switch. Always use insulated tools and follow safety precautions.
Is It Safe To Add A Light Switch By Myself?
Adding a light switch can be safe if you follow all safety rules. Turn off power at the circuit breaker before starting. If unsure, consult a licensed electrician to avoid electrical hazards and ensure code compliance.
Conclusion
Adding a light switch from another switch is a simple task. It needs basic tools and careful steps. Always turn off power before starting work. Double-check all connections to avoid mistakes. This guide helps save money and time. You can control lights easily from two spots.
Try it yourself and enjoy the convenience. Safety first, and take your time. You will feel proud after finishing this project.