Are you tired of fumbling for the light switch when entering a room? Installing a 3-way light switch lets you control your lights from two different spots, making your life easier and more convenient.
If you think this sounds complicated, don’t worry—you can do it yourself with the right guidance. You’ll discover simple, step-by-step instructions to install a 3-way light switch safely and effectively. Keep reading, and soon you’ll have full control of your lighting with just a flip of a switch!
Tools And Materials Needed
Installing a 3-way light switch requires specific tools and materials. Having everything ready makes the job easier and safer. This section lists all essential items you need before starting.
Basic Tools
You need a screwdriver set with flathead and Phillips tips. A voltage tester is crucial to check power before work. Wire strippers help remove insulation without damaging wires. Needle-nose pliers are useful for bending and holding wires. A tape measure assists in accurate wire cutting.
Electrical Materials
Purchase two 3-way switches designed for your home’s voltage. Use 14/3 or 12/3 electrical wire, depending on your circuit requirements. Wire nuts secure wire connections safely. Electrical tape helps cover exposed wires and adds protection. Outlet boxes may be needed if installing new switches.
Safety Gear
Wear insulated gloves to protect against electric shock. Safety glasses shield your eyes from debris. Use a sturdy ladder if working at height. Always work with the power off to avoid accidents.
Safety Precautions
Safety is the top priority before starting any electrical work. Installing a 3-way light switch involves handling live wires. Mistakes can cause shocks or fire hazards. Proper safety steps protect you and your home.
Follow clear safety rules to avoid accidents. Take time to prepare and understand the process fully. Never rush when working with electricity. Care and caution lead to a safe installation.
Turn Off Power At The Circuit Breaker
Always switch off the power at the main breaker panel. Do not rely on the light switch alone. Use a voltage tester to confirm wires are not live. This step prevents electrical shocks during installation.
Use Proper Tools And Equipment
Use insulated tools made for electrical work. Avoid using damaged or worn-out tools. Wear rubber-soled shoes to reduce shock risk. Keep your workspace dry and clear of clutter.
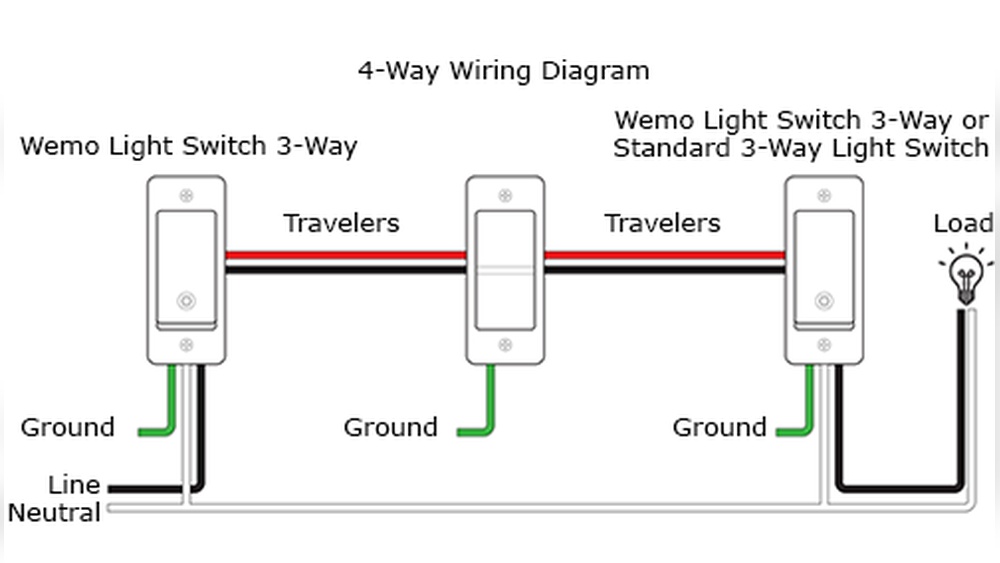
Follow Wiring Diagrams Closely
Use a wiring diagram specific to your 3-way switch setup. Incorrect wiring can cause short circuits or damage. Label wires before disconnecting to keep track. Double-check connections before restoring power.
Work In Good Lighting And Ventilation
Ensure the work area is well-lit to see wires clearly. Poor lighting increases mistakes and accidents. Keep the room ventilated to avoid discomfort or heat. A clean, bright space helps maintain focus.
Wear Safety Gear
Wear safety glasses to protect your eyes from sparks or debris. Use gloves to avoid cuts and shocks. Avoid loose clothing that may catch on wires or tools. Safety gear adds an extra layer of protection.
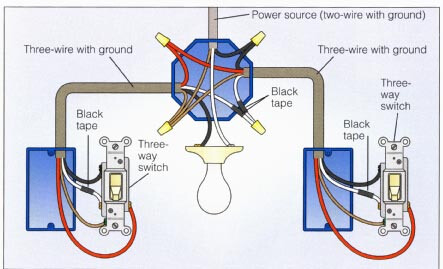
How 3 Way Switches Work
Understanding how 3 way switches work is key to installing them correctly. These switches control one light from two different places. This setup is common in hallways, staircases, and large rooms.
Each 3 way switch has three terminals. Two are traveler terminals, and one is a common terminal. The traveler terminals carry power back and forth between the switches. The common terminal connects to either the power source or the light fixture.
When you flip either switch, it changes the path of the electrical current. This switch action either completes or breaks the circuit. The light turns on or off depending on the switch position.
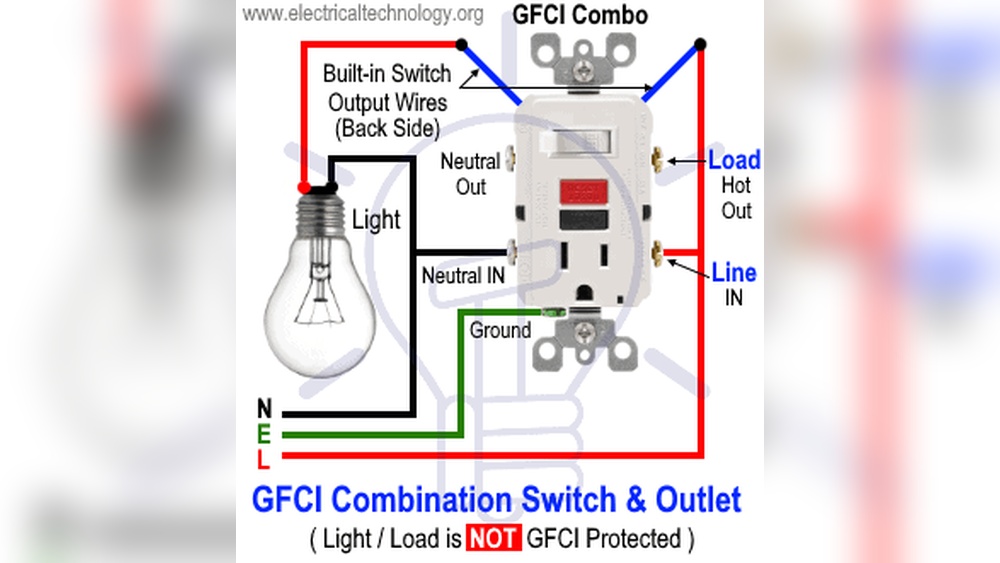
Basic Components Of A 3 Way Switch
A 3 way switch has three screw terminals. Two are usually brass colored, called travelers. The third is darker, called the common terminal. These parts help direct the electric current.
How Electrical Current Flows
Electricity travels from the power source through the common terminal. It then moves via travelers to the other switch. The switches control which path the current takes. This flow determines if the light is on or off.
Switch Positions And Light Control
Each switch can connect the common terminal to one traveler. Flipping a switch changes the connection. This action either allows electricity to flow or stops it. The light responds accordingly.
Advantages Of 3 Way Switches
They offer control of one light from two spots. This adds convenience and safety. No need to walk in the dark to turn off a light.

Credit: www.gelighting.com
Identify Existing Wiring
Identifying existing wiring is the first step in installing a 3-way light switch. It helps you understand how your current switches connect to the light fixture. This knowledge prevents mistakes and ensures a safe installation.
Before starting, turn off power at the circuit breaker. Use a voltage tester to confirm no electricity flows through the wires. Safety first.
Locate The Switch Boxes
Find the two switch boxes that control the light. They usually sit at each end of the hallway or room. Open the boxes carefully to see the wires inside.
Identify Wire Types
Look for three main wire types: travelers, common, and ground. Traveler wires connect the two switches. The common wire carries power or connects to the light. The ground wire is for safety.
Use A Voltage Tester
Test each wire with a voltage tester. This step confirms which wire is live. Mark the common wire because it connects differently than travelers.
Label Wires For Clarity
Use tape or tags to label each wire. Mark traveler wires as “Traveler 1” and “Traveler 2.” Label the common wire “Common.” This helps during installation.
Turn Off Power
Before starting the installation, always turn off the power at the circuit breaker. This step keeps you safe from electric shocks while working on the switches. Safety first to avoid accidents.
Locate The Circuit Breaker
Start by finding your home’s main electrical panel. This panel usually sits in the basement, garage, or utility room. Open the panel door carefully to see the breakers inside. Each breaker controls power to different parts of your house.
Look for the breaker labeled for the room or area where you will work. If no label exists, switch off the main breaker to cut power to the entire house. This step ensures no electricity flows to the light switch.
Switch Off The Power
Flip the correct breaker to the “off” position. This action stops electricity from reaching the switch wires. Double-check by moving the switch on and off. The light should not respond or flicker.
Turning off the power prevents electric shocks. It keeps you safe while installing the 3-way switch. Never skip this step before handling electrical wiring.
Verify Power Is Off
Use a non-contact voltage tester to confirm no power exists. Hold the tester near the wires or switch box. The tester lights up or beeps if electricity is present.
Testing twice avoids accidents. If unsure, test multiple wires. Safety first. No power means safe work.
Credit: community.inovelli.com
Remove Old Switches
Start by turning off the power to the old switches. Carefully remove the switch cover and unscrew the switch from the wall. Gently pull out the switch to access the wiring for replacement.
Start by switching off the power at the circuit breaker. This step keeps you safe from electric shock. Never skip this important safety step.
Remove Switch Cover Plate
Use a screwdriver to take off the cover plate from the old switch. This reveals the screws holding the switch in place.
Unscrew The Old Switch
Loosen the screws on the sides of the switch. Pull the switch gently out of the electrical box.
Note Wire Positions
Look closely at how the wires connect to the old switch. Take a photo or label each wire. This helps connect the new switch correctly.
Disconnect Wires
Use a screwdriver to loosen the terminal screws. Carefully remove the wires from the switch. Keep the wires apart to avoid accidental contact.
Connect Wires To New Switches
Connecting wires to new switches is a key step in installing a 3-way light switch. This step controls how electricity flows between switches. Proper connections ensure the switches work smoothly. Understanding wire types and their correct placement is important. Follow each step carefully for safe and effective wiring.
Identify Common And Traveler Wires
The common wire carries power to the switch. It usually has a different color, often black or dark-colored. Traveler wires connect the two switches together. These wires often have red or light-colored insulation. Use a voltage tester to confirm the common wire. Mark the wires to avoid confusion later.
Attach Wires To Terminals
Connect the common wire to the terminal labeled “COM” or “Common.” Attach traveler wires to the remaining two terminals. Tighten terminal screws firmly to hold the wires. Avoid loose connections to prevent electrical issues. Wrap bare copper ground wires around the green screw. Secure everything before placing the switch back into the box.
Install Switches In Boxes
Installing switches in boxes is an important step for a 3-way light switch setup. It keeps wires organized and safe. Proper installation ensures the switches work well and last long.
Follow each step carefully. Use the right tools and materials. Avoid loose wires or crowded boxes to prevent problems later.
Choose The Correct Electrical Boxes
Select boxes that fit the switch size and wall space. Boxes must be deep enough for wires and the switch. Plastic or metal boxes both work, but use metal if local rules require it.
Secure The Boxes To Wall Studs
Attach boxes firmly to the wall studs. Use screws and check that boxes do not move. This keeps switches stable and easy to operate.
Pull Wires Through The Boxes
Feed the wires through the box openings carefully. Leave enough wire length for easy connection. Avoid sharp bends to protect the wires.
Organize And Prepare Wires Inside The Box
Strip insulation from wire ends. Arrange wires neatly inside the box. This helps to connect each wire to the right terminal on the switch.
Restore Power And Test
Restoring power and testing your 3-way light switch is a crucial step. It confirms the installation is correct and safe. This step ensures your switches control the light from two locations smoothly.
Before turning on the power, double-check all wires are connected tightly. Loose connections can cause problems or be dangerous. After confirming the wiring, restore power at the breaker panel.
Turn On The Circuit Breaker
Locate the breaker controlling the light switch circuit. Flip it to the ON position carefully. This action restores electricity to the switch and the light fixture.
Test Each Switch
Use both switches to turn the light on and off. Each switch should control the light independently. Test every position to ensure smooth operation without flickering or failure.
Check For Any Issues
Watch for sparks, buzzing, or unusual sounds near switches. If any problems appear, turn off the breaker immediately. Inspect your wiring again for mistakes or loose connections.

Credit: community.smartthings.com
Troubleshooting Tips
Troubleshooting a 3 way light switch can seem hard. Small mistakes can stop the switch from working right. Knowing where to check helps fix problems fast. Here are useful tips to help solve common issues.
Check The Power Supply
Make sure power is turned off before testing. Use a voltage tester to check if power reaches the switch. No power means the circuit breaker might be off. Reset it and test again.
Inspect The Wiring Connections
Loose or wrong wires cause most problems. Look for wires that are not fully connected. Match the wires to the right terminals. Tighten all screws to secure the wires firmly.
Test The Switches Individually
One switch might be faulty. Remove the switch and test it with a multimeter. Replace the switch if it does not show continuity when flipped.
Look For Damaged Wires
Old or damaged wires may break the circuit. Check for cuts, burns, or worn insulation. Replace any damaged wire to ensure safe operation.
Confirm The Traveler Wires
Traveler wires connect the two switches. Make sure these wires are connected to the correct terminals. Swap traveler wires if the light does not turn on from both switches.
Frequently Asked Questions
What Tools Are Needed To Install A 3-way Light Switch?
You need a screwdriver, wire stripper, voltage tester, and electrical tape. These tools help safely connect wires and secure the switches.
How Do I Identify The Common Terminal On A 3-way Switch?
The common terminal is usually a different color screw, often black or dark bronze. It connects to the power source or the light fixture.
Can I Install A 3-way Switch Without Turning Off Power?
No, always turn off power at the circuit breaker before installation. This prevents electrical shock and ensures safety.
What Wires Connect Between Two 3-way Switches?
Two traveler wires connect the switches, usually red and black. They allow the switches to communicate and control the light.
Conclusion
Installing a 3 way light switch can save you time and effort. It lets you control lights from two places. Follow each step carefully and use the right tools. Double-check your work to avoid any problems. Safety always comes first when working with electricity.
With patience, anyone can do this simple upgrade. Enjoy the convenience of controlling your lights easily. Keep this guide handy for future reference. Small projects like this build confidence and skills. Give it a try and see the difference yourself.