Are you looking to add extra safety and convenience to your home electrical setup? Connecting a GFCI outlet with a light switch might sound tricky, but it’s easier than you think—and it can make a big difference in protecting your family from electrical shocks.
In this guide, you’ll discover simple, step-by-step instructions that anyone can follow, even if you’re not an expert. By the end, you’ll know exactly how to wire your GFCI outlet to work seamlessly with your light switch, boosting both safety and functionality.
Ready to take control of your home’s electrical safety? Let’s dive in.
Gfci Outlet Basics
A GFCI outlet is a special type of electrical socket. It helps protect people from electric shock. These outlets detect small changes in electrical current. They shut off power fast to prevent harm.
Understanding GFCI outlet basics is important before connecting it with a light switch. Knowing how it works keeps your home safe and your wiring correct.
Purpose And Benefits
GFCI outlets protect against electrical shocks. They are important in areas with water, like kitchens and bathrooms. These outlets cut power if they detect a ground fault. This prevents serious injury or electrical fires.
They also help protect appliances and wiring from damage. GFCIs improve home safety and meet electrical codes. Using them reduces the risk of accidents at home.
Key Components
A GFCI outlet has several key parts. The test button checks if the outlet works properly. The reset button restores power after a trip. Internal sensors monitor the electrical current flow.
These sensors detect any imbalance in current. The outlet then quickly shuts off power. The wiring terminals connect the outlet to your home’s electrical system. Understanding these parts helps with safe installation.

Credit: www.youtube.com
Tools And Materials Needed
Before connecting a GFCI outlet with a light switch, gather the right tools and materials. Having everything ready makes the job safer and easier. This step saves time and avoids frustration during installation.
Essential Tools
- Screwdriver set – both flathead and Phillips
- Wire stripper – to remove insulation from wires
- Voltage tester – to check power is off
- Needle-nose pliers – for bending and shaping wires
- Electrical tape – to secure wire connections
- Wire nuts – to join wires safely
- Flashlight – for better visibility in dark areas
Required Materials
- GFCI outlet – designed to protect from electrical shocks
- Light switch – controls the connected light fixture
- Electrical box – houses the outlet and switch
- Appropriate gauge wire – usually 12 or 14 gauge
- Wire connectors – to connect wires securely
- Wall plate – covers and protects the outlet and switch
Safety Precautions
Working with electrical devices like GFCI outlets and light switches needs care. Safety is the top priority to avoid shocks or damage. Follow these precautions strictly to protect yourself and your home.
Power Shutdown
Always turn off the main power before starting any electrical work. Use the circuit breaker to cut power to the area. Double-check that the power is off by testing the outlet or switch. Never trust just the switch position. This step prevents dangerous electric shocks.
Proper Handling
Use insulated tools designed for electrical work. Avoid touching wires with bare hands. Hold wires by their insulated parts only. Keep your work area dry and clear of clutter. Wear rubber-soled shoes to reduce shock risks. Handle all parts gently to avoid damage or loose connections.
Identify Wiring Setup
Identifying the wiring setup is the first step to connect a GFCI outlet with a light switch. Understanding the wires inside your electrical box helps you make safe and correct connections. This step prevents wiring errors and ensures the GFCI functions properly.
Carefully inspecting the wires allows you to know which ones bring power and which carry power to other devices. This knowledge is essential before connecting the GFCI outlet and light switch together.
Locate Line And Load Wires
Look inside the electrical box for wire groups. The line wires bring power from the main panel. They are usually black or red. The load wires send power to other outlets or devices. They also might be black or red but connect differently.
Use a voltage tester to confirm which wires have power. The line wires will have voltage when the breaker is on. The load wires will only have power if something downstream is active. Mark these wires with tape or labels for easy identification.
Check Existing Switch Connections
Remove the light switch cover and inspect the wires connected to it. Note how many wires connect to the switch and their colors. Usually, a switch has two or three wires: a hot wire and a switched wire.
Trace the wires to see where they go. This helps you understand how the switch controls the light. Knowing this setup helps you connect the GFCI outlet without disrupting the light switch function.
Wiring The Gfci Outlet
Wiring the GFCI outlet correctly is important for safety and function. This process controls the power flow and protects against electrical shocks. Understanding the wires and their roles helps you connect everything properly. Follow the steps carefully to ensure a safe installation.
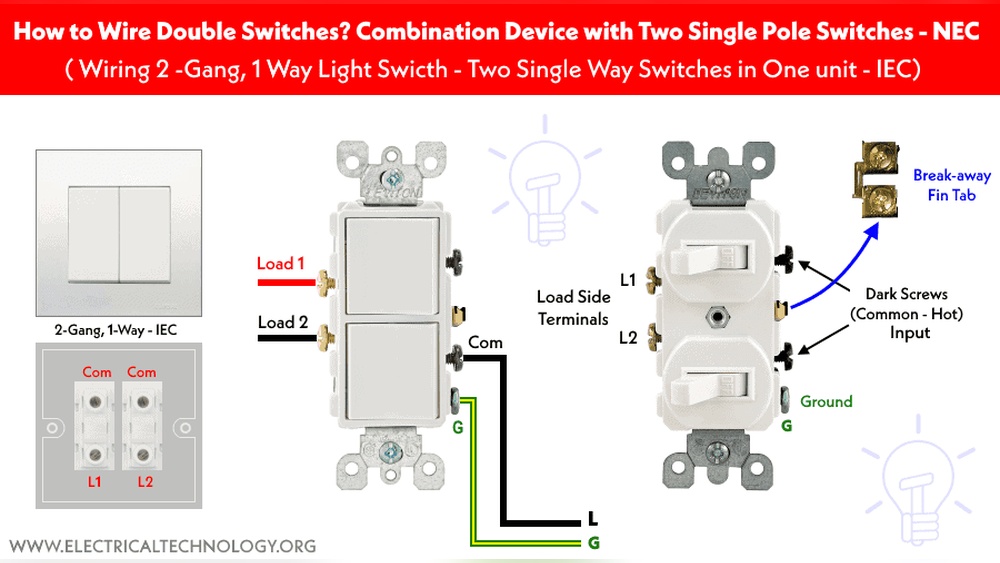
Connect Line Wires
First, identify the line wires. These bring power from the main electrical source. Usually, the black wire is the hot wire, and the white wire is neutral. Connect the black line wire to the brass terminal marked “Line.” Attach the white line wire to the silver terminal marked “Line.” Make sure the wires are secure and tight. Loose connections can cause problems or hazards.
Connect Load Wires
Next, find the load wires. These send power to other outlets or devices. Connect the black load wire to the brass terminal marked “Load.” Attach the white load wire to the silver terminal marked “Load.” These connections allow the GFCI to protect downstream outlets. Double-check all wires before closing the outlet box. Proper wiring ensures safety and correct operation.

Credit: diy.stackexchange.com
Integrate Light Switch
Integrating a light switch with a GFCI outlet adds convenience and safety. It lets you control a light fixture using the same circuit as the outlet. This setup is common in bathrooms and kitchens.
Proper wiring is important to ensure both devices work correctly. Follow safety rules and use the right tools. This section explains how to connect the switch and verify connections.
Wire Switch To Control Light
Turn off power at the breaker before starting. Connect the black (hot) wire from the power source to the switch’s input terminal. Then, connect the black wire from the light fixture to the switch’s output terminal.
Use wire nuts to join white (neutral) wires together, including the fixture’s neutral. Ground wires should connect to the green screw on the switch and the outlet.
Make sure wires are tight and secure. Loose wires cause sparks or flickering lights. Always double-check your connections before moving on.
Verify Switch And Outlet Connections
Turn the power back on after wiring. Test the switch by flipping it on and off. The light should respond immediately. If it does not, recheck the wiring.
Use a voltage tester to check the outlet. It must have power and the GFCI function should work. Press the test and reset buttons to confirm the outlet is safe.
Check all screws and wire nuts for tightness. Inspect for exposed wires or damage. Correct any issues before using the switch and outlet regularly.
Testing The Setup
Testing the setup after connecting a GFCI outlet with a light switch is very important. It ensures the wiring is correct and both devices work safely. Follow these steps carefully to check the power and function of each part.
Restore Power
First, turn the circuit breaker back on. This restores power to the outlet and switch. Watch for any sparks or unusual sounds. If everything looks normal, proceed to the next step.
Test Gfci Functionality
Press the “Test” button on the GFCI outlet. The power should cut off immediately. This shows the safety mechanism works. Then, press the “Reset” button to restore power. If the outlet does not reset, check the wiring again.
Test Light Switch Operation
Flip the light switch on and off. The connected light should respond correctly. If the light does not turn on, double-check the connections. Make sure the switch controls only the light, not the outlet.

Credit: www.do-it-yourself-help.com
Troubleshooting Tips
Troubleshooting a GFCI outlet connected with a light switch can save time and avoid frustration. Small wiring mistakes or faulty devices often cause problems. Understanding common issues helps fix them quickly. This section covers easy tips to get your setup working smoothly again.
Common Wiring Issues
Wrong wiring is a frequent cause of GFCI outlet problems. Mixing up line and load wires can stop the outlet from working. Loose connections may cause flickering lights or no power. Check all wire nuts and terminals for tightness. Use a voltage tester to verify power flow. Make sure the light switch wiring does not interfere with the GFCI outlet’s function.
Resetting The Gfci Outlet
The reset button on the GFCI outlet often fixes minor faults. Press the reset firmly until you hear a click. If the button won’t reset, it might indicate a wiring issue or a faulty outlet. Unplug all devices on the circuit and try resetting again. Replace the GFCI outlet if it continues to trip or won’t reset. Regular resetting helps maintain outlet safety and performance.
Frequently Asked Questions
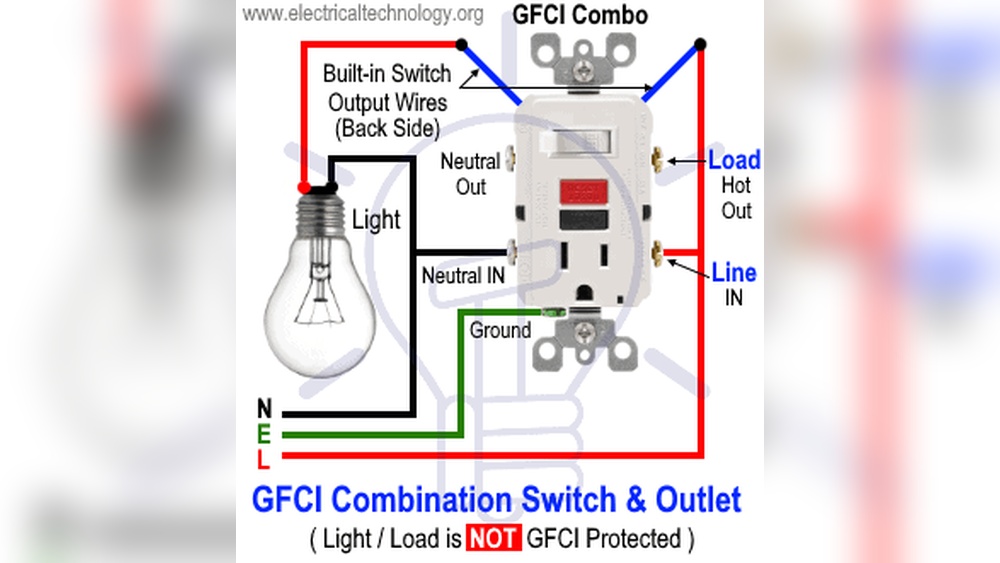
How Do I Wire A Gfci Outlet To A Light Switch?
To wire a GFCI outlet to a light switch, connect the power source to the line terminals of the GFCI. Then, connect the load terminals to the light switch, ensuring proper grounding. This setup provides protection and control for both devices.
Can A Gfci Outlet Control A Light Switch Safely?
Yes, a GFCI outlet can safely control a light switch if wired correctly. The GFCI protects against electrical faults, while the switch controls the light. Proper wiring and following electrical codes are essential for safety and functionality.
What Tools Are Needed To Connect Gfci And Light Switch?
You need a screwdriver, wire strippers, voltage tester, and electrical tape. Also, have wire nuts and a multimeter ready. These tools help safely connect the GFCI outlet to the light switch with proper electrical standards.
Why Use A Gfci Outlet With A Light Switch?
Using a GFCI outlet with a light switch enhances safety by preventing electrical shock. It protects devices in wet or damp areas. This combination is ideal for kitchens, bathrooms, or outdoor lighting circuits.
Conclusion
Connecting a GFCI outlet with a light switch is simple and safe. Follow the steps carefully to avoid mistakes. Always turn off power before starting any work. Double-check your wiring before turning power back on. This setup helps protect your home from electric shocks.
Take your time and be patient during installation. Safety matters most in any electrical project. Now you can control lights and outlets easily and securely. Keep this guide handy for future reference.