Are you looking to add a dimmer switch to your light setup but don’t know where to start? Connecting a dimmer to a light switch can seem tricky, but it’s easier than you think.
Imagine having full control over your room’s brightness, setting the perfect mood anytime you want. In this guide, you’ll get clear, step-by-step instructions that anyone can follow—even if you’re not an expert. Keep reading, and you’ll soon enjoy the comfort and style that a dimmer switch brings to your home.
Tools And Materials Needed
Connecting a dimmer to a light switch requires specific tools and materials. Having the right items makes the process safe and easy. Prepare everything before starting to avoid interruptions.
Tools Needed
Gather basic tools for electrical work. A screwdriver is essential for removing switch covers. Wire strippers help remove insulation from wires. A voltage tester ensures the power is off. Needle-nose pliers assist in bending wires. Electrical tape secures wire connections. A drill may be needed for mounting screws.
Materials Needed
Choose a compatible dimmer switch for your lighting type. Use wire nuts to connect wires safely. Ensure the electrical box is in good condition. Have extra wire if the existing one is too short. Use a dimmer switch rated for your light bulbs. Follow manufacturer instructions for specific parts.
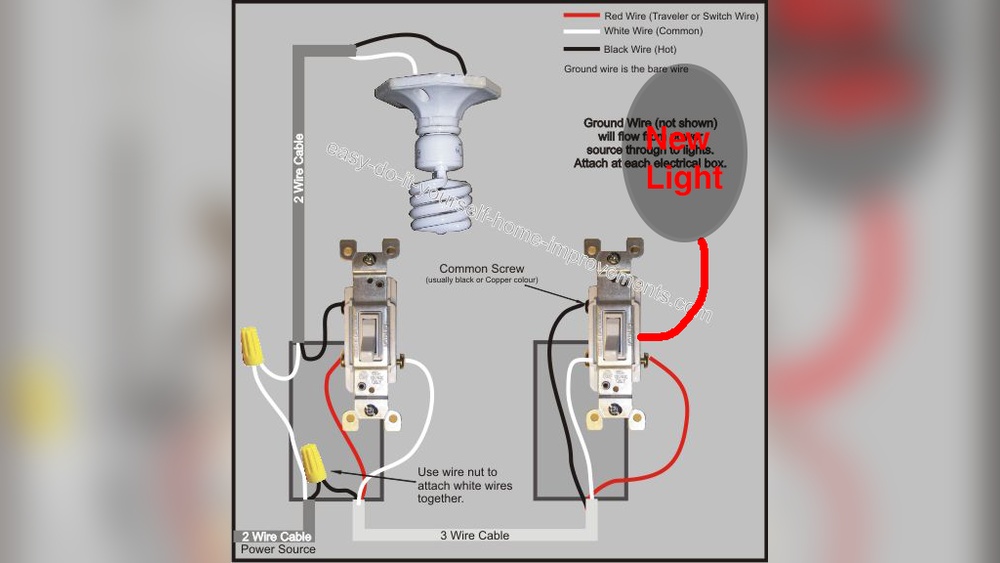
Credit: www.gelighting.com
Safety Precautions
Working with electrical wiring can be dangerous. Following safety rules protects you from shock and injury. Always treat electricity with respect and care.
Before starting, switch off the power at the breaker box. This stops electricity from flowing to the switch. Double-check by testing the switch with a voltage tester. Never assume the power is off.
Turn Off The Power
Locate the correct breaker for the light switch. Flip the breaker to the off position. Use a voltage tester to ensure no current flows. This step is crucial to avoid electric shocks.
Use Proper Tools And Equipment
Choose insulated tools designed for electrical work. Avoid using damaged or worn-out tools. Wear rubber-soled shoes to reduce the risk of shock. Keep your work area dry and clean.
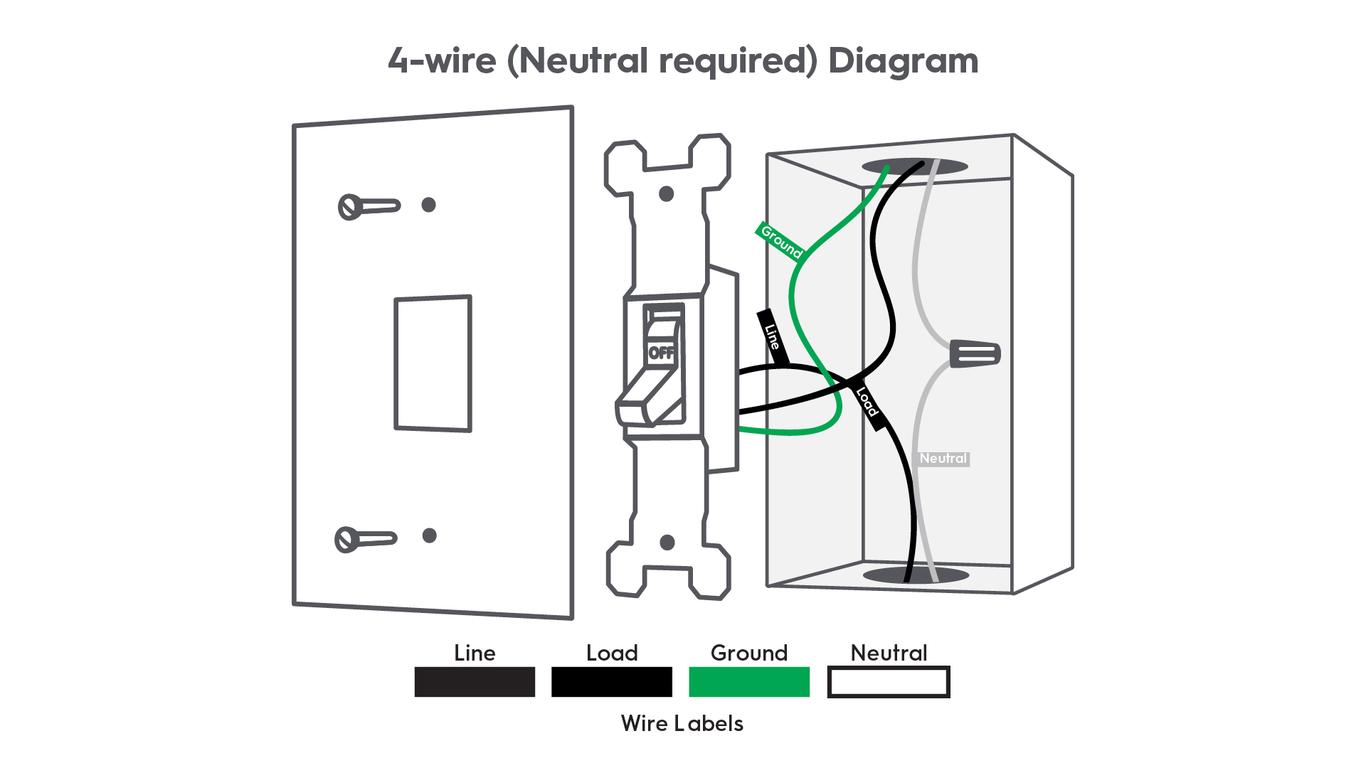
Understand Your Wiring
Identify all wires before disconnecting anything. Know which wire is live, neutral, or ground. Label wires if needed to avoid confusion. Incorrect connections can cause short circuits or fires.
Work In A Well-lit Area
Good lighting helps you see wires clearly. Avoid working in dark or cramped spaces. Use a flashlight or portable lamp if necessary. Clear visibility reduces mistakes during installation.
Follow Manufacturer Instructions
Read the dimmer switch manual carefully. Follow all installation steps as described. Use the recommended wiring diagrams. This ensures safe and proper dimmer function.
Identify Your Existing Switch Type
Before installing a dimmer switch, identifying your existing switch type is essential. This step helps ensure compatibility and safety. Different switches work in different ways. Knowing your switch type guides you to choose the right dimmer.
Most homes have one of three common switch types. Each type has a unique wiring setup and function. Recognizing these will save time and avoid mistakes.
Single-pole Switch
A single-pole switch controls one light or set of lights from one location. It has two terminals and usually one wire for power and one for the light. These switches are the simplest and most common in homes.
Three-way Switch
A three-way switch controls one light from two different locations. It has three terminals and uses special wiring called traveler wires. These switches are often found in hallways or large rooms with two entrances.
Four-way Switch
A four-way switch works with two three-way switches to control a light from three or more locations. It has four terminals and is part of a more complex wiring system. These switches are less common but found in bigger spaces.
Turn Off Power Supply
Turning off the power supply is the first and most important step before connecting a dimmer to a light switch. It keeps you safe from electric shocks and prevents damage to your devices. Never skip this step. Safety comes first.
Before starting any electrical work, make sure no electricity flows to the switch. This allows you to work without any risk. Always double-check the power is off before touching wires.
Locate The Circuit Breaker
Find the main circuit breaker panel in your home. It is usually near your electric meter or in a utility room. Look for the breaker that controls the lights in the room where you will install the dimmer.
Switch Off The Correct Breaker
Flip the switch on the breaker panel to the OFF position. This cuts power to the light switch you want to change. If you are unsure, turn off the main breaker to stop power to the whole house.
Test The Power Is Off
Use a voltage tester or a simple lamp to check if the power is truly off. Touch the tester to the wires in the switch box. If the tester shows no electricity, it is safe to proceed.
Inform Others About The Work
Let others in your home know you have turned off the power. This prevents someone from accidentally switching it back on. A simple sign on the breaker panel can help.
Remove The Old Switch
Removing the old switch is the first step to install a dimmer switch. Safety is very important here. Turn off the power to the switch at the circuit breaker. Use a tester to check if the power is off. This prevents any electric shock during the process.
Next, remove the switch cover plate. Use a screwdriver to take out the screws holding the plate. Then, carefully pull the plate away from the wall.
Turn Off Power At The Breaker
Find the correct breaker for the switch and turn it off. Double-check by flipping the switch on and off. Use a voltage tester to make sure no electricity flows.
Remove The Switch Cover Plate
Use a screwdriver to unscrew the cover plate. Keep screws safe for later use. Pull the plate gently off the wall.
Unscrew And Pull Out The Old Switch
Unscrew the mounting screws holding the switch to the box. Pull the switch out slowly to see the wires. Do not touch wires before confirming power is off.
Note Wire Positions And Connections
Look closely at how wires connect to the switch. Take a photo or mark wires with tape. This helps to connect the dimmer switch correctly.
Credit: www.finnleyelectrical.com.au
Prepare The Dimmer Switch
Preparing the dimmer switch is an important step before installation. It ensures the switch works safely and correctly. This process helps avoid common problems like flickering or short circuits. Follow these simple steps to get your dimmer switch ready.
Check The Dimmer Switch Type
First, identify the type of dimmer switch you have. Some work only with specific bulbs. For example, LED dimmers differ from incandescent ones. Using the right dimmer type improves performance and safety.
Turn Off The Power
Always turn off the power at the circuit breaker. This step protects you from electric shock. Use a voltage tester to confirm no current is flowing. Safety is the top priority in any electrical work.
Remove The Dimmer Switch Cover
Next, remove the cover plate from the dimmer switch. This reveals the wiring terminals. Handle the switch carefully to avoid damage. Keep the screws safe for later use.
Inspect The Wiring Connections
Look at the wires attached to the dimmer switch. Check for any loose or damaged wires. Tighten loose connections with a screwdriver. Replace damaged wires before proceeding.
Prepare The Wires
Strip about half an inch of insulation from the wire ends. Use wire strippers for clean cuts. Avoid nicking the wire strands. Properly prepared wires make secure connections easier.
Connect The Dimmer Wires
Connecting the dimmer wires is a key step in replacing a light switch with a dimmer. Proper wiring ensures the dimmer works safely and correctly. It also helps avoid damage to your electrical system or the dimmer itself.
Before starting, turn off the power at the circuit breaker. Use a voltage tester to confirm no electricity flows to the switch. Safety first.
Match Wire Colors
Begin by identifying the wires coming from the wall and the dimmer. Most dimmers have black, red, and green or copper wires. Black and red are usually for power and load. Green or copper is the ground wire.
Match each dimmer wire to the corresponding wire from the wall. Black to black, red to red, and green or copper to the ground wire. Proper matching ensures the dimmer controls the light correctly.
Secure Wire Connections
Once wires are matched, twist them tightly together. Use wire nuts to cover and protect each connection. Make sure no bare wire shows outside the nut.
Give each connection a gentle tug. If it feels loose, twist the wires again and reattach the nut. Secure connections prevent shorts and flickering lights.
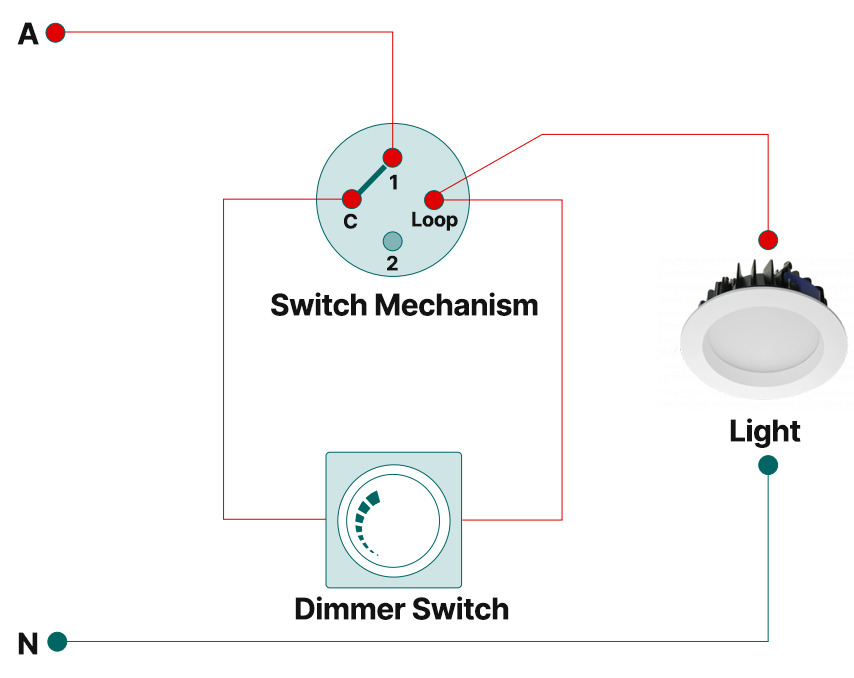
Install The Dimmer Switch
Installing the dimmer switch is a key step to control your light’s brightness. This process requires care and basic tools. Follow the steps carefully for a safe and successful setup.
Turn off the power at the breaker box before starting. This prevents electrical shocks and keeps you safe.
Unscrew the cover plate from the existing switch. Use a screwdriver to remove the switch from the wall box. Gently pull the switch out to expose the wires. Note how the wires are connected to the old switch. Take a photo for reference if needed.
Connect The Dimmer Switch Wires
Match the wires of the dimmer switch to the house wires. Usually, black wires connect to black, white to white, and green or copper to ground. Use wire connectors to secure the connections tightly. Make sure no bare wire is exposed outside the connectors.
Secure The Dimmer Switch And Test
Push the wires back carefully into the wall box. Attach the dimmer switch using screws. Place the cover plate back on. Turn the power back on at the breaker. Test the dimmer by sliding or turning the control. The light should adjust smoothly without flickering.
Restore Power And Test
Restoring power and testing your new dimmer switch is the final step. This step confirms your work is safe and the dimmer works properly. Take your time and follow each action carefully. Safety matters most.
Turn On The Circuit Breaker
Go back to your electrical panel. Find the breaker you switched off earlier. Flip it to the ON position to restore power. Wait a few seconds. This allows electricity to flow back to the switch.
Check The Dimmer Switch
Go to the room with the new dimmer switch. Flip the switch to the ON position. Slowly turn the dimmer dial or slide the control. Watch the light brighten and dim smoothly. Confirm no flickering or buzzing sounds occur.
Test Light Response
Adjust the dimmer through its full range. Test from the lowest to the brightest setting. Ensure the light changes evenly without turning off. This shows the dimmer is wired correctly and works well.
Look For Issues
Listen for any unusual sounds near the switch. Check if the light stays steady. If you notice flickering or buzzing, power off immediately. Double-check your wiring or consult an electrician. Safety first, always.
Troubleshooting Common Issues
Troubleshooting common issues with dimmer switches helps keep your lighting working smoothly. Problems can be simple to fix with the right steps. Understanding these issues saves time and frustration.
Dimmer Not Working
Check the power source first. Make sure the circuit breaker is on. Confirm the dimmer switch is wired correctly. Loose connections can stop it from working. Test the dimmer with a different bulb. Some dimmers don’t support certain bulb types. Replace the dimmer if it still does not work.
Flickering Lights
Flickering often means a bad connection. Tighten all wiring connections at the dimmer and switch box. Use bulbs compatible with the dimmer type. LED bulbs often flicker on incompatible dimmers. Replace flickering bulbs with dimmer-compatible ones. If flicker continues, check for voltage issues in your home.
Buzzing Sounds
Buzzing comes from electrical noise or loose parts. Make sure the dimmer is rated for your bulb type. LED and CFL bulbs sometimes cause buzzing. Tighten screws and wiring to stop vibration. Replace the dimmer switch with a higher quality model if buzzing persists. Avoid cheap dimmers as they often buzz.
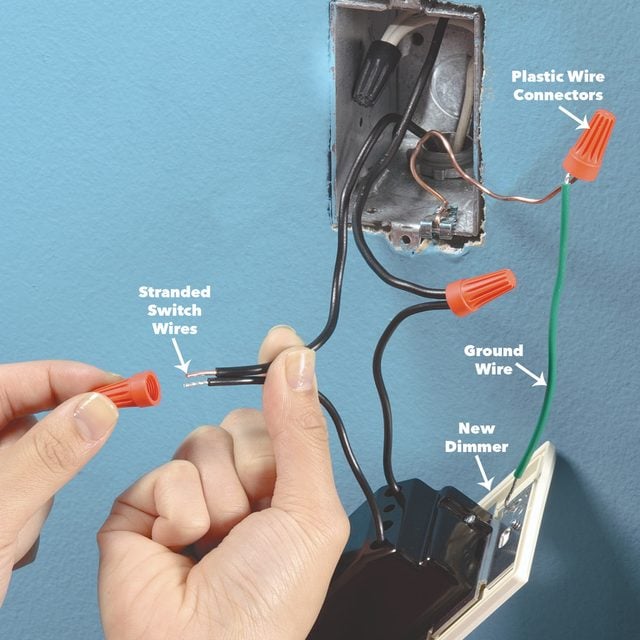
Credit: www.familyhandyman.com
Frequently Asked Questions
How Do I Connect A Dimmer To A Light Switch?
To connect a dimmer, first turn off power. Remove the existing switch, connect dimmer wires matching colors, secure connections, and mount the dimmer. Finally, restore power and test the dimmer for proper function.
Can I Replace A Light Switch With A Dimmer?
Yes, you can replace a standard light switch with a dimmer. Ensure the dimmer is compatible with your bulb type. Follow safety steps, switch off power, and connect the dimmer correctly for smooth dimming control.
What Tools Are Needed To Install A Dimmer Switch?
You need a screwdriver, wire stripper, voltage tester, and electrical tape. These tools help safely remove the old switch, prepare wires, and secure the new dimmer switch during installation.
Is It Safe To Install A Dimmer Switch Myself?
Yes, if you follow safety precautions. Turn off power at the breaker, use a voltage tester, and follow the wiring instructions carefully. If unsure, consult a professional electrician for safe installation.
Conclusion
Connecting a dimmer to a light switch is simple and useful. It lets you control the light brightness easily. Always turn off the power before starting work. Follow the steps carefully to avoid mistakes. Use the right tools and parts for safety.
Testing the dimmer after installation is important. Enjoy the comfort and energy savings that dimmers bring. This small change can improve your home’s lighting a lot. Try it yourself and see the difference.