If you’ve ever dealt with brake light problems, you know how frustrating it can be. The brake light switch is a small but crucial part that keeps your car safe by signaling when you press the brake pedal.
Sometimes, you may need to disconnect this switch to fix an issue or replace it. But how do you do that without causing more trouble? This guide will walk you through the simple steps to disconnect your brake light switch quickly and safely.
Keep reading—you’ll learn exactly what to do, even if you’re not a car expert.

Credit: www.wikihow.com
Tools Needed
Gathering the right tools makes disconnecting the brake light switch easier and safer. Using proper tools helps avoid damage and saves time. Prepare everything before starting the job.
Basic Hand Tools
Start with a set of basic hand tools. A flathead screwdriver and a Phillips screwdriver are essential. These help remove panels or covers near the switch. A pair of pliers can also help with tight connectors.
Socket Set
A socket set is useful for bolts holding the switch in place. Common sizes range from 8mm to 12mm. Choose the correct size to avoid stripping bolts. A ratchet wrench will speed up the removal process.
Multimeter
A multimeter checks the electrical connection of the brake light switch. It helps confirm power flow and switch function. Testing ensures the switch is fully disconnected and not faulty.
Safety Gloves
Wear safety gloves to protect your hands. Gloves prevent cuts and bruises from sharp parts. They also improve grip on small tools and components.

Credit: www.youtube.com
Locate The Brake Light Switch
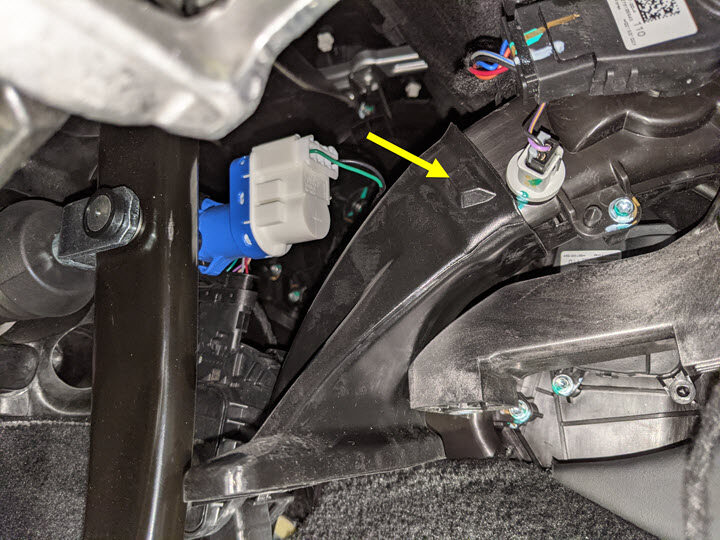
Locating the brake light switch is the first step in disconnecting it safely. The brake light switch controls the brake lights by sending a signal when you press the brake pedal. Finding it makes the process easier and faster.
The brake light switch is usually near the brake pedal. It is a small device connected to the pedal arm or bracket. The switch has wires running from it to the car’s electrical system.
Check Under The Dashboard
Look under the dashboard on the driver’s side. The brake light switch is often mounted on the brake pedal bracket. It is close to where the brake pedal connects to the car.
Identify The Switch Shape And Wiring
The brake light switch is small and rectangular or cylindrical. It has one or two electrical connectors with wires attached. The wires usually run towards the fuse box or brake light circuit.
Use A Flashlight For Better Visibility
Use a flashlight to see clearly under the dashboard. The area can be dark and cramped. Light helps you spot the switch and wires easily.
Consult The Vehicle Manual
The vehicle manual shows the exact location of the brake light switch. It may have pictures or diagrams. This guide helps confirm you found the right part.
Prepare The Vehicle
Preparing the vehicle is the first step before disconnecting the brake light switch. This ensures a safe and smooth process. Proper preparation prevents damage and protects you from electrical hazards.
Ensure Safety
Park the vehicle on a flat surface. Engage the parking brake firmly. Turn off the engine and remove the key from the ignition. Wear gloves and safety glasses to protect your hands and eyes. Keep the area well-lit and free from distractions.
Disconnect Battery
Locate the vehicle’s battery under the hood. Use a wrench to loosen the negative battery terminal. Remove the negative cable first to stop electrical flow. Secure the cable away from the battery to avoid accidental contact. This step prevents short circuits during the brake light switch work.
Remove Electrical Connector
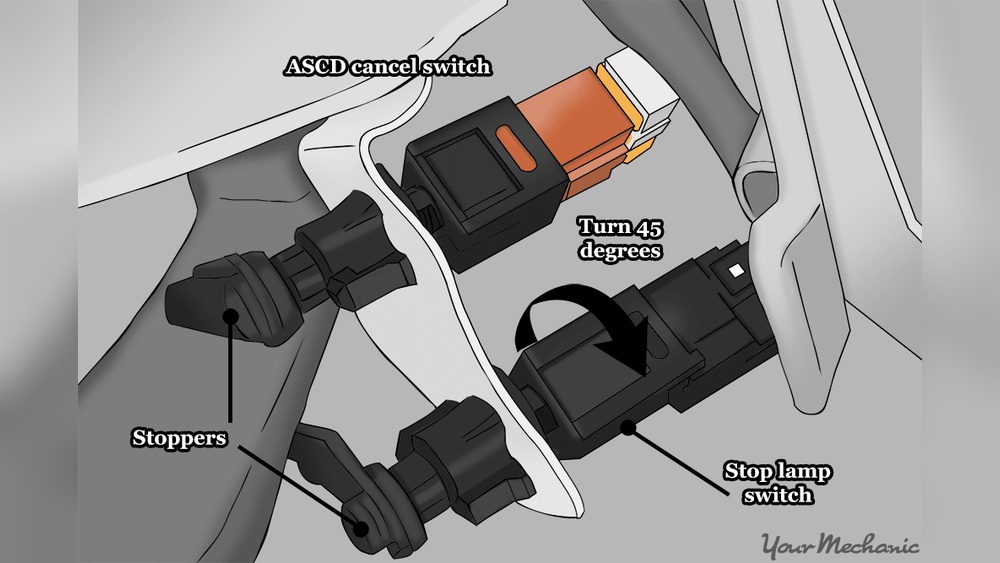
Start by locating the brake light switch connector near the brake pedal. Gently press the tab and pull the connector straight out to disconnect it safely. Avoid pulling on the wires to prevent damage.
Identify The Electrical Connector
The electrical connector links the brake light switch to the car’s wiring. It carries power to the brake lights. Before disconnecting, locate this connector near the brake pedal. It usually has a plastic housing and wires coming out of it.
Press The Release Tab
Most connectors have a small tab or clip that locks them in place. Press this tab gently with your fingers or a small tool. This unlocks the connector and allows you to pull it apart. Do not force it to avoid damage.
Pull The Connector Apart
Hold the connector by its housing, not the wires. Pull it straight out to disconnect from the brake light switch. If it feels stuck, press the release tab again. Avoid twisting or yanking to prevent breaking the connector.
Detach The Brake Light Switch
Detaching the brake light switch is a simple but important step. It allows you to replace or inspect the switch safely. Follow clear steps to avoid damage or mistakes. Understanding how the switch is mounted helps you remove it correctly.
Identify Mounting Method
Look closely at the brake light switch. It may be held by a clip, screw, or bolt. Some switches snap into place. Others require loosening fasteners. Check the area around the switch for any locking tabs. Knowing the mounting method saves time and prevents damage.
Release The Switch
Use the right tool for the mounting type. Press clips gently to release the switch. Turn screws or bolts counterclockwise to loosen them. Pull the switch straight out without twisting. Handle the switch carefully to avoid breaking it. Keep the mounting parts safe for reinstallation.
Test The Brake Lights
Testing the brake lights is a key step after disconnecting the brake light switch. It ensures the lights work properly for safety. Faulty brake lights can cause accidents or traffic tickets.
This test is simple and quick. It helps find any wiring or switch problems early. Follow these steps to check the brake lights correctly.
Prepare For The Test
Park your car on a flat surface. Turn off the engine and set the parking brake. Get a helper to assist you by watching the brake lights.
Press The Brake Pedal
Ask your helper to stand behind the car. Slowly press the brake pedal. The brake lights should turn on immediately. If not, there might be a connection issue.
Check Each Brake Light
Verify all brake lights light up. Look for any dim or flickering lights. These signs show a possible electrical problem or a bad bulb.
Use A Brake Light Tester
You can use a brake light tester tool for accuracy. Connect the tester to the brake light switch. This tool simulates pressing the brake pedal and shows if the circuit works.
Fix Problems Found
Note any lights that do not work. Replace bulbs or repair wiring as needed. Reconnect the brake light switch and test again. Safe driving depends on working brake lights.
Tips For Reinstallation
Reinstalling the brake light switch requires care and attention. Proper reinstallation ensures the brake lights work safely and correctly. Follow these tips to avoid problems and keep your vehicle safe on the road.
Check The Switch Position
Place the brake light switch exactly where it was. The switch should align with the brake pedal arm. Incorrect positioning can cause the brake lights to stay on or not light up.
Tighten Mounting Securely
Use the correct tools to tighten the mounting screws or bolts. The switch must be firmly attached but not over-tightened. Loose mounting can cause switch movement and failure.
Reconnect Electrical Connector
Attach the electrical connector to the switch carefully. Ensure it clicks into place. A loose connection may cause brake lights to malfunction or flicker.
After reinstalling, press the brake pedal and check the lights. The brake lights should turn on immediately. Test multiple times to confirm proper function.
Adjust Switch If Needed
If the brake lights stay on or do not light, adjust the switch. Small movements can fix alignment problems. Adjust until the lights respond correctly to the pedal.
Credit: service.tesla.com
Frequently Asked Questions
How Do I Safely Disconnect A Brake Light Switch?
First, turn off the vehicle and remove the key. Locate the brake light switch near the brake pedal. Disconnect the electrical connector carefully to avoid damage. Use gloves for safety and avoid touching metal parts to prevent electrical shocks.
What Tools Are Needed To Disconnect Brake Light Switch?
You typically need a flathead screwdriver and pliers. Some switches may require a socket wrench. Always check your vehicle’s manual for specific tools. Having gloves and safety glasses is also recommended for protection.
Can Disconnecting Brake Light Switch Cause Issues?
Yes, disconnecting it can disable brake lights. This may lead to safety hazards and legal issues. Always ensure the switch is reconnected properly after inspection or repair to maintain brake light functionality.
How To Identify The Brake Light Switch Location?
The brake light switch is usually near the top of the brake pedal arm. It’s a small electrical component connected to wiring. Consult your vehicle manual for exact location details to avoid confusion.
Conclusion
Disconnecting a brake light switch is a simple task anyone can do. Follow the steps carefully and stay safe. Double-check your work before driving the vehicle again. This helps avoid brake light problems on the road. Taking time to do it right saves you money and trouble later.
Remember, small fixes keep your car working well. Try this guide next time you need to disconnect your brake light switch. You’ll feel more confident handling basic car repairs yourself.