Are you looking to brighten up your space with multiple LED strip lights but want to control them all with just one switch? Connecting several LED strips to a single switch might sound tricky, but it’s easier than you think.
Imagine turning on all your lights at once with a simple click—no fuss, no hassle. In this guide, you’ll discover clear, step-by-step instructions to make your lighting setup neat, efficient, and perfectly synced. Keep reading, and by the end, you’ll have full control over your LED strips without any complicated wiring headaches.
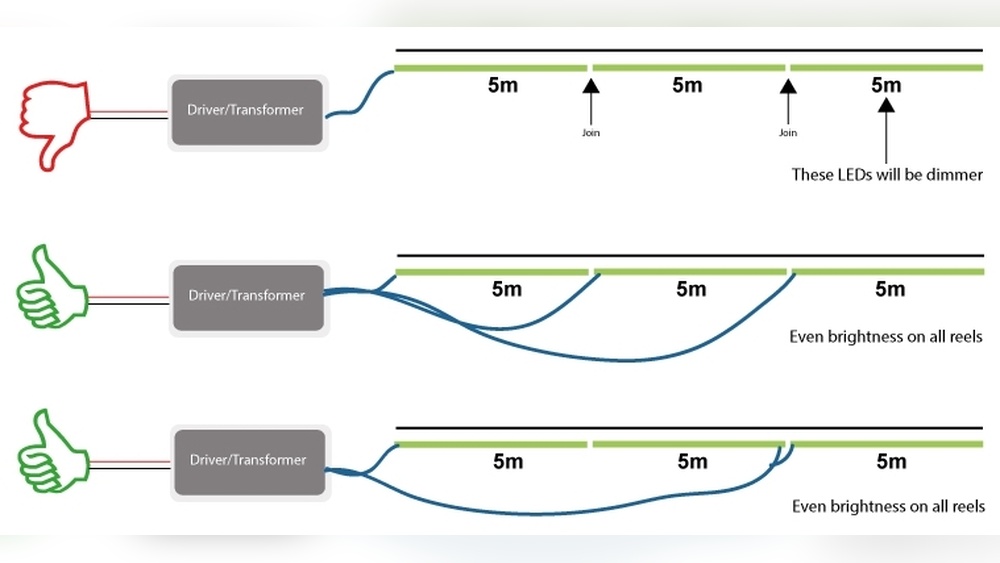
Credit: hitlights.com
Choosing The Right Led Strips
Choosing the right LED strips is key to a smooth setup. It affects how your lights work and how long they last. Pick strips that fit your space and style. Consider the type, power needs, and size carefully. This helps avoid problems and keeps your room looking great.
Types Of Led Strip Lights
There are several LED strip types. Single-color strips shine one color only. RGB strips change colors using a controller. Some strips mix white and color LEDs for flexible lighting. Choose a type that matches your mood and space use.
Voltage And Power Requirements
LED strips need the right voltage to work well. Common voltages are 12V and 24V. Check your power supply matches the strip’s voltage. The power (watts) depends on the strip length and brightness. Ensure your power source can handle all connected strips.
Length And Brightness Considerations
Measure your space before buying LED strips. Longer strips need more power and may dim at the ends. Brightness is shown in lumens per meter. Pick brightness levels based on room size and lighting needs. Avoid too dim or too bright lights for comfort.
Selecting The Switch
Selecting the right switch is important for controlling multiple LED strip lights. The switch must handle the total power and work well with LED technology. Choosing a suitable switch keeps your setup safe and efficient.
Types Of Switches Compatible With Led Strips
Simple on/off switches work fine for many LED strips. Toggle and rocker switches are common choices. Dimmer switches allow adjusting brightness, but only use LED-compatible dimmers. Avoid using old dimmers made for incandescent bulbs.
Switch Ratings And Capacity
Check the voltage and current ratings on the switch label. The switch must support the total wattage of all connected LED strips. Using a low-rated switch can cause overheating or failure. Always pick a switch with a higher rating than your setup requires.
Smart Switch Options
Smart switches offer remote control and scheduling features. They connect to Wi-Fi or Bluetooth for app control. Some support voice commands through smart home devices. Choose smart switches designed for LED lighting to prevent flickering.
Wiring Basics For Multiple Led Strips
Connecting multiple LED strip lights to one switch needs a clear understanding of wiring basics. Proper wiring ensures all strips work well together. It also keeps the setup safe and efficient. Learning these basics helps avoid common mistakes. This section covers key points about wiring multiple LED strips.
Connecting In Series Vs Parallel
LED strips can connect in two main ways: series and parallel. Series means connecting strips one after another. The current flows through each strip in turn. This setup can cause dim lights if strips are too long.
Parallel connection means each strip connects directly to the power source. Each strip gets full voltage. This method keeps brightness even across all strips. Parallel wiring is usually better for multiple LED strips.
Calculating Total Load
Total load means the total power all LED strips use together. Calculate it to avoid overloading the power supply. Check the wattage of one LED strip first. Multiply by the number of strips connected. The power supply should support this total load.
Too much load can cause flickering or damage. Use a power supply with some extra capacity for safety. This simple step protects your LED setup.
Safety Precautions
Always turn off power before starting any wiring. Use insulated tools to avoid electric shock. Make sure all connections are tight and secure. Loose wires can cause short circuits or fires.
Do not exceed the power supply limits. Use fuses or circuit breakers if possible. Keep wires away from water or heat sources. Following these safety steps protects you and your LED lights.
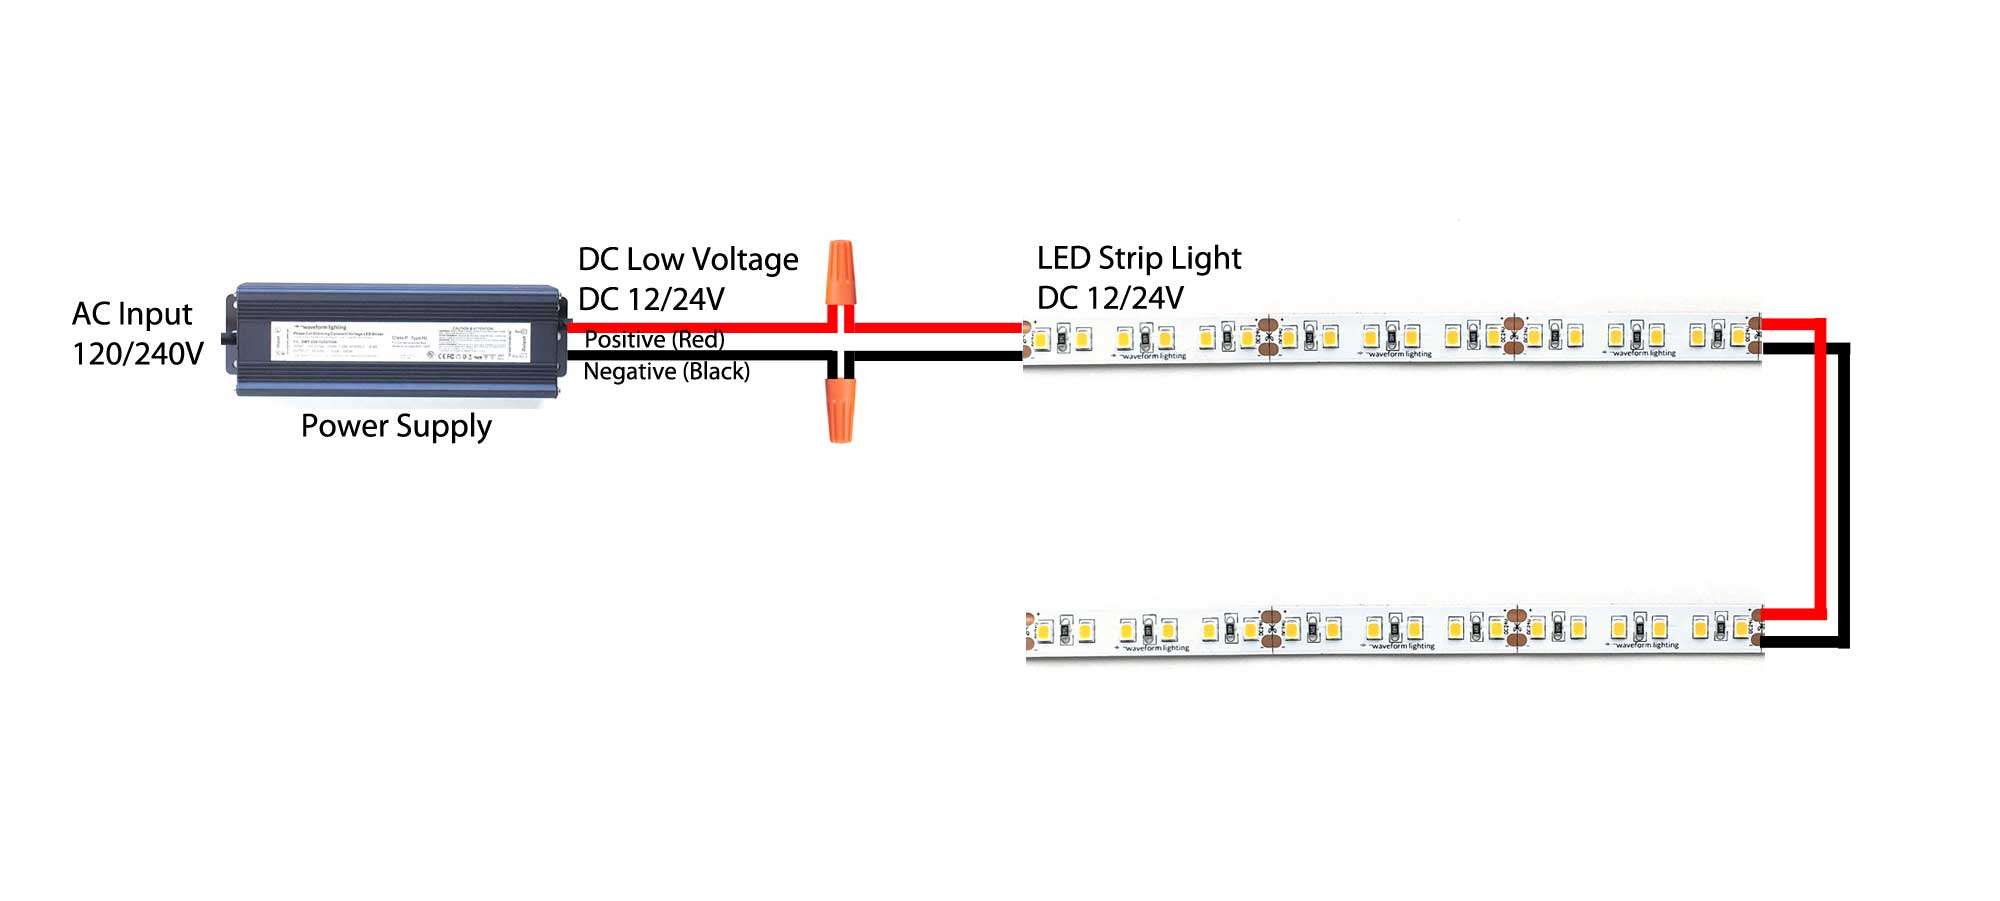
Credit: www.waveformlighting.com
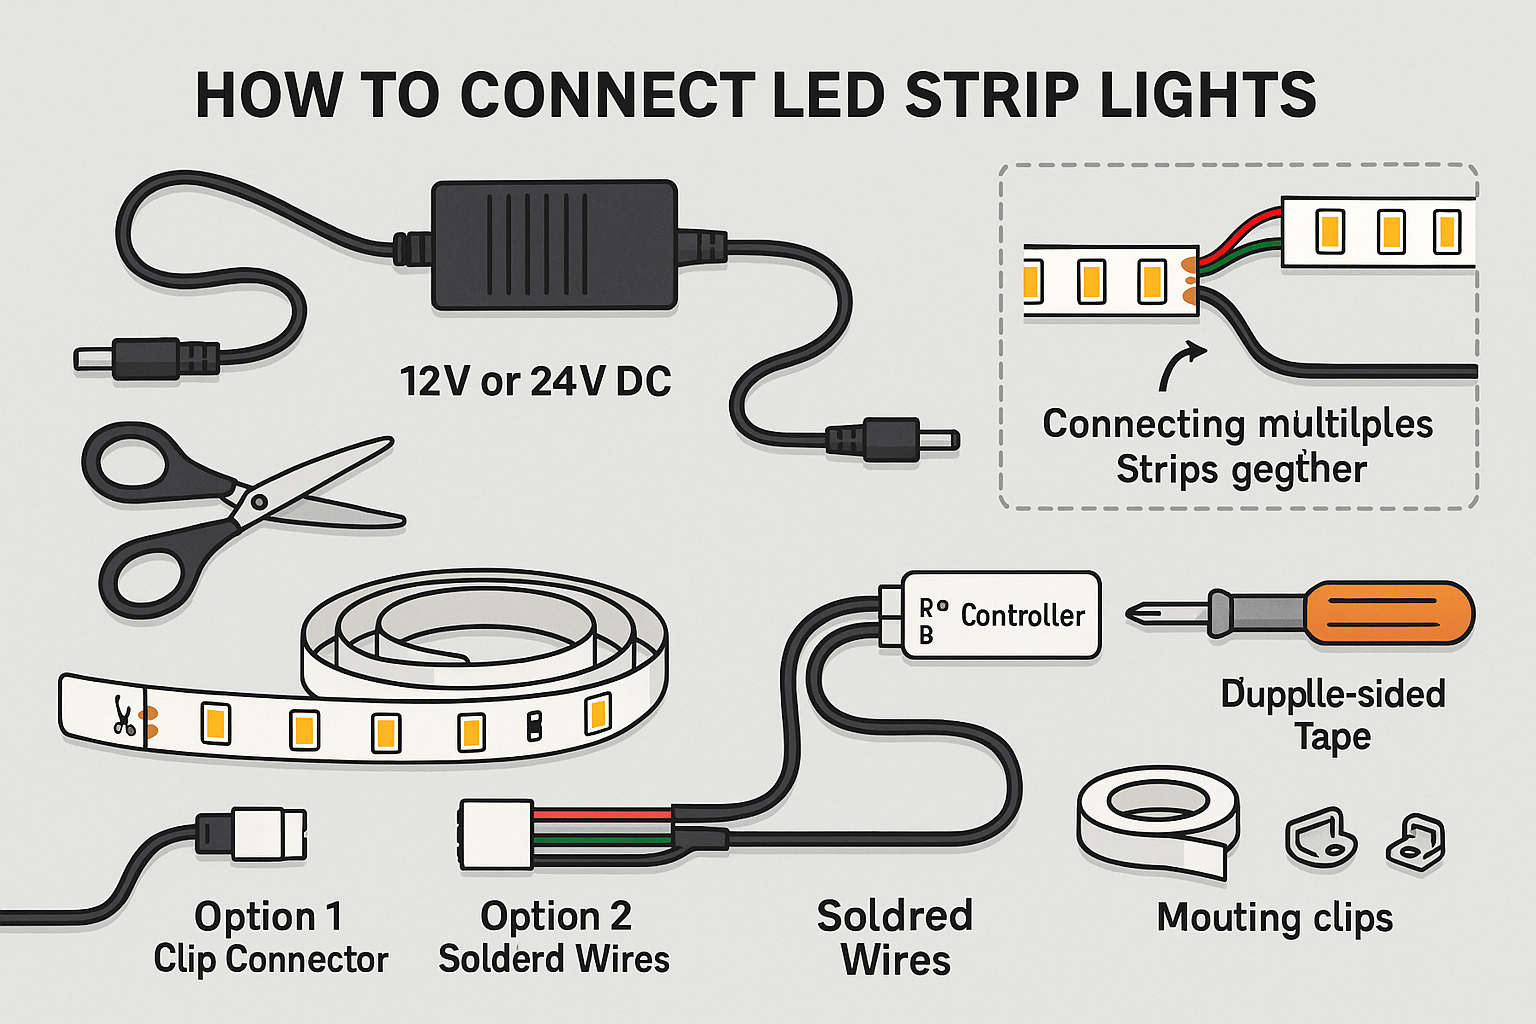
Tools And Materials Needed
Connecting multiple LED strip lights to one switch needs the right tools and materials. Using proper equipment ensures a safe and smooth setup. This section explains the key items you will need.
Essential Wiring Tools
Start with basic wiring tools. A wire stripper helps remove insulation without damage. A screwdriver is needed to tighten terminals and connectors. Pliers assist in bending and holding wires firmly. A multimeter checks voltage and continuity to avoid errors. Electrical tape secures connections and prevents shorts. Having these tools ready makes the job easier and safer.
Connectors And Accessories
Choose the correct connectors for your LED strips. Quick connectors allow easy joining without soldering. Soldering kits provide a strong, permanent bond if preferred. Heat shrink tubing protects and insulates soldered joints. Splitter cables help connect multiple strips to one power source. Use mounting clips or adhesive tapes to fix strips in place. The right accessories ensure neat and reliable wiring.
Power Supply Considerations
Select a power supply that matches your LED strips’ voltage and current. Check the total length of all strips to calculate power needs. Use a power supply with enough wattage to avoid dim lights or damage. A switch compatible with your power supply type is important. Consider a power supply with built-in protection against overheating or short circuits. Proper power planning keeps your LED setup safe and bright.
Step-by-step Connection Process
Connecting multiple LED strip lights to one switch can brighten any room easily. This process is simple but requires careful steps to ensure safety and proper function. Follow each step below to connect your LED strips correctly.
Preparing The Led Strips
First, gather all your LED strips and check their length. Cut the strips only at marked points to avoid damage. Peel back the protective cover on the copper pads for better contact. Make sure the strips are clean and dry before starting the connection.
Wiring Multiple Strips Together
Use connectors or solder wires to join the strips. Match the positive (+) and negative (-) terminals carefully. Keep the wires short to avoid voltage drop. Arrange the strips in a line or shape that fits your space. Secure the connections with electrical tape or heat shrink tubing.
Connecting To The Switch
Turn off the power before working on wiring. Connect the main power wires from the LED strips to the switch terminals. Use a proper switch rated for LED lighting. Attach the switch to the power source, following the wiring diagram. Double-check all connections for safety.
Testing The Setup
Switch on the power and press the switch to test. All LED strips should light up evenly. If some strips do not light, check the wiring again. Look for loose connections or reversed polarity. Adjust or fix any issues until all strips work perfectly.
Troubleshooting Common Issues
Troubleshooting common issues with multiple LED strip lights connected to one switch is important. It helps keep your lighting system working well. Problems like flickering lights, strips not turning on, or overheating can occur. Solving these problems quickly saves time and avoids damage. Here are ways to fix these common issues.
Flickering Lights
Flickering lights happen often with LED strips. Loose connections are a common cause. Check all wires and connectors to make sure they are tight. Using a poor power supply can also cause flickering. Use a power supply that matches the strips’ voltage and current needs. Sometimes, long strip runs cause voltage drop. Try shorter runs or add extra power points along the strip.
Strips Not Turning On
When strips do not turn on, start by checking the power source. Make sure the switch and power supply are working. Test with another device to confirm power flow. Check the polarity of the connections; LED strips need correct positive and negative wiring. A broken strip or connector can stop the lights. Inspect the strips closely for damage or loose joints. Replace any faulty parts to restore lighting.
Overheating Problems
LED strips may overheat from too much current or poor ventilation. Use a power supply with the right wattage to avoid excess heat. Avoid connecting too many strips to one power source. Mount strips on aluminum channels or heat sinks to help cool them. Keep the strips away from tight spaces or direct heat. Overheating shortens LED life and can cause failure.
Enhancing Your Led Setup
Enhancing your LED setup makes your lighting more flexible and fun. You can control brightness, add more strips, and keep lights working longer. These upgrades improve your space and your experience.
Using Dimmers And Controllers
Dimmers let you change the light’s brightness easily. Controllers add color and effects. They give you more control with simple buttons or apps. This makes your lighting fit any mood or activity.
Expanding With Additional Strips
Add more LED strips to cover bigger areas or new spots. Connect extra strips to the same switch for uniform control. Make sure your power supply can handle the extra load. This way, your lighting stays bright and safe.
Maintaining Your Led Lights
Clean your LED strips regularly to remove dust and dirt. Check connections often to prevent loose wires. Replace damaged strips quickly to avoid problems. Proper care keeps your lights bright and lasting longer.

Credit: www.youtube.com
Frequently Asked Questions
How Do I Wire Multiple Led Strips To One Switch?
Connect all LED strip positive wires to the switch output terminal. Then, connect all negative wires to the power supply negative. Ensure the power supply can handle the total current of all strips combined for safe operation.
Can One Power Supply Handle Several Led Strips?
Yes, one power supply can power multiple LED strips if its wattage rating exceeds the total power draw of all strips combined. Always check the total current requirement and choose a supply with a margin for safety.
What Type Of Switch Works Best For Led Strips?
A standard single-pole switch or a relay switch works well for LED strips. For dimmable strips, use a compatible dimmer switch. Ensure the switch can handle the current drawn by all connected LED strips.
How Do I Prevent Voltage Drop In Long Led Strip Connections?
To prevent voltage drop, use thicker gauge wires and shorter cable runs. Consider injecting power at multiple points along the strips, especially for longer runs, to maintain brightness and performance.
Conclusion
Connecting multiple LED strip lights to one switch can simplify your lighting setup. It saves space and makes control easier. Always check the power limits and wiring instructions. Use proper connectors to avoid problems. Keep safety in mind to prevent accidents.
With these steps, you can enjoy smooth and neat lighting control. Try it yourself and see how convenient it feels. Simple, smart, and effective lighting starts here.


