Imagine walking into a room and controlling both your fan and light with just one simple switch. No more fumbling with multiple switches or getting up to turn off the fan separately.
Wouldn’t that make your daily routine smoother and your space more organized? If you’ve ever wondered how to simplify this little but important part of your home, you’re in the right place. You’ll discover easy steps and practical tips to control your fan and light together, saving you time and adding convenience to your life.
Keep reading, and you’ll learn how to make your home smarter with a simple switch!
Credit: www.homedepot.com
Tools And Materials Needed
Controlling a fan and light with one switch requires specific tools and materials. Having the right items ensures a safe and smooth setup. This section lists everything needed for the job.
Basic Electrical Tools
- Screwdriver (flathead and Phillips)
- Wire stripper
- Voltage tester
- Needle-nose pliers
- Electrical tape
- Wire nuts
- Drill (optional for mounting)
Required Switch Types
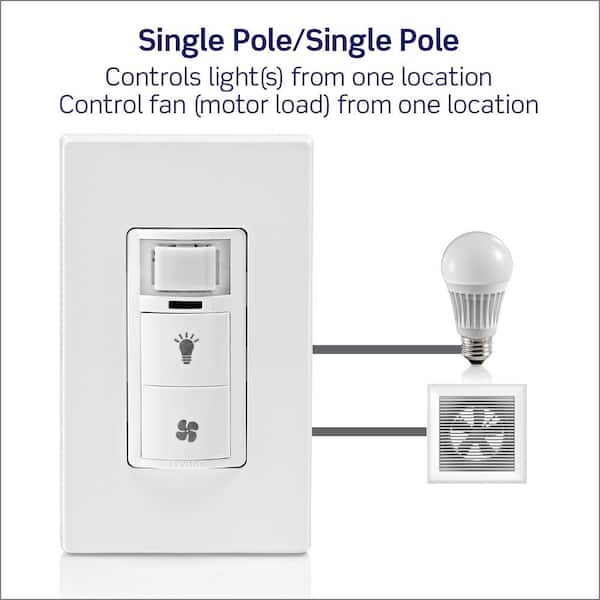
- Single-pole switch with dual control
- Combination fan and light switch
- Smart switch with fan and light control (optional)
Additional Components
- Electrical wires (14 or 12 gauge depending on circuit)
- Wall plate to cover switch
- Wire connectors
- Mounting screws

Credit: www.reddit.com
Safety Precautions
Safety is the top priority when controlling a fan and light with one switch. Working with electricity can be risky without proper care. Follow key safety steps to avoid accidents and damage. Simple precautions protect you and your home.
Power Off Procedures
Always turn off the main power before starting any work. Use the circuit breaker to cut electricity to the switch. Double-check with a voltage tester to confirm power is off. Never trust the switch position alone. This prevents electric shocks and injuries.
Protective Gear
Wear insulated gloves to protect your hands from electric shocks. Use safety goggles to shield your eyes from dust and sparks. Avoid loose clothing or jewelry that can catch on wires. Proper gear reduces the risk of harm during installation.
Working With Electrical Wiring
Handle wires carefully to avoid damaging insulation. Use proper tools designed for electrical work. Follow wiring diagrams exactly to connect wires correctly. Secure all connections tightly to prevent shorts. If unsure, consult a professional electrician to stay safe.
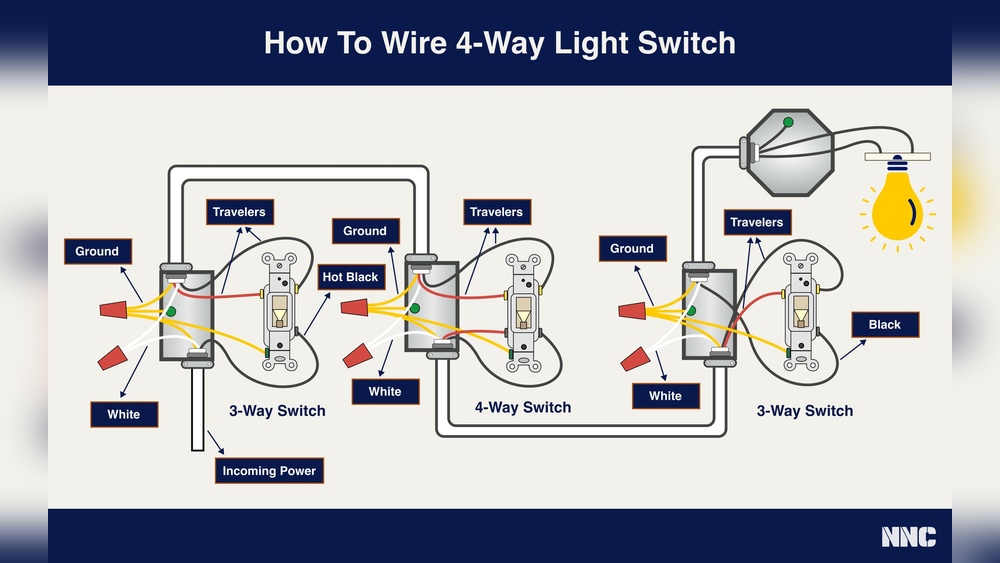
Types Of Switches For Fan And Light Control
Controlling a fan and light with one switch requires a careful wiring setup. The right wiring method ensures both devices work correctly and safely. There are several wiring options to connect a fan and light to a single switch. Each method has its own benefits and challenges. Understanding these options helps in choosing the best approach for your project.
Parallel Wiring
Parallel wiring connects the fan and light side by side. Both devices get power from the same source. This setup allows the fan and light to run independently. If one device fails, the other still works. Parallel wiring is simple and common in homes. It keeps the voltage stable for both devices.
Series Wiring
Series wiring links the fan and light one after the other. Power flows through the fan before reaching the light. This setup is less common because it can cause issues. The devices share the same current, which may reduce performance. If one device stops working, both will turn off. Series wiring is not ideal for fan and light control.
Using A Relay Or Contactor
A relay or contactor acts as a switch controlled by the main switch. It allows higher power devices to run safely. The switch controls the relay coil, which turns the fan and light on or off. This method protects the switch from heavy current. It also offers more flexibility for future upgrades. Using a relay is a smart choice for larger fans or lights.
Wiring Setup Options
Controlling both a fan and light with one switch saves space and simplifies your setup. This step-by-step guide helps you install the switch safely and correctly. Follow each step carefully to avoid mistakes and ensure proper function.
Switch Removal
Turn off the power at the circuit breaker to stay safe. Use a voltage tester to confirm no electricity flows to the switch. Remove the switch cover plate by unscrewing it. Unscrew the old switch and gently pull it out from the wall. Note how the wires are connected before disconnecting them.
Wiring Connections
Identify the fan and light wires among the cables. Connect the common wire to the switch’s common terminal. Attach the fan wire to one of the switch terminals. Attach the light wire to the other switch terminal. Tighten all screws to secure the wires firmly. Use wire nuts to join wires if needed. Make sure no bare wires show outside the connections.
Mounting The Switch
Carefully push the switch back into the wall box. Align it so the screw holes match. Screw the switch into place without over-tightening. Attach the switch cover plate and screw it firmly. Turn on the circuit breaker. Test the switch by toggling it to control the fan and light together.
Step-by-step Installation
Testing and troubleshooting are key steps after installing a switch to control a fan and light. These steps ensure the setup works correctly and safely. Faulty wiring or poor connections can cause problems. Proper testing helps find and fix these issues quickly.
Checking Connections
Start by turning off the power at the breaker. Remove the switch cover plate. Inspect all wire connections carefully. Make sure wires are tight in their terminals. Look for loose or disconnected wires. Check that the fan and light wires connect to the right terminals. Use a voltage tester to confirm power is off before touching wires.
Common Issues
The fan or light may not turn on. The switch might feel loose or not click properly. The fan could run without the light, or the light works without the fan. Flickering lights or a humming sound can happen. These signs show wiring problems or a faulty switch. Sometimes, the breaker may trip repeatedly.
Fixing Wiring Errors
Check the wiring diagram for your switch model. Correct any swapped wires by moving them to the right terminals. Tighten any loose wire connections. Use wire nuts to secure exposed wires. Replace damaged wires if needed. If the switch is faulty, replace it with a new one. Turn the power back on and test the switch again carefully.
Testing And Troubleshooting
Controlling a fan and light with one switch can be simple and smart. Efficient control helps save energy and adds comfort. Small changes make a big difference in daily use.
Here are some tips to control your fan and light better. These ideas help you use less power and enjoy easy operation.
Using Dimmer Switches
Dimmer switches adjust light brightness smoothly. You can set the light to low or high as needed. Some dimmers also control fan speed. This lets you choose the perfect setting for any time.
Smart Switch Integration
Smart switches connect to your phone or voice assistants. Control fan and light without moving. Set schedules to turn devices on or off automatically. Save energy and keep your home comfortable.
Energy Saving Practices
Turn off fan and light when not in use. Use natural light during the day. Clean fan blades regularly for better airflow. Choose energy-efficient bulbs to lower power use.

Credit: diy.stackexchange.com
Frequently Asked Questions
How Can One Switch Control Both Fan And Light?
One switch can control both by wiring a single switch to the fan and light circuit. This setup uses a dual load switch or a relay to manage both devices simultaneously.
Is It Safe To Control Fan And Light With One Switch?
Yes, it is safe if installed correctly. Ensure proper wiring and use a switch rated for combined load to avoid electrical hazards.
What Tools Are Needed To Control Fan And Light With One Switch?
You need a screwdriver, wire stripper, voltage tester, electrical tape, and a suitable switch. Always turn off power before starting.
Can I Control Fan Speed And Light Brightness With One Switch?
No, a single switch typically controls on/off only. Separate dimmer or speed controllers are required for brightness and speed adjustments.
Conclusion
Controlling a fan and light with one switch saves space and effort. It makes your room simpler and more organized. The process is easy to follow and does not need special skills. You can enjoy comfort and convenience every day.
Try this setup to improve your home’s functionality. It fits well in any room or style. Small changes can make a big difference. Start today and see how smooth life feels.