Are you ready to take control of your home lighting and add convenience to your daily routine? Learning how to connect a 4 way light switch might sound tricky, but it’s easier than you think.
With just a few simple steps, you can control one light from three or more locations—perfect for hallways, large rooms, or staircases. In this guide, you’ll find clear instructions and helpful tips that make the process straightforward, even if you’re not an expert.
Keep reading to discover how you can upgrade your lighting setup and enjoy the freedom of easy control right at your fingertips.

Credit: community.smartthings.com
What Is A 4 Way Switch
A 4 way switch controls a light from three or more places. It is part of a multi-switch system. This system allows you to turn a light on or off from different locations. This is very useful in large rooms or long hallways.
The 4 way switch works with two 3 way switches. The 3 way switches are at the ends of the circuit. The 4 way switch is placed between them. This setup lets you control the light from multiple points.
What Does A 4 Way Switch Look Like?
A 4 way switch has four terminals. These terminals connect to wires from the 3 way switches. The switch changes the connection path between these wires. This change controls whether the light is on or off.
Where Do You Use A 4 Way Switch?
Use a 4 way switch in places with three or more switch points. Common spots include hallways, staircases, and large rooms. It gives more control and convenience in turning lights on or off.
Why Use A 4 Way Switch?
A 4 way switch increases flexibility in lighting control. It lets you control one light from many places. This reduces the need to walk back to the first switch. It adds safety and ease to your home lighting.
Tools And Materials Needed
Preparing to connect a 4 way light switch requires the right tools and materials. Having everything ready makes the job easier and safer. This section lists all essential items for the task.
Basic Tools
Start with basic hand tools. A flathead screwdriver and a Phillips screwdriver are needed to remove and attach screws. Wire strippers help to strip the insulation off wires cleanly. Needle-nose pliers allow for bending and holding wires during connection. A voltage tester is important to check if wires carry electricity. This ensures safety before you touch any wire.
Electrical Materials
You will need the 4 way switch itself along with two 3 way switches. Use electrical wires rated for your home’s voltage. Wire nuts are needed to connect wires safely and keep them secure. Electrical tape helps to insulate wire connections and prevent short circuits. A wall plate covers the switches and finishes the job neatly.
Safety Equipment
Safety gear protects you while working with electricity. Wear insulated gloves to avoid shocks. Safety glasses protect your eyes from debris. A sturdy ladder helps you reach high switch boxes comfortably. Always make sure the power is off before starting work.
Safety Precautions
Safety is the top priority when working with electrical switches. Handling a 4 way light switch requires care to prevent shocks or damage. Follow clear safety steps to keep yourself safe and ensure the wiring works correctly.
Turn Off Power At The Circuit Breaker
Always switch off the power at the main breaker before starting. Test the wires with a voltage tester to confirm no electricity flows. Never trust the switch position alone.
Use Proper Tools And Equipment
Use insulated tools designed for electrical work. Avoid metal tools that may cause short circuits. Wear rubber-soled shoes to reduce shock risk.
Work In A Dry Environment
Ensure the area is dry before starting. Water and electricity are a dangerous mix. Avoid working in damp or wet conditions to reduce shock risk.
Follow Wiring Diagrams Carefully
Use correct wiring diagrams to connect the 4 way switch. Miswiring can cause shorts or damage the circuit. Double-check each connection before restoring power.
Keep Children And Pets Away
Keep the work area free from children and pets. Distractions may lead to mistakes or accidents. Create a safe zone while working on electrical wiring.
Identify Existing Wiring Setup
Before installing a 4 way light switch, find the current wiring setup. This step makes the process safe and easy. Understanding the existing wires helps you connect the new switch correctly.
Check the wires in the switch box carefully. Look for the number and color of wires. These details give clues about how the switches are wired now.
Turn Off Power
First, turn off power at the circuit breaker. This prevents electric shock. Use a voltage tester to confirm no power is flowing to the switch box.
Remove Switch Cover
Take off the switch plate with a screwdriver. This exposes the wiring inside the box. Keep screws safe for later use.
Identify Wire Colors
Look at the colors of wires in the box. Common colors are black, white, red, and green or bare copper. Each color has a role in the circuit.
Note Wire Connections
Observe how wires connect to the switch terminals. Take photos or write notes. This helps you remember the setup before making changes.
Locate Traveler Wires
Find the traveler wires that link switches. They usually connect to brass screws. Knowing traveler wires is key for a 4 way switch.
Turn Off Power Supply
Turning off the power supply is the first and most important step before connecting a 4 way light switch. It keeps you safe from electric shocks. Always take this step seriously to avoid injuries or damage to your electrical system.
Before starting work, make sure no electricity flows to the switch. This stops any accidents while you handle the wires. Safety must come first in all electrical projects.
Locate The Main Circuit Breaker
Find your home’s main electrical panel. It usually stands in the basement, garage, or utility room. Look for the big switch or lever that controls all power in your house.
Turn Off The Correct Breaker
Identify the breaker for the switch you want to work on. It may be labeled by room or area. Flip this switch to the “off” position to cut power to the light switch.
Use A Voltage Tester
Check the wires with a voltage tester to confirm no power is running. Touch the tester to each wire. No light or sound means the circuit is safe to work on.
Inform Others In The House
Tell everyone that the power is off to avoid surprises. This prevents someone from turning the breaker back on while you work. Keep safety clear and simple.

Credit: community.inovelli.com
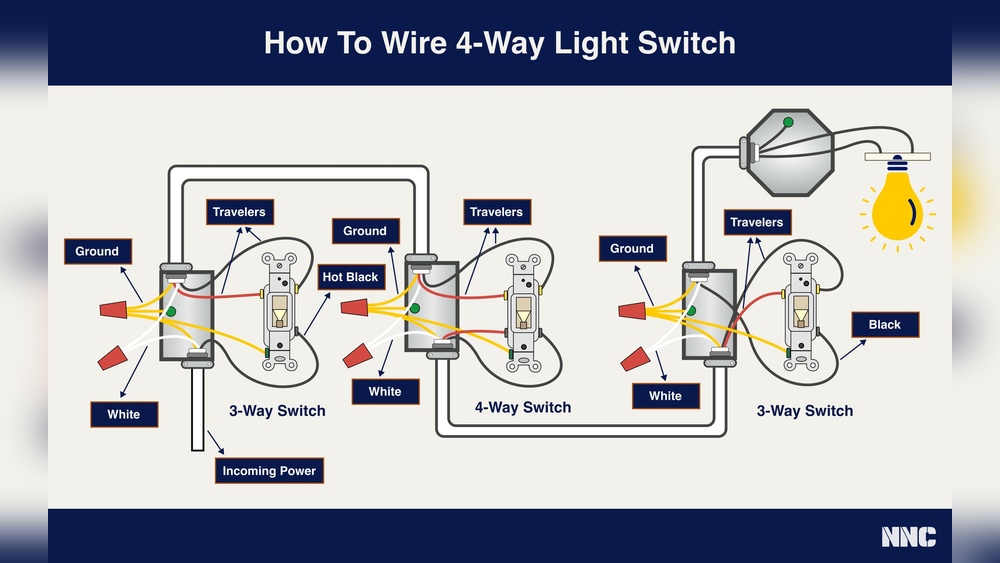
Wiring The 3 Way Switches
Wiring the 3 way switches is the first step in setting up a 4 way light switch system. These switches control the light from two different points. Getting the wiring right is important for safety and function.
Each 3 way switch has three terminals. One is the common terminal, and the other two are traveler terminals. The common terminal connects to the power source or the light fixture. The traveler terminals connect to the 4 way switch in the middle.
Identify The Common Terminal
Look for the common terminal on the 3 way switch. It usually has a different color screw, often black or dark bronze. Connect the wire from the power source or the light fixture to this terminal. This wire carries the live current or returns it to the light.
Connect The Traveler Wires
Attach the two traveler wires to the remaining terminals. These wires link the two 3 way switches through the 4 way switch. Make sure the connections are tight and secure. Loose wires can cause flickering or failure.
Check Ground Connections
Ground wires improve safety and reduce shock risks. Connect the ground wire to the green screw on the switch. Also, bond the ground wires together in the switch box. This step is key to meet electrical codes.
Test The 3 Way Switch Wiring
Before finalizing, turn on the power. Test each 3 way switch to see if it controls the light. The light should turn on and off from both switches. If not, check the wire connections again.
Connecting The 4 Way Switch
Connecting the 4 way switch allows control of one light from three or more locations. This setup is common in large rooms or long hallways. It needs two 3 way switches and one or more 4 way switches between them.
Understanding how to wire the 4 way switch is key. It ensures the light works correctly from all switches. Follow clear steps to connect wires to the right terminals on the 4 way switch.
Turn Off Power Before Starting
Always switch off the circuit breaker before working on the switch. Use a voltage tester to confirm no electricity flows. Safety first to avoid shocks.
Identify Traveler Wires
Locate the traveler wires coming from the 3 way switches. These wires connect to the 4 way switch. They usually have the same color or are marked.
Connect Traveler Wires To The 4 Way Switch
Attach the traveler wires to the 4 way switch terminals. The 4 way switch has two pairs of terminals. Each pair connects to traveler wires from one 3 way switch.
Secure Ground Wire
Connect the ground wire to the green screw on the 4 way switch. This adds an important safety path. Make sure it is tight and secure.
Test The Switch Setup
Turn the power back on and test each switch. The light should turn on or off from any switch location. If not, recheck the wiring connections.
Testing The Switches
Testing the switches is a key step after wiring a 4-way light switch. This ensures the connections work properly and the lights respond as expected. Checking each switch helps find any wiring mistakes early. Follow these simple steps to test your setup safely and clearly.
Turn Off Power Before Testing
Start by turning off the power at the circuit breaker. This prevents shocks and keeps you safe. Use a non-contact voltage tester to confirm no power is flowing. Safety first before touching any wires or switches.
Check Each Switch Position
Turn the power back on after confirming safety. Test each switch by flipping it on and off. The light should turn on or off from any switch. If not, note which switch fails to respond.
Use A Voltage Tester For Accuracy
A voltage tester can check if current flows through the switch terminals. Touch the tester probes to the terminals while toggling the switch. This helps find faulty switches or loose wires quickly.
Inspect For Loose Connections
If a switch doesn’t work, turn off power again. Open the switch cover and check all wire connections. Tighten any loose screws and ensure wires are secure. This often fixes common problems.
Repeat Testing After Adjustments
After fixing any issues, restore power and test the switches again. Confirm the light responds correctly from all switch locations. Repeat this process until all switches work smoothly.
Troubleshooting Common Issues
Troubleshooting common issues with a 4 way light switch can save time and stress. Problems often arise from wiring mistakes or faulty parts. Understanding the basics helps fix these problems quickly and safely.
Check wiring connections and switch functionality first. Many issues come from loose wires or wrong placements. Take a step-by-step approach to identify and correct errors.
Identifying Loose Or Disconnected Wires
Loose wires cause flickering or no light at all. Turn off power before checking wires. Look for wires that are not tightly connected to terminals. Tighten any loose connections with a screwdriver. Ensure wires match the original setup.
Testing The Switches For Faults
Switches can wear out or break over time. Use a voltage tester to check each switch. Replace any switch that does not pass the test. Faulty switches may cause lights to fail or flicker.
Verifying Correct Wiring Order
The 4 way switch system needs the right wiring order. Confirm traveler wires connect properly between switches. Wrong connections stop the light from working. Follow a wiring diagram to double-check each wire.
Checking For Power Supply Issues
No power means no light. Use a tester at the power source to confirm power flow. Check circuit breakers or fuses for tripped or blown parts. Reset or replace them as needed.

Credit: www.youtube.com
Frequently Asked Questions
What Tools Do I Need To Connect A 4-way Switch?
You need a screwdriver, wire stripper, voltage tester, and electrical tape. Also, have 14/3 or 12/3 electrical wire handy. These tools ensure safe and efficient installation of the 4-way switch.
How Do 3-way And 4-way Switches Differ?
A 3-way switch controls a light from two locations. A 4-way switch adds control from a third or more locations. The 4-way switch connects between two 3-way switches for multi-point control.
Can I Install A 4-way Switch Myself?
Yes, with basic electrical knowledge and safety precautions, you can install a 4-way switch. Always turn off power before starting. Follow wiring diagrams carefully to avoid mistakes or hazards.
What Is The Wiring Sequence For A 4-way Switch?
The 4-way switch has four terminals connecting two traveler wires from 3-way switches. These terminals allow the current to toggle between traveler wires, controlling the light from multiple locations.
Conclusion
Connecting a 4 way light switch is easier than it seems. Follow each step carefully and take your time. Double-check all wires before turning on power. Safety matters most, so always use caution. A properly connected switch lets you control lights from multiple spots.
Practice makes perfect, so don’t worry if it takes a few tries. Soon, you will feel confident handling basic electrical tasks. Keep this guide handy for future projects. Simple tools and patience can make a big difference. Now, enjoy the convenience of your new light setup.