Have you ever wished your lights could turn on and off automatically, saving you time and energy? Programming a timer switch for your lights is easier than you think.
Imagine coming home to a well-lit house without fumbling for the switch or worrying about leaving the lights on all day. In this guide, you’ll learn simple steps to set up your timer switch quickly and confidently. Keep reading, and by the end, you’ll have full control over your lighting schedule—making your home smarter and your life a little easier.
Choosing The Right Timer Switch
Choosing the right timer switch is important for easy and effective light control. The right switch saves energy and adds convenience. It fits your needs and works well with your home setup. Understanding the options helps you pick the best one. This section explains the types, compatibility, and power needs of timer switches.
Types Of Timer Switches
There are several types of timer switches. Mechanical timers use a dial and simple gears. They are easy to set and affordable. Digital timers offer more options like multiple on/off settings. Some have a battery backup to save settings during power loss. Smart timers connect to Wi-Fi and can be controlled by apps. Choose a type that matches your lifestyle and budget.
Compatibility With Light Fixtures
Not all timer switches work with every light fixture. Check if the timer supports LED, incandescent, or fluorescent bulbs. Some timers need a neutral wire to function. Older homes may lack this wire, limiting your options. Read the product details to confirm compatibility. Using the wrong timer can cause flickering or damage to lights.
Power Requirements
Timer switches have different power needs. Most require a neutral wire to complete the circuit. Some models work without it but with limited features. Verify the voltage rating matches your home’s electrical system. Using a timer with wrong power specs can cause failure or safety issues. Always follow the manufacturer’s instructions for installation and use.
Credit: www.thefrugalnoodle.com
Tools And Materials Needed
Before programming a timer switch for your lights, gather all needed tools and materials. This step ensures a smooth and safe installation. Having the right items ready saves time and avoids mistakes. Here is a simple list to help you prepare.
Basic Electrical Tools
Start with essential electrical tools. A screwdriver set is a must for removing and securing screws. Wire strippers help you remove insulation from wires safely. A voltage tester checks if wires carry current, ensuring safety. Needle-nose pliers make bending and twisting wires easier. These basic tools are enough for most timer switch installations.
Safety Equipment
Safety comes first. Use insulated gloves to protect your hands from electric shocks. Wear safety goggles to shield your eyes from sparks or debris. A flashlight or headlamp helps if you work in dim spaces. Always turn off power at the breaker before starting work. Safety equipment minimizes risk during the project.
Additional Components
Besides tools, some extra parts may be needed. Electrical tape secures wire connections and prevents shorts. Wire nuts join wires safely and firmly. A timer switch compatible with your lighting system is essential. Sometimes, a small electrical box is required if the current one is damaged. Keep all components ready before you start.
Preparing For Installation
Preparing for installation is a key step in setting up your timer switch. It ensures safety and smooth work. Before starting, gather all tools and materials. Read the timer switch manual carefully. Follow each step to avoid mistakes.
Turning Off Power
Safety first. Turn off power at the circuit breaker. Do not rely on the wall switch alone. Use a voltage tester to confirm power is off. This prevents electric shock and injury. Take your time with this step.
Removing The Existing Switch
Remove the switch cover plate using a screwdriver. Unscrew the switch from the wall box. Gently pull the switch out to see the wires. Keep track of screws and parts for later use. Avoid touching wires directly.
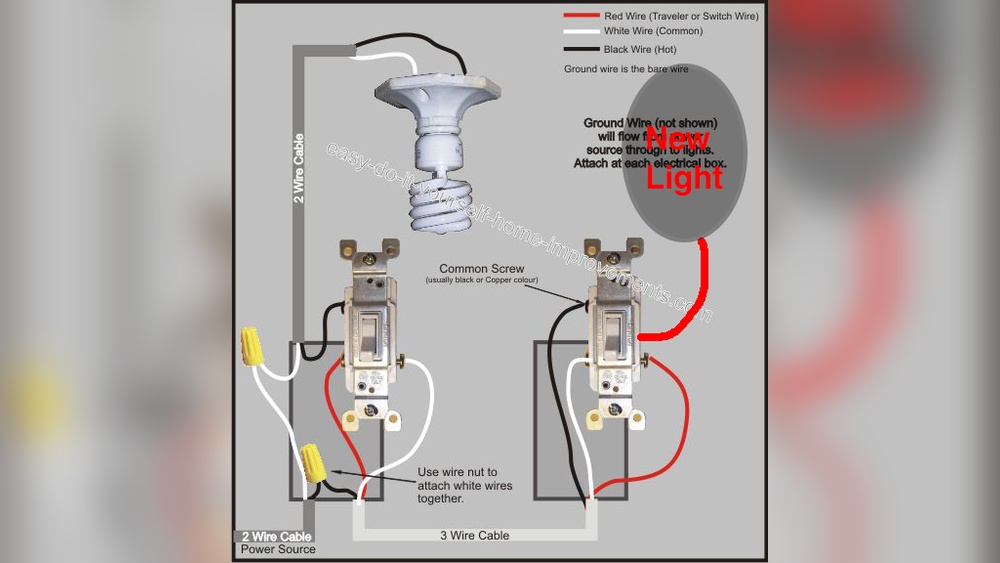
Identifying Wiring
Look at the wires connected to the old switch. Identify the live, neutral, and ground wires. Use a wire color guide if unsure. Take a photo for reference before disconnecting. Proper identification is crucial for correct installation.

Credit: www.reddit.com
Wiring The Timer Switch
Wiring the timer switch is a key step in setting up your light control. It needs careful work to ensure safety and proper function. This section guides you through each step, making the process clear and simple.
Connecting The Wires
Turn off the power at the breaker before starting. Identify the wires: usually, black is hot, white is neutral, and green or bare is ground. Match the timer switch wires to the house wires by color. Use wire nuts to join each pair tightly. Double-check each connection for security and correct color matching.
Securing The Timer Switch
Carefully push the wires back into the electrical box. Avoid pinching or bending them sharply. Attach the timer switch to the box with screws. Make sure the switch sits flush and level. Fix the faceplate over the switch for a clean finish.
Testing The Connections
Turn the power back on at the breaker. Press the timer switch buttons to check function. The lights should turn on and off according to your settings. If not, turn off power and review wiring connections. Testing confirms safe and correct operation of your timer switch.
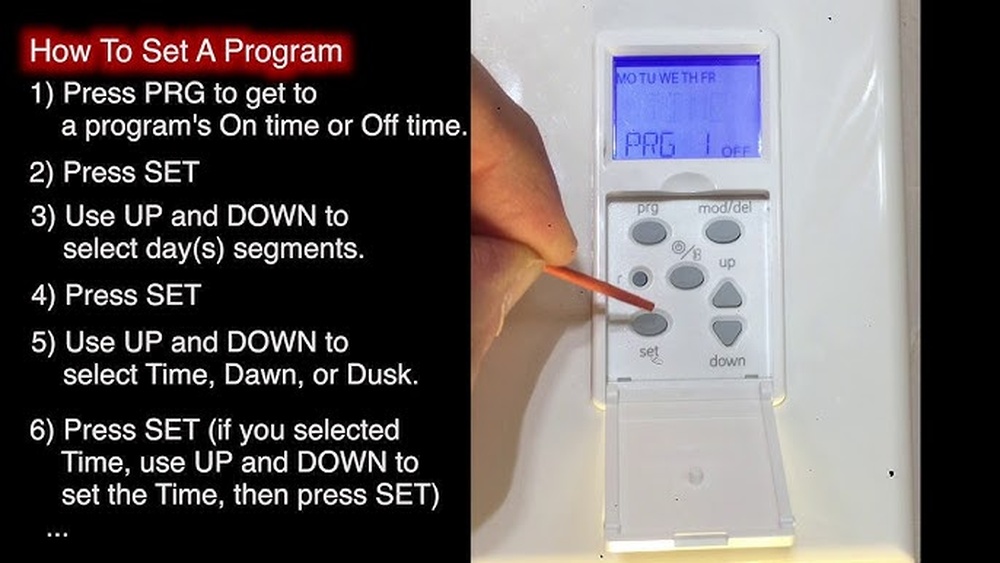
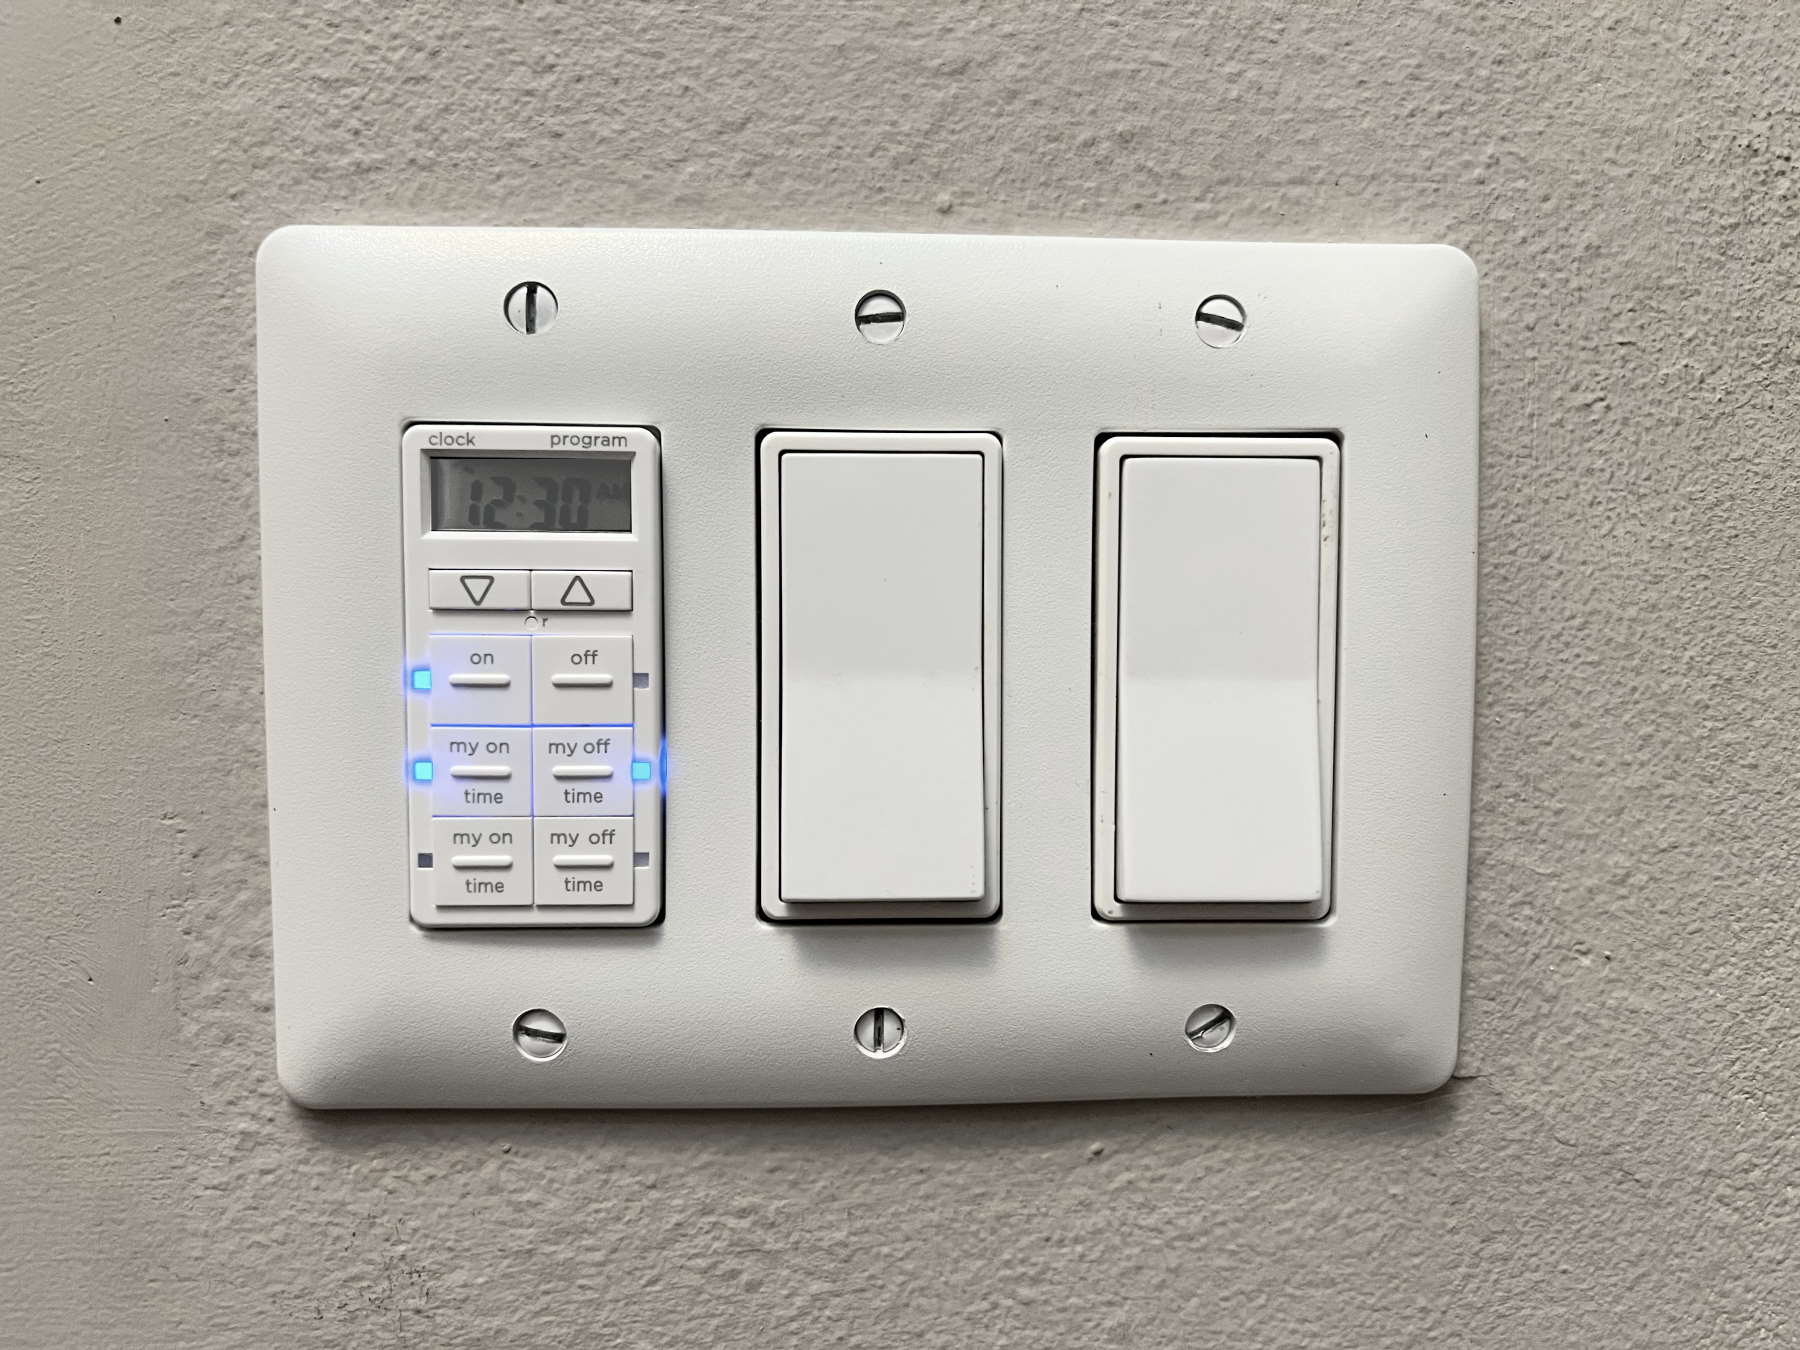
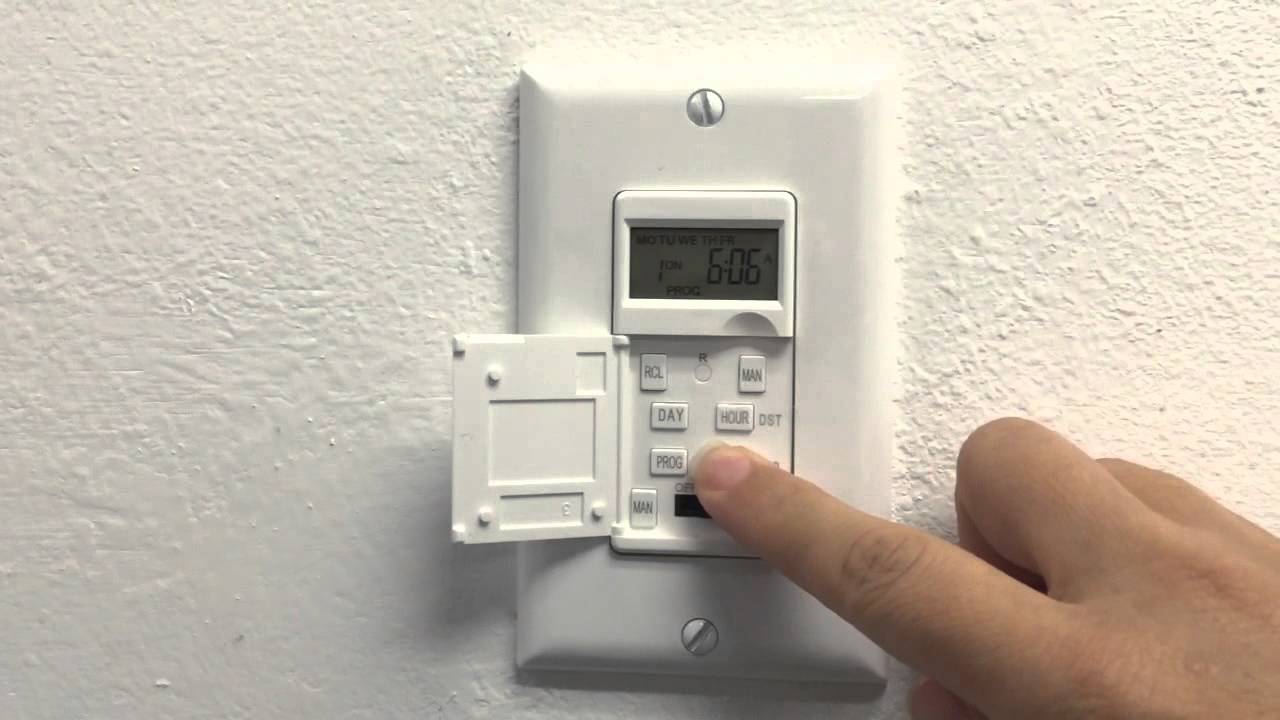
Programming The Timer
Programming the timer switch for your lights is simple and saves energy. This process lets you control when your lights turn on and off automatically. Follow these steps to set the timer correctly. It ensures your lights work exactly as you want.
Setting Current Time
First, set the current time on the timer. Press the clock or time button. Use the up and down arrows to adjust the hour and minutes. Make sure the AM or PM setting is correct. Confirm the time by pressing the clock button again. This step is important for accurate scheduling.
Configuring On And Off Times
Next, set the times for your lights to turn on and off. Press the program or set button. Choose the on time and adjust the hour and minutes. Confirm the on time. Then set the off time in the same way. You can usually add multiple on/off cycles if needed. Save your settings before exiting.
Using Manual Override
The manual override lets you control the lights without changing the schedule. Use this function to turn lights on or off instantly. It is useful when you want light outside your programmed times. Press the override or manual button once to switch modes. Press again to return to automatic control.
Troubleshooting Common Issues
Troubleshooting common issues with your timer switch helps keep your lights working right. Problems can happen, but most are easy to fix. This guide covers the main issues you might face.
Timer Not Turning On Or Off
Check if the timer is plugged in or wired correctly. A loose connection can stop it from working. Make sure the circuit breaker is on. Try resetting the timer by turning it off and on again.
Look for any damage or wear on the timer. If none, the timer itself might be faulty and need replacement.
Incorrect Time Display
Set the current time carefully. Use the right AM or PM setting. If the display shows the wrong time after setting, the battery inside may be dead. Replace the battery to keep the clock running.
Some timers reset after a power cut. You must reset the time after power returns.
Switch Not Responding
Test the switch by pressing the manual override button. If nothing happens, the switch could be broken. Check wiring for loose or broken connections.
Make sure the switch matches your light type. Some timers do not work with certain bulbs or fixtures.
Maintenance And Tips
Maintaining your timer switch ensures it works well and lasts longer. Simple care helps avoid common problems. Follow easy tips to keep the timer switch reliable and efficient.
Regular Testing
Test the timer switch every few weeks. Check if the lights turn on and off at the set times. This helps catch any errors early. Fix small issues before they become big problems.
Battery Replacement
Some timer switches use batteries. Change them once a year or when the timer stops working. Use the correct battery type. A fresh battery keeps the timer running smoothly.
Upgrading Timer Switches
Older timer switches may lack new features. Upgrade to a modern switch for better control. New models save energy and offer more settings. Choose one that fits your needs and budget.
Credit: www.youtube.com
Frequently Asked Questions
How Do I Set A Timer Switch For Lights?
To set a timer switch, first turn off the power. Then, follow the manufacturer’s instructions to program the on/off times. Most models use buttons or dials to set the schedule.
Can I Program A Timer Switch Without Technical Skills?
Yes, most timer switches are user-friendly. They come with simple instructions. Beginners can easily set basic on/off schedules without prior experience.
What Are Common Mistakes When Programming Timer Switches?
Common errors include incorrect time settings, AM/PM confusion, and not resetting after power loss. Always double-check your schedule and test the switch after programming.
How Does A Timer Switch Save Energy?
Timer switches automatically turn lights off when not needed. This reduces unnecessary electricity usage and lowers energy bills. They help maintain efficient lighting schedules.
Conclusion
Programming a timer switch for your lights saves energy and adds convenience. It helps control when lights turn on and off automatically. You can set it for daily routines or special occasions. The process is simple, and anyone can do it with a little practice.
Remember to follow the instructions carefully and test the settings. Enjoy the comfort and savings that come with a programmed timer switch. Small steps like this make your home smarter and more efficient. Give it a try today.