Have you ever wished you could control a light without hunting for a switch across the room? What if you could turn that regular outlet into a handy light switch and make your space more convenient instantly?
Adding a light switch from an outlet is easier than you think, and you don’t need to be an expert electrician to do it. You’ll discover simple, step-by-step instructions that anyone can follow. By the end, you’ll have the power to upgrade your home’s lighting in a way that saves time and adds comfort.
Ready to make your everyday life a little brighter? Keep reading!
Tools And Materials Needed
Adding a light switch from an outlet requires specific tools and materials. Prepare everything before starting. This ensures a smooth and safe project.
Basic Electrical Tools
Gather essential tools for working with electrical wiring. You need a screwdriver set, both flathead and Phillips. Wire strippers are important to remove insulation safely. A voltage tester helps check if wires are live. Needle-nose pliers make bending wires easier. A drill may be needed to create holes for the switch.
Required Materials
Choose the right materials for the new switch setup. Get a single-pole light switch for simple on/off control. Use electrical wire suitable for your home’s wiring, usually 14-gauge or 12-gauge. Electrical tape helps protect wire connections. Wire nuts secure the wire ends safely. A plastic switch box will hold the switch in place.
Safety Gear
Protect yourself while working with electricity. Wear insulated gloves to avoid shocks. Safety goggles protect your eyes from sparks or debris. Use shoes with rubber soles for extra insulation. Turn off the power at the breaker before starting. Keep a flashlight nearby in case of power loss.
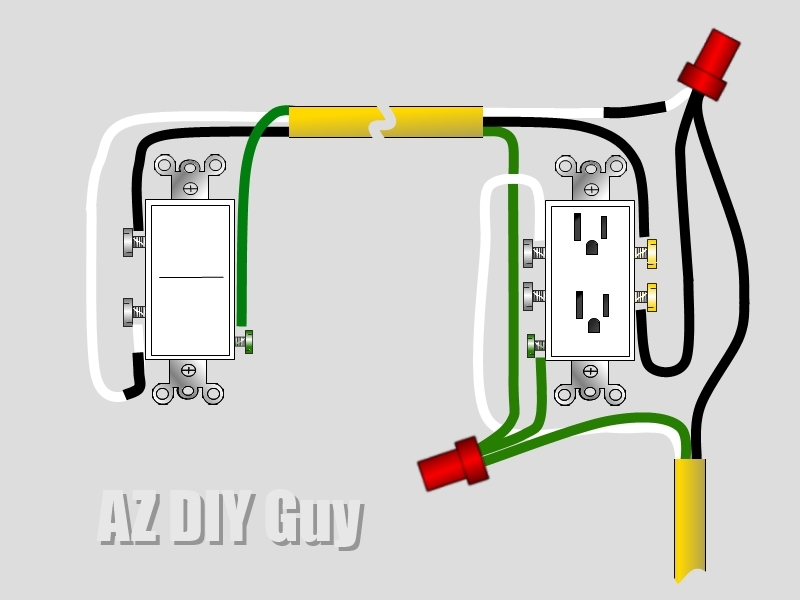
Credit: www.azdiyguy.com
Safety Precautions
Safety comes first when adding a light switch from an outlet. Electricity is dangerous and can cause serious injury. Taking the right steps protects you and your home. Follow these safety precautions carefully to avoid accidents.
Power Shutdown
Always turn off the power before starting any electrical work. Find the correct circuit breaker in your panel. Switch it off to cut power to the outlet and wires. Double-check that the power is off before touching anything. This step prevents electric shocks and short circuits.
Testing For Live Wires
Use a voltage tester to check if wires are live. Test all wires in the outlet box. The tester lights up or beeps if electricity flows. Never assume wires are safe to touch. Testing ensures no hidden power is present and keeps you safe.
Working Safely
Wear insulated gloves and use tools with insulated handles. Keep your workspace dry and clear of clutter. Do not work in wet conditions. Keep one hand in your pocket to reduce risk of shock. Follow the instructions carefully and stay focused on the task.
Planning The Installation
Planning the installation of a light switch from an outlet is a vital first step. Careful planning saves time and prevents mistakes. It ensures safety and proper function. Focus on where and how to place the switch. Understand the electrical setup. Know the rules that apply. This section guides you through key points to plan well.
Choosing The Right Location
Pick a spot easy to reach. The switch should be close to the light fixture. Avoid places behind doors or furniture. Think about how people will use the space. The location must be safe and practical. Keep the switch away from water sources. Plan for enough space for the switch box.
Understanding Circuit Layout
Know your home’s wiring system before starting. Find out which circuit powers the outlet. Identify if the outlet has a neutral wire. This is necessary for many light switches. Turn off power at the breaker for safety. Use a tester to check wires. Make sure the circuit can handle the extra load. Understanding the layout prevents overloads and hazards.
Checking Electrical Codes
Follow local electrical codes strictly. Codes protect your home and family from risks. Verify if permits are needed for this work. Use only approved materials and tools. Install the switch according to code height and position rules. Inspect your work or hire a professional for review. Compliance ensures a safe and legal installation.
Removing The Outlet Cover
Removing the outlet cover is the first step before installing a light switch. It gives you clear access to the wiring inside the electrical box. This step must be done carefully to avoid any damage or electrical hazards.
Turning Off Power
Safety is the top priority. Turn off the power to the outlet at the circuit breaker. Double-check by plugging in a device or using a voltage tester. This ensures no electricity flows to the outlet while you work.
Unscrewing The Cover Plate
Use a screwdriver to remove the screws holding the outlet cover. Keep the screws safe for later. Gently pull the cover plate away from the wall. Avoid forcing it to prevent breaking the plate or wall damage.
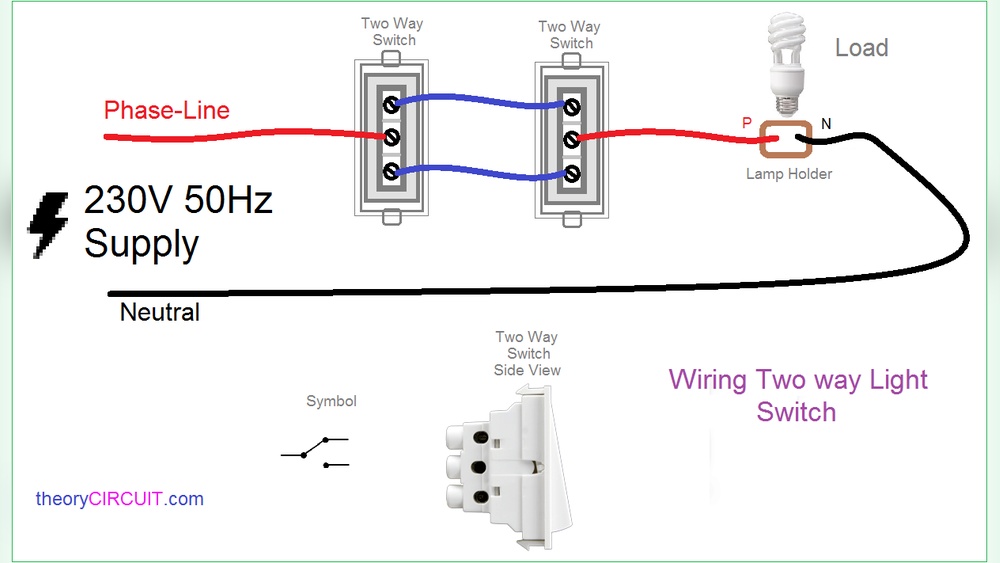
Wiring The New Switch
Wiring the new switch is a key step in adding a light switch from an outlet. It involves handling electrical wires safely and making the right connections. Understanding each wire’s role helps avoid mistakes and ensures the switch works properly. Follow each step carefully to connect the wires and secure them well.
Identifying Wires
First, turn off the power at the circuit breaker. Use a voltage tester to confirm no electricity flows. Look inside the outlet box. You will see black, white, and bare copper wires. Black wires carry the power. White wires are neutral. Bare copper wires are ground. Knowing these colors helps connect the switch correctly.
Connecting Switch Wires
Take the black wire that supplies power and connect it to one terminal of the switch. Then, connect a new black wire from the other switch terminal to the light fixture. The white wires should stay connected together. Ground wires must connect to the switch’s green screw or grounding wire. This setup controls power flow to the light.
Securing Wire Connections
Twist wires together tightly with pliers before adding wire nuts. Screw on the wire nuts firmly until no bare wire shows. Tug gently on each wire to check the connection. Wrap electrical tape around the wire nuts and terminals for extra safety. Push wires neatly back into the box. Secure the switch with screws and attach the cover plate.
Credit: www.reddit.com
Installing The Switch Box
Installing the switch box is a key step in adding a light switch from an outlet. This step creates a safe and secure place for your new switch. The switch box must fit well inside the wall to hold the switch firmly. Follow each step carefully for a strong installation.
Cutting The Wall Opening
Start by marking the spot where you want the switch. Use a pencil to outline the switch box on the wall. Check the size of the box to match the outline. Use a drywall saw to cut along the pencil lines. Cut slowly to avoid damage to pipes or wires inside the wall. Remove the cut piece of drywall gently. Clean the edges so the box fits perfectly.
Mounting The Switch Box
Insert the switch box into the wall opening. Hold the box steady while you secure it. Use screws to fix the box to the wall studs. If the box has clamps, tighten them to grip the drywall. Check that the box is flush with the wall surface. A well-mounted box keeps the switch safe and easy to use.
Testing The New Switch
Testing the new switch is a key step after installation. It ensures the wiring is correct and the switch works as expected. Proper testing prevents electrical problems and keeps your home safe.
Restoring Power
Turn the circuit breaker back on. This restores power to the outlet and switch. Do not touch any wires before restoring power. Use a voltage tester to confirm the power is live.
Checking Switch Functionality
Flip the switch to the ON position. Check if the connected light or device turns on. Flip the switch OFF and ensure the light goes off. Test the switch several times for consistent operation. If the switch does not work, turn off power and check wiring again.

Credit: www.do-it-yourself-help.com
Finishing Touches
Finishing touches make your light switch look neat and safe. They protect the wiring and give the wall a clean, smooth appearance. Taking time for these steps ensures your new switch works well and lasts long.
Installing Switch Cover Plate
Place the cover plate over the switch carefully. Align the holes with the screws on the switch. Tighten the screws just enough to hold the plate firmly. Avoid overtightening to prevent cracking the plate. The cover hides wires and protects your fingers.
Cleaning Up Work Area
Remove any dust, debris, or tools from the area. Use a damp cloth to wipe the wall and switch surface. Sweep or vacuum the floor to clear small particles. Keeping the area clean prevents accidents and keeps your home tidy. Dispose of any old parts properly.
Troubleshooting Tips
Adding a light switch from an outlet can be tricky. Problems may arise during or after installation. Knowing how to solve common issues saves time and frustration. This section helps you identify and fix typical problems quickly. Follow these troubleshooting tips to ensure your light switch works safely and correctly.
Common Wiring Issues
Wiring mistakes cause most problems when adding a switch. Loose connections can stop the switch from working. Check all wire nuts and terminals for tightness. Wrong wires connected together can create a short circuit. Use a voltage tester to find live wires before you start.
Sometimes, the switch controls the wrong light or outlet. This happens if wires are swapped by accident. Label wires before disconnecting to avoid confusion. Also, confirm the switch is wired to the correct circuit.
Another issue is a buzzing or flickering light. This often means a poor connection. Inspect the wires for damage or corrosion. Replace any faulty parts to fix the problem. Make sure the switch rating matches the light fixture.
When To Call A Professional
Electricity is dangerous without proper knowledge. Call an electrician if you feel unsure or unsafe. Complex wiring or unusual circuits need expert skills. A professional ensures all connections meet safety codes.
Do not attempt repairs if you see sparks or smell burning. These signs indicate serious issues requiring immediate attention. Hiring a licensed electrician prevents accidents and protects your home.
Sometimes, local laws require a permit for electrical work. A professional can handle permits and inspections. This guarantees your installation is legal and secure.
Frequently Asked Questions
How Do I Safely Add A Light Switch From An Outlet?
Turn off the power at the breaker before starting. Use a voltage tester to confirm no electricity flows. Follow wiring diagrams carefully to connect the switch. Use proper tools and materials to ensure safety and compliance with electrical codes.
Can I Control Multiple Lights From One New Switch?
Yes, you can control several lights by wiring them in parallel. Ensure the total load does not exceed the switch rating. Use appropriate gauge wire for the combined electrical load. Always follow local electrical codes for safe installation.
What Tools Are Needed To Add A Switch From An Outlet?
You need a voltage tester, wire stripper, screwdriver, and pliers. Also, have wire nuts and electrical tape ready for connections. Use a drill if new holes are required. Proper tools ensure a safe and efficient installation process.
How Do I Choose The Right Wire For The Switch Installation?
Use 14-gauge wire for 15-amp circuits and 12-gauge for 20-amp circuits. Choose wire rated for indoor use and suitable for your local code. Ensure the wire length is sufficient to reach the switch location safely.
Conclusion
Adding a light switch from an outlet can be simple and useful. Follow the steps carefully and stay safe. Double-check all connections before turning the power back on. This project saves time and adds convenience to any room. Take your time and ask for help if needed.
Soon, you will enjoy easy control of your lights. A small change that makes a big difference.