Are you tired of walking across the room just to turn a light on or off? Imagine controlling your lights from two different switches, making your space more convenient and efficient.
Learning how to connect a two-way switch light might sound tricky, but with the right guide, you can do it yourself and save time and money. You’ll discover simple, step-by-step instructions that anyone can follow. By the end, you’ll have the confidence to upgrade your lighting setup and enjoy the convenience it brings.
Ready to make your home smarter and easier to control? Let’s get started!
Tools And Materials Needed
Connecting a two way switch light requires specific tools and materials. Having everything ready makes the job faster and safer. This section lists what you need to complete the task smoothly.
Essential Tools
A screwdriver set is key for loosening and tightening screws. Use a flathead and a Phillips screwdriver for different screw types.
Wire strippers remove insulation from wires without damage. They help prepare wires for connection.
A voltage tester ensures the power is off before working. Safety first to avoid electric shocks.
Needle nose pliers help bend and hold wires in place. They are handy for precise wire handling.
Required Materials
Two two-way switches are the main components. Choose switches that match your electrical system.
Electrical wires connect the switches and light. Use wires rated for your home’s voltage.
Wire connectors join wires safely and securely. They prevent loose connections and shorts.
Electrical tape insulates wire connections. It adds an extra layer of safety.
Safety Gear
Wear insulated gloves to protect against electric shocks. Safety gear is essential for any electrical work.
Use safety glasses to shield your eyes from debris. Protect your vision during installation.
Have a flashlight or headlamp ready. It helps if you work in dim spaces.
Understanding Two Way Switch Wiring
Two way switch wiring lets you control one light from two places. It is common in hallways and large rooms.
This wiring system uses two switches connected to the same light. Each switch can turn the light on or off independently.
Knowing how the wires connect helps to install or fix these switches safely and correctly.
What Is A Two Way Switch?
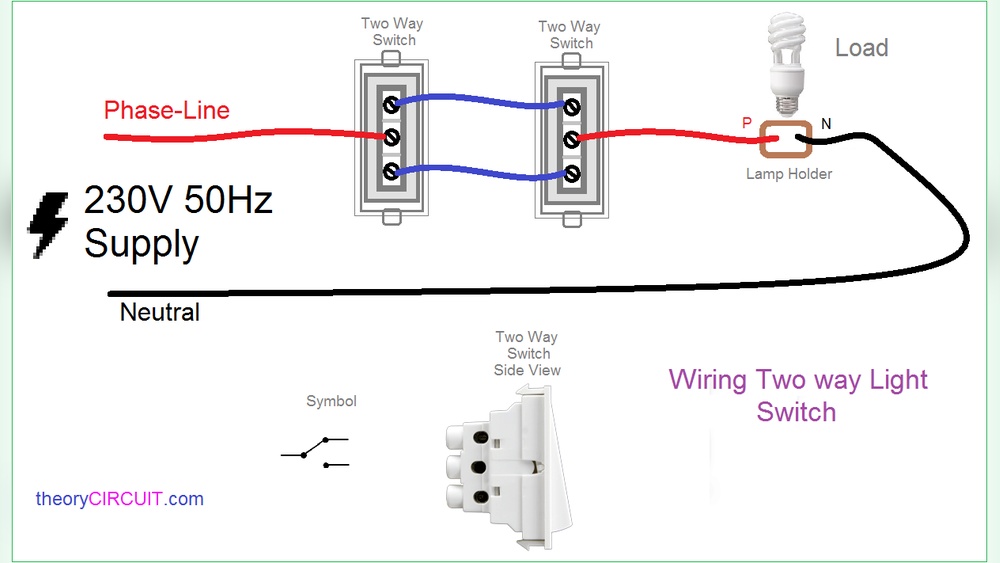
A two way switch has three terminals. These are called common, L1, and L2.
The common terminal connects to the power or the light. L1 and L2 connect to the other switch.
This setup allows electricity to flow through either path, turning the light on or off.
Wires Used In Two Way Switch Wiring
Three main wires connect the switches: live, traveler, and neutral wires.
The live wire brings power to the first switch. Traveler wires connect the two switches.
The neutral wire usually runs directly to the light. It completes the circuit.
How The Wiring Works
Electric current flows from the power source to the first switch.
It moves through one of the traveler wires to the second switch.
The second switch controls if the current reaches the light or not.
Switch positions change the path of the current, turning the light on or off.
Safety Precautions
Working with electrical wiring can be risky without the right safety steps. Taking precautions is key to avoid shocks and accidents. Safety protects you and your home.
Follow these simple rules before connecting a two way switch light. Each step helps keep the work safe and smooth.
Turn Off The Power
Always switch off the main power at the breaker box. Check that the power is really off by testing the wires with a voltage tester. Never work on live wires.
Use Proper Tools
Choose insulated tools made for electrical work. Avoid using damaged or worn-out tools. The right tools reduce the risk of electric shock.
Wear Safety Gear
Put on rubber-soled shoes and gloves. Safety glasses protect your eyes from sparks or debris. Dress in clothes that cover your skin fully.
Follow Wiring Diagrams
Use clear and correct wiring diagrams. Incorrect wiring can cause short circuits or fire. Double-check connections before powering the circuit.
Work In A Dry Area
Keep the workspace dry and free of water. Wet conditions increase the chance of electric shock. Dry hands and tools before starting work.

Credit: www.realpars.com
Turning Off Power Supply
Turning off the power supply is the first and most important step when connecting a two-way switch light. It keeps you safe from electric shocks while working. Always treat electrical circuits with care.
Before starting, make sure no electricity flows to the switch or light fixture. This prevents accidents and damage to your tools or devices.
Locate The Main Circuit Breaker
Find the main circuit breaker in your home’s electrical panel. It controls power to the entire house or specific areas. Identify the breaker that controls the lighting circuit you will work on.
Switch Off The Correct Circuit
Flip the breaker switch to the off position. This stops electricity from reaching the light and switches. Double-check by trying to turn on the light. It should stay off.
Use A Voltage Tester
Before touching wires, test the circuit with a voltage tester. This tool shows if any current is still present. Confirm power is off to avoid electric shocks.
Wear Safety Gear
Wear insulated gloves and safety glasses. These protect you from accidental contact with live wires. Safety gear is essential even after turning off power.
Identifying Wires
Identifying wires is the first step to connect a two-way switch light safely and correctly. Knowing each wire’s function helps avoid mistakes and ensures the switch works as intended.
Two-way switches use specific wires for power, load, and travelers. These wires look similar but have different roles in the circuit. Recognizing them can be simple with a few tips.
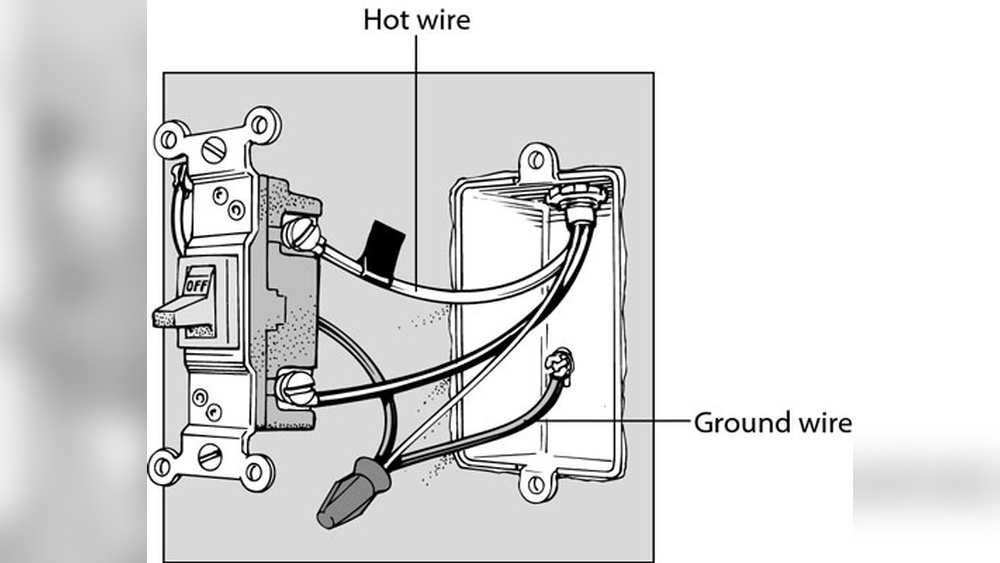
Understanding Wire Colors
Wire colors show their purpose in the circuit. Black or red wires usually carry power. White wires often serve as neutral. Green or bare copper wires are for grounding. Note that colors might vary slightly by region.
Using A Voltage Tester
A voltage tester can check which wire has live power. Touch the tester to each wire carefully. The wire causing the tester to light up or beep is the live wire. This step is important for safety and correct wiring.
Identifying Traveler Wires
Traveler wires connect the two switches. They usually have the same color, like red or black. These wires carry current between the switches to control the light from two places. Labeling them helps in later steps.
Locating The Load Wire
The load wire goes from the switch to the light fixture. It carries power to the light. Often, it is black but may differ. Confirm this wire by tracing it to the light fixture or using a tester.

Credit: www.youtube.com
Wiring The First Switch
Wiring the first switch is the first step to connect a two way switch light. This step sets the foundation for the entire wiring process. Understanding each wire’s role helps avoid mistakes and keeps the setup safe.
Before starting, turn off the power at the circuit breaker. Safety is the top priority. Use a voltage tester to confirm no electricity flows through the wires. This simple check prevents shocks.
Identify The Wires
Look inside the switch box to find the wires. Usually, there are three: one common wire and two traveler wires. The common wire connects to the power source or the light fixture. The traveler wires link the two switches.
Connect The Common Wire
Attach the common wire to the common terminal on the switch. This terminal is often marked with a different color screw, usually black or dark brass. Make sure the wire is tightly secured to avoid loose connections.
Attach Traveler Wires
Connect the two traveler wires to the traveler terminals on the switch. These terminals are usually brass-colored screws. The order does not matter here, but the traveler wires must be connected correctly on both switches.
Secure And Test
After wiring, secure the switch back into the box. Restore power at the breaker and test the switch. The light should turn on or off from this switch and the other switch. If it does not work, recheck all connections.
Wiring The Second Switch
Wiring the second switch is a key step in setting up a two-way light switch. This switch lets you control the light from two different places. The wiring must be done carefully to make sure everything works safely and correctly.
Start by turning off the power at the circuit breaker. Safety is very important when working with electrical wiring. Use a voltage tester to check if the wires are not live before you touch them.
Identify The Common Terminal
Look for the common terminal on the second switch. It is usually marked with a different color or label. Connect the traveler wire from the first switch to one of the traveler terminals on the second switch. The common terminal will connect to the wire going to the light fixture.
Connect The Traveler Wires
Two traveler wires run between the first and second switches. Connect these wires to the traveler terminals on the second switch. Make sure to keep the wires tight and secure under the terminal screws. Loose wires can cause the switch to fail or create a fire hazard.
Attach The Ground Wire
Find the green or bare copper ground wire. Connect this wire to the green grounding screw on the second switch. Grounding helps prevent electrical shocks and makes the switch safer to use. Always include the ground wire in your wiring setup.
Secure The Switch And Test
Push the wired switch back into the electrical box carefully. Screw it in place without over-tightening. Restore power at the breaker and test both switches. The light should turn on and off from either switch smoothly. If it does not, double-check all connections.
Connecting The Light Fixture
Connecting the light fixture is a key step in wiring a two-way switch. This part ensures the light turns on or off from either switch. Proper connection avoids flickering and electrical faults.
Follow clear steps to connect the light fixture safely. This helps the switches work together smoothly.
Identify The Wires From The Light Fixture
First, find the wires coming from the light fixture. Usually, there are three: live, neutral, and earth. The live wire carries electricity to the bulb. The neutral wire completes the circuit. The earth wire is for safety, preventing shocks.
Connect The Light Fixture To The Switch Wiring
Connect the live wire from the fixture to the common terminal of one switch. Join the neutral wire directly to the neutral supply wire. Connect the earth wire to the grounding point or earth terminal. This ensures safety and proper functioning.
Secure All Wire Connections
Use wire connectors or terminal blocks to join wires. Make sure connections are tight and secure. Loose wires can cause sparks or failure. Double-check all connections before closing the fixture.
Testing The Setup
Testing the setup is a key step after wiring your two-way switch light. It ensures everything works correctly and safely. This step helps you catch wiring mistakes early. You avoid electrical hazards and save time fixing problems later.
Always test carefully and follow safety rules. Use the right tools for the job. Now, let’s explore how to check your two-way switch light setup.
Preparing For The Test
Turn off the main power before starting any test. Use a voltage tester to confirm no current flows. Wear insulated gloves to stay safe. Make sure all wires are connected tightly. Double-check your wiring matches the diagram.
Testing The Switch Operation
Turn the power back on. Flip the first switch and watch the light. It should turn on or off. Then flip the second switch. The light should change state again. Test both switches multiple times. The light must respond to both switches.
Checking For Wiring Issues
If the light does not turn on, check wires again. Look for loose or swapped wires. Use a continuity tester to check each wire path. Make sure no wires touch each other. Fix any problems before using the switch.
Final Safety Check
After testing, turn off the power again. Secure all switch covers and panels. Tighten screws and organize wires neatly. Turn power on one last time. Ensure everything works and looks safe.
Troubleshooting Common Issues
Troubleshooting common issues with two-way switch lights helps save time and effort. Many problems arise from simple wiring mistakes or loose connections. Identifying these issues early prevents damage and ensures safety.
Below are common problems and ways to fix them. Follow these tips to get your two-way switch working perfectly.
Check For Loose Or Disconnected Wires
Loose wires cause the switch to fail or work intermittently. Turn off the power first. Then, open the switch box and inspect all wire connections. Tighten any loose screws or reconnect wires that are detached. Secure connections improve switch performance and safety.
Verify Correct Wiring Connections
Wrong wiring often causes lights to stay off or flicker. Ensure the live wire connects to the common terminal. The traveler wires must connect to the traveler terminals on both switches. Use a wiring diagram for guidance. Correct wiring guarantees proper switch operation.
Test The Switches For Faults
Faulty switches can cause lights to fail. Use a multimeter to test switch continuity. Replace any switch that shows no continuity when toggled. New switches restore proper function and prevent electrical issues.
Inspect The Light Bulb And Fixture
Sometimes the problem lies in the bulb or fixture, not the switches. Check if the bulb is burned out. Try replacing it with a new one. Inspect the fixture for damage or loose wiring. Fix or replace faulty parts to restore lighting.
Ensure Power Supply Is Active
Power outages or tripped breakers stop the light from working. Check your circuit breaker panel for tripped switches. Reset any tripped breaker. Confirm the power supply is active before troubleshooting switches.

Credit: www.sciencephoto.com
Frequently Asked Questions
What Is A Two Way Switch Light?
A two way switch light allows control of one light from two different switches. It’s commonly used in staircases or hallways for convenience and safety.
How Do I Wire A Two Way Switch Light?
Connect the live wire to the common terminal of the first switch. Use traveler wires to link both switches. Attach the light to the common terminal of the second switch.
Can I Use Regular Switches For Two Way Lighting?
No, regular switches don’t have the necessary terminals. Two way switches are specially designed with three terminals to enable control from two points.
What Tools Are Needed To Connect Two Way Switch Light?
You’ll need a screwdriver, wire stripper, voltage tester, electrical tape, and wire connectors. These tools ensure safe and proper installation of the two way switch.
Conclusion
Connecting a two-way switch light is easier than it seems. Follow each step with care and check your work twice. Safety matters most—always turn off power before starting. Using the right wires and tools makes the job smoother. Once connected, test the switches to ensure they work properly.
This setup lets you control lights from two places. Simple and practical for any home or room. Now, you can enjoy better lighting control with confidence. Keep this guide handy for future electrical tasks.