Are you tired of walking into a dark room and fumbling for the light switch? Installing a 3 way light switch lets you control your lights from two different spots, making your home more convenient and safer.
If you’ve been wondering, “How do I install a 3 way light switch? ” You’re in the right place. This guide will walk you through each step clearly and simply, so you can upgrade your lighting without stress or confusion.
By the end, you’ll feel confident handling the wiring and enjoy the comfort of smarter lighting control. Keep reading, and let’s make your home brighter and easier to navigate!
Tools And Materials Needed
Before installing a 3 way light switch, gather the right tools and materials. This step saves time and avoids frustration. Having everything ready helps the job go smoothly.
Each tool plays a key role in the installation. The materials ensure the switch works properly and safely. Let’s explore what you need.
Essential Tools
You need a screwdriver set for removing and attaching screws. A voltage tester checks if wires have power. Wire strippers cut and strip the insulation from wires. Needle-nose pliers help bend and twist wires easily. A drill with bits is useful for making holes if needed. Electrical tape secures wire connections.
Required Materials
Start with two 3 way switches designed for this setup. Use 3 conductor cable with ground wire to connect switches. Wire nuts join wires safely without exposed metal. A faceplate covers the switch for a neat finish. Make sure your wire gauge matches your home’s electrical system.
Safety Gear
Wear insulated gloves to protect from electric shock. Safety glasses shield your eyes from debris. A flashlight or headlamp helps if working in dark spaces. Always switch off power at the breaker before starting work.
Safety Precautions
Working with electrical wiring can be risky. Safety comes first when installing a 3 way light switch. Taking proper precautions protects you from shocks and accidents. Follow simple steps to stay safe throughout the process.
Turn Off The Power
Switch off the power at the circuit breaker. Double check that the power is off by testing the wires. Use a voltage tester to ensure no electricity flows.
Use Proper Tools
Use tools designed for electrical work. Insulated screwdrivers and wire strippers reduce the risk of shocks. Avoid using damaged or worn tools.
Wear Protective Gear
Wear gloves to protect your hands from cuts and shocks. Safety glasses protect your eyes from sparks or debris. Dress in clothes that cover your arms and legs.
Work In A Dry Area
Keep the workspace dry to avoid electric shock. Do not work with wet hands. Use a dry cloth to wipe any moisture before starting.
Label The Wires
Label each wire before disconnecting them. This helps avoid confusion during installation. Clear labels save time and prevent mistakes.
Follow Local Codes
Check local electrical codes before starting the job. Codes ensure your work is safe and legal. Call a professional if unsure about any rule.
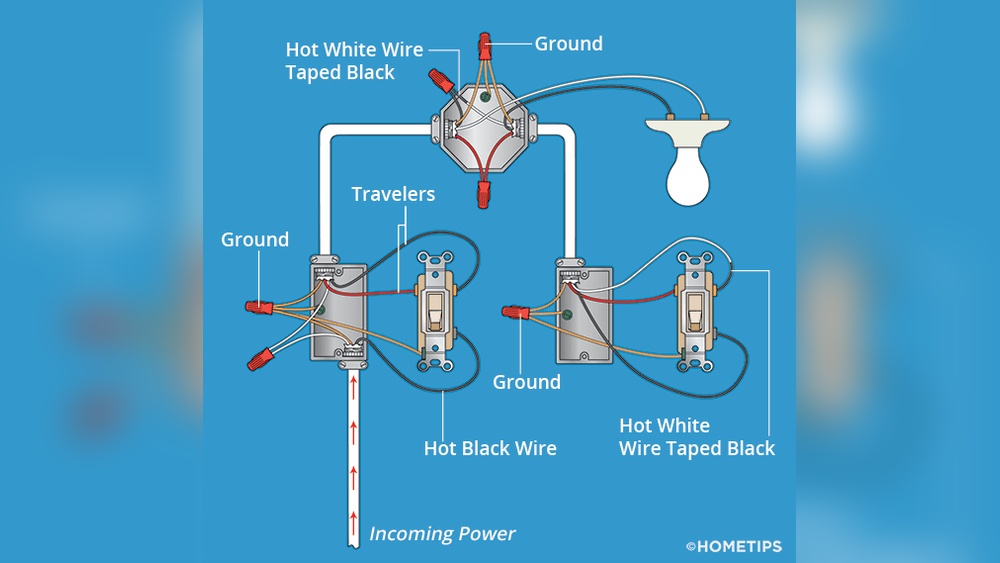
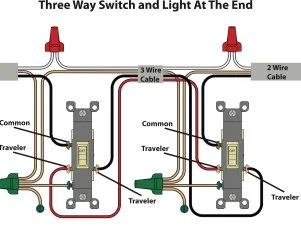
How A 3 Way Switch Works
A 3 way light switch lets you control one light from two places. It is common in hallways, stairs, or large rooms. Understanding how it works makes installation easier and safer.
The switch setup uses two switches connected by special wires. These switches can turn the light on or off from either location. The key is the way electricity flows between the switches and the light.
What Is A 3 Way Switch?
A 3 way switch has three terminals. These terminals connect to wires called travelers. These travelers carry electricity between the two switches. This design allows the switches to work together.
How Do The Switches Control The Light?
Each switch can connect the light to power or disconnect it. When both switches are in the right position, electricity flows and the light turns on. Changing either switch breaks the flow and turns the light off.
Why Use Traveler Wires?
Traveler wires carry current between the two switches. They let each switch send or break the electric path. This makes it possible to control one light from two spots.
The Role Of The Common Terminal
One terminal on each switch is the common. It connects to the power source or the light fixture. The common terminal switches the current between the travelers.

Credit: www.reddit.com
Identify Your Wiring Setup
Start by checking the wires in your wall to know what type of setup you have. Look for travelers, common wires, and power sources. This helps to connect the switches correctly.
Understanding Your Current Wiring
Start by turning off the power at the circuit breaker. Safety first. Remove the switch cover plate and gently pull out the switch. Look at the wires attached to the switch. Usually, you will see a black, white, and sometimes a red wire. These wires carry power, neutral, and traveler signals.
Check if your wiring matches a typical 3-way switch setup. Two switches control one light. The wires connect both switches and the light fixture. Identifying these wires helps you avoid mistakes during installation.
Identifying The Common And Traveler Wires
Look closely at the screws on the switch. The common screw is usually darker or a different color. This screw connects to the power source or the light fixture. The traveler screws connect to the wires that run between the two switches. These traveler wires often have red and black insulation.
Mark the wires with tape or a marker. This makes it easier to connect them correctly later. Knowing which wire is which prevents confusion and errors.
Using A Voltage Tester Safely
Use a voltage tester to check which wires have power. This tool helps confirm the common wire. Test each wire carefully. Do not touch bare wires. The tester shows if a wire is live by lighting up or beeping.
Testing wires before installation ensures safety and correct wiring. It also helps you understand your home’s wiring system better.
Turn Off Power At Circuit Breaker
Turning off the power at the circuit breaker is the first step in installing a 3-way light switch. It keeps you safe from electric shock. Always double-check that the power is off before you start working.
Without turning off the power, you risk serious injury. Electric current can cause burns or shocks. Safety is the top priority when working with electrical wiring.
Locate The Correct Circuit Breaker
Find your home’s electrical panel. It usually sits in the basement, garage, or utility room. Look for the breaker that controls the lights or room where you work. Each breaker has a label or number.
If labels are unclear, turn off breakers one at a time. Test the light switch to find the right one. This step ensures the power is off at the switch.
Switch Off The Circuit Breaker
Flip the correct breaker to the OFF position. This action stops electricity flow to the switch. You may feel a small click when it turns off. Do not force the breaker; it should move easily.
Verify Power Is Off
Use a non-contact voltage tester or a simple tester tool. Hold it near the wires or switch box. The tester will not light up if the power is off. Always test twice to be sure.
Never touch wires until you confirm no electricity is present. This step prevents accidents during installation.
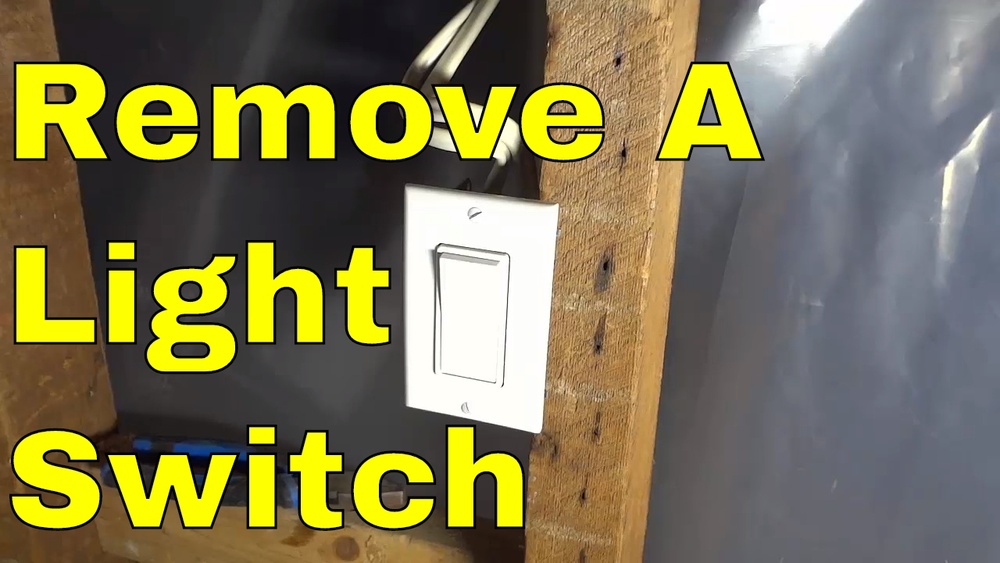
Remove Existing Switches
Removing the existing switches is the first step in installing a 3 way light switch. This step prepares the wiring for the new switch setup. Safety is important here. Always turn off the power before touching any wires or switches.
Follow these simple steps to remove your current switches safely and correctly.
Find the circuit breaker that controls the switch. Turn it off to cut power. Use a voltage tester to check if the switch is dead. Never skip this step. It protects you from electric shock.
Remove The Switch Cover Plate
Unscrew the cover plate with a screwdriver. Set the screws aside safely. The cover plate will come off easily. This gives access to the switch and wiring.
Unscrew The Existing Switch
Loosen the screws holding the switch in place. Pull the switch gently out of the electrical box. Do not pull hard; wires may still be attached.
Note Wire Positions And Connections
Take a clear photo or draw a diagram of the wires. Note where each wire connects to the switch. This helps during the new switch installation.
Disconnect The Wires
Use a screwdriver to loosen the terminal screws. Carefully detach the wires from the switch. Keep wires separated and avoid touching them together.
Connect The New 3 Way Switches
Connecting the new 3 way switches is a key step in the installation process. It involves attaching wires to specific terminals on each switch. Correct wiring ensures both switches control the light properly. Careful work here avoids electrical problems and keeps the setup safe.
Wiring The Common Terminal
Locate the common terminal on the switch. It is usually marked with a darker screw or labeled “COM.” Connect the wire coming from the power source or the light fixture to this terminal. This wire carries the main current, so make sure it is tight and secure.
Wiring The Traveler Terminals
Find the two traveler terminals on the switch. These are often lighter-colored screws. Attach the two traveler wires to these terminals. These wires link the two switches and allow them to work together. Keep the connections firm to avoid loose wiring.
Ground Wire Connection
Identify the ground wire, usually a bare copper or green wire. Connect it to the green ground screw on the switch. This connection protects against electrical shock. If the switch box has a ground wire, connect it as well for safety.
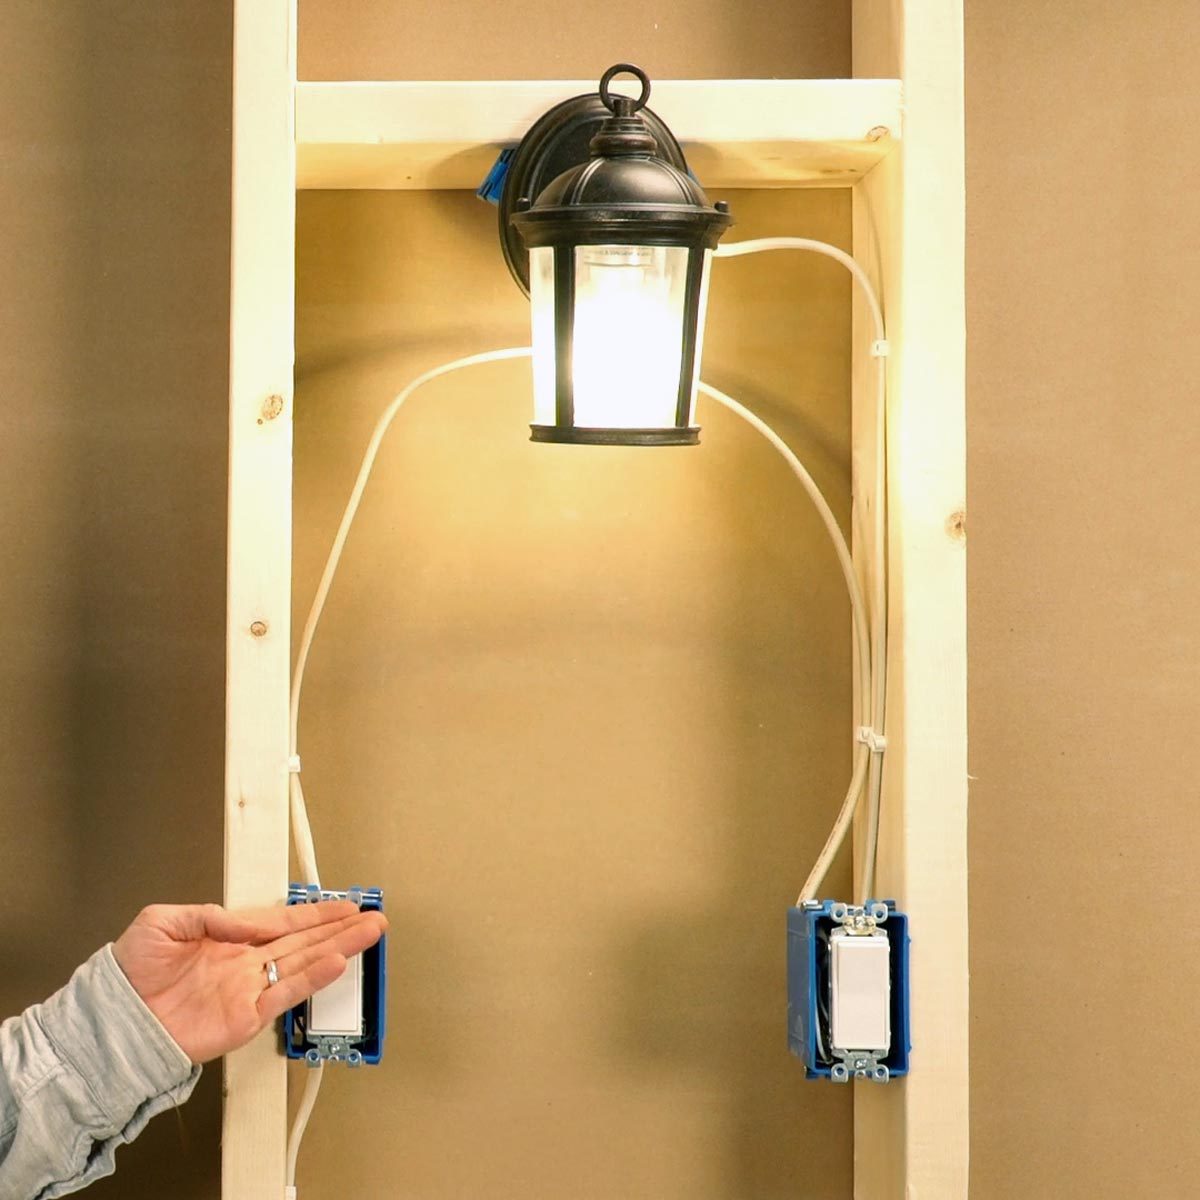
Mount The Switches And Restore Power
Mounting the switches and restoring power are the last steps in installing a 3 way light switch. These steps secure your work and bring the lights back to life. Proper mounting ensures safety and a neat finish. Restoring power tests your installation and confirms everything works.
Secure The Switches In The Wall Boxes
Start by carefully pushing the wired switches into the wall boxes. Make sure wires are not pinched or bent sharply. Align the switches with the mounting holes. Use screws to fasten the switches firmly. Avoid overtightening to prevent damage to the switch or wall box.
Attach The Switch Covers
Place the switch covers over the mounted switches. Align the screw holes with the switches. Screw the covers gently into place. The covers protect wiring and give a clean look. Check that covers sit flush against the wall without gaps.
Restore Power At The Circuit Breaker
Go to your circuit breaker panel. Find the switch that controls the circuit you worked on. Flip the breaker back to the ON position. This restores electricity to your 3 way switch setup. Be ready to test the switches immediately.
Test Both Switches For Proper Function
Flip each switch on and off several times. The light should turn on and off from both switches. Confirm the switches work smoothly and without flickering. If the light does not respond properly, turn off power and check wiring again. Proper testing ensures your installation is safe and correct.
Test The 3 Way Switches
Testing your 3 way switches is a key step after installation. It ensures the wiring works correctly and the lights respond as expected. This step saves time and prevents future issues.
Proper testing checks if both switches control the light from different locations. It also confirms the switches are wired properly and the circuit is safe to use.
Turn On Power And Check The Light
Restore power at the breaker box before testing. Flip one of the switches to the ON position. The light should turn on. If it does not, recheck your wiring connections.
Test Both Switches For Full Control
Flip the first switch OFF. Then, flip the second switch ON. The light should turn on. Switch each one ON and OFF to see if the light responds from both locations.
Look For Flickering Or Inconsistent Light
Check the light for flickering or dimming. This could mean a loose wire or poor connection. Tighten connections and test again if needed.
Use A Voltage Tester For Safety
Use a voltage tester to confirm power flows correctly through both switches. Test each terminal on the switch. This helps ensure safe and proper wiring.
Credit: www.familyhandyman.com
Troubleshooting Common Issues
Troubleshooting common issues during a 3-way light switch installation can save time and frustration. Problems often arise from wiring mistakes or loose connections. Identifying these issues early helps keep your project on track.
Check each step carefully. Small errors can cause the switch to fail or behave oddly. Testing and fixing these problems ensures your switches work properly and safely.
Checking For Loose Connections
Loose wires can stop the switch from working. Turn off the power before inspecting. Tighten any wires that feel loose. Make sure the wire is wrapped fully around the screw.
Verifying Correct Wire Placement
Each wire must connect to the right terminal. Mixing traveler and common wires causes confusion. Use the wiring diagram from the switch packaging. Double-check every wire location before turning on power.
Testing The Switch Functionality
Use a voltage tester to check power flow. Test each switch separately. Flip the switches and watch the light. If the light does not respond, recheck wiring and connections.
Inspecting For Damaged Wires Or Components
Damaged wires can cause shorts or failures. Look for frayed or cut insulation. Replace any damaged wire before continuing. Also, check the switch itself for cracks or wear.
Credit: www.hgtv.com
Frequently Asked Questions
What Tools Are Needed To Install A 3 Way Light Switch?
You need a screwdriver, voltage tester, wire stripper, electrical tape, and a 3 way switch. Safety gloves and a flashlight help too.
How Do I Identify Traveler Wires In A 3 Way Switch?
Traveler wires connect the two switches. Use a voltage tester to identify the two traveler wires. They usually have red or black insulation.
Can I Replace A Single Switch With A 3 Way Switch?
Yes, but you must run additional wiring between switches. A 3 way switch allows control from two locations.
Is It Safe To Install A 3 Way Switch Myself?
Yes, if you turn off power at the breaker and follow instructions carefully. Use a voltage tester to confirm power is off.
Conclusion
Installing a 3 way light switch can save you time and effort. Follow the steps carefully for a safe setup. Always turn off the power before starting any wiring work. Check your connections twice to avoid mistakes. With patience, you can control lights from two places easily.
This simple upgrade can make your home more convenient. Take your time and enjoy the results once done. Remember, safety first and double-check your work. Ready to light up your space the smart way?