Are you tired of fumbling for a light switch when entering a room? Installing a 3 way light switch can change that.
It lets you control one light from two different spots, making your home more convenient and efficient. If you think it sounds complicated, don’t worry—you can learn how to do it yourself, even if you’re not an expert. In this guide, you’ll find simple, clear steps that will help you install a 3 way light switch safely and easily.
Keep reading to take control of your lighting and upgrade your space today!

Credit: www.belkin.com
Tools And Materials Needed
Installing a 3 way light switch requires specific tools and materials. Having the right items makes the process easier and safer. Prepare all tools before starting the project. This saves time and helps avoid mistakes.
Essential Tools For Installation
You need a few basic tools to install a 3 way switch. A screwdriver set with flathead and Phillips tips is necessary. Wire strippers help remove insulation from wires. A voltage tester ensures power is off before working. Needle-nose pliers assist in bending and twisting wires. A drill may be needed to create holes for new wiring.
Materials Required For The Switch
Choose the correct 3 way switches for your setup. Electrical wires, usually 14/3 or 12/3 gauge, are needed. Wire nuts secure wire connections safely. Electrical tape adds extra protection to wire joints. A new electrical box may be required if space is limited. Always select materials that meet local electrical codes.
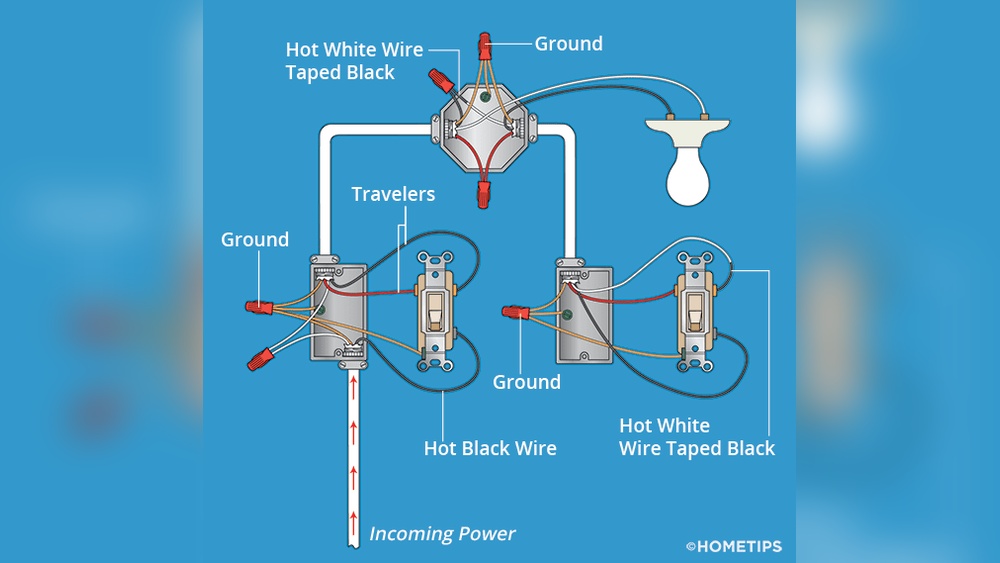
Credit: www.kennethballard.com
How 3 Way Switches Work
Understanding how 3 way switches work helps you control lights from two different places. This setup is common in hallways, staircases, and large rooms. It makes turning lights on or off more convenient.
A 3 way switch system uses two switches and one light fixture. Each switch can turn the light on or off, independent of the other switch’s position. This works through special wiring inside the switches.
What Is A 3 Way Switch?
A 3 way switch has three terminals. It differs from a regular switch which has only two. These extra terminals allow the switch to connect with another switch to control one light.
How Do The Switches Connect?
The two switches connect using traveler wires. These wires carry current between the switches. Depending on the switch positions, the current either flows or stops.
How Does The Light Turn On Or Off?
When the switches create a complete path for electricity, the light turns on. Changing either switch breaks or completes the path, turning the light off or on. This lets you control the light from two spots.
Turn Off Power Safely
Turning off power safely is the first and most important step before installing a 3 way light switch. This prevents electric shocks and keeps you safe during the work. Always treat electricity with respect and caution.
Never skip this step. Even a small mistake can cause serious injury or damage. Follow simple safety rules to protect yourself and your home.
Locate Your Home’s Circuit Breaker Panel
Find the main circuit breaker panel in your home. It is usually in the basement, garage, or utility room. The panel controls electricity for the entire house.
Look for a box with multiple switches or breakers. This is where you will turn off the power for the switch you want to work on.
Identify The Correct Circuit Breaker
Check which breaker controls the light switch you want to install. The breakers may be labeled. If not, switch off one breaker at a time and test the light switch.
Use a simple light tester or press the switch to see if power is off. This step ensures you turn off the right breaker.
Turn Off The Power At The Breaker
Flip the correct breaker to the off position. This cuts power to the switch’s wiring. Make sure the switch no longer works by testing it.
Do not rely on just turning off the switch on the wall. Power can still be live behind it.
Double-check Power Is Off Before You Start
Use a voltage tester or multimeter to check the wires. Touch the tester to the wires where you will work. It should show no power.
Do not touch any wires with bare hands until you confirm the power is off. Safety first.

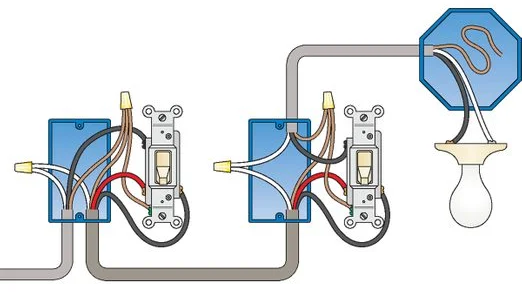
Credit: community.smartthings.com
Remove Existing Switches
Removing the existing switches is the first step to install a 3 way light switch. It helps you see the wiring and prepares the space for new switches. Take time to work safely and carefully.
Always turn off the power at the circuit breaker before touching any wiring. Use a voltage tester to confirm no electricity is flowing. Safety first.
Turn Off Power At The Circuit Breaker
Locate the correct circuit breaker and switch it off. Double check that the power is off by testing the switch. This prevents electric shocks during the process.
Remove The Switch Cover Plates
Use a screwdriver to remove screws holding the cover plates. Set the plates and screws aside safely. This reveals the switches and wiring behind.
Unscrew The Existing Switches
Unscrew the switches from the electrical box carefully. Gently pull the switches out to expose the wires. Keep the wires intact for the next step.
Note The Wiring Setup
Look closely at the wires connected to the switches. Note the colors and where each wire connects. Take photos or draw a diagram for reference.
Disconnect The Wires
Loosen the screws or disconnect wire nuts holding the wires. Remove the wires from the old switches carefully. Do not damage the wire ends.
Identify Wiring Components
Before installing a 3 way light switch, identifying wiring components is key. Understanding each part helps ensure a safe and correct setup. This step lays the foundation for a smooth installation process.
Wiring in a 3 way switch setup is different from a regular switch. Knowing the components makes the task less confusing. It also helps avoid common wiring mistakes.
Traveler Wires
Traveler wires connect the two switches in the circuit. Usually, these wires are red and black. They carry current between the switches to control the light from two locations.
Common Wire
The common wire is the main wire that connects to the power source or the light fixture. It is often darker or marked differently. This wire plays a central role in the switch operation.
Ground Wire
The ground wire is a safety feature. It is usually green or bare copper. It protects from electric shocks by directing electricity safely to the ground.
Neutral Wire
Neutral wires complete the electrical circuit. They carry current back to the power source. Neutral wires are usually white and must be handled carefully.
Connect The First Switch
Connecting the first switch is a key step in installing a 3 way light switch. This switch controls the light from one location. Getting the wiring right here makes the whole system work smoothly. Follow clear steps to set up the first switch safely and correctly.
Turn Off Power At The Circuit Breaker
Safety comes first. Switch off the power to the circuit at the breaker box. Test the wires with a voltage tester to confirm no electricity flows. This step prevents shocks during installation.
Identify The Wires In The Box
Remove the switch cover and pull out the wires carefully. Look for the common wire, traveler wires, and ground wire. The common wire connects to the power source or light fixture. Traveler wires link to the second switch.
Connect The Common Wire To The Switch
Attach the common wire to the common terminal on the switch. This terminal is often a different color, like black or dark bronze. Tighten the screw firmly to ensure a good connection.
Attach The Traveler Wires
Connect the two traveler wires to the traveler terminals on the switch. These terminals are usually brass-colored screws. Match each wire to a terminal, tightening screws securely.
Secure The Ground Wire
Connect the ground wire to the green grounding screw on the switch. This wire provides safety by grounding the circuit. If there is no ground wire, check local codes before proceeding.
Mount The Switch And Restore Power
Push the wires gently back into the box. Screw the switch into place. Attach the wall plate. Turn the power back on at the breaker. Test the switch to check if it controls the light correctly.
Wire The Second Switch
Wiring the second switch is an important step in installing a 3 way light switch. This switch controls the light together with the first switch. Proper wiring ensures smooth operation from both locations.
Take your time and check each wire carefully. Use the right tools for safety and accuracy. Follow the instructions to connect the wires correctly.
Identify The Wires On The Second Switch
Look for the common terminal on the switch. It usually has a different color screw, often black or dark. The traveler terminals are the other two screws, typically brass-colored.
Find the traveler wires coming from the first switch. These wires connect to the traveler terminals on the second switch. The common terminal connects to the wire going to the light fixture.
Connect The Traveler Wires
Attach the traveler wires to the two traveler terminals. It does not matter which traveler wire goes to which traveler terminal. Tighten the screws firmly to hold the wires in place.
Check that no wire strands are loose. Loose wires can cause flickering or poor connection.
Attach The Common Wire
Connect the common wire to the common terminal. This wire links the second switch to the light fixture. Make sure the connection is secure and tight.
Secure The Ground Wire
Connect the ground wire to the green grounding screw on the switch. If the switch box is metal, connect the ground wire there too. This step ensures safety by grounding the circuit.
Final Check Before Closing The Box
Double-check all wire connections for tightness. Make sure no wires touch each other. Carefully push the wires back into the switch box.
Attach the switch to the box and secure it with screws. Turn the power on and test both switches to confirm proper function.
Install The Light Fixture
Installing the light fixture is an important step in setting up a 3 way light switch. It connects the switch wiring to the light, allowing control from two locations. This part is simple and safe when done carefully.
Follow each step closely to ensure the fixture works well with your new switches. Check that power is off before starting to avoid any shocks.
Prepare The Light Fixture And Wiring
Begin by unpacking your light fixture and reading the instructions. Check the wires inside the fixture; usually, there is a black (hot), white (neutral), and green or bare (ground) wire. Strip about half an inch of insulation from each wire if needed.
Connect The Wires To The Fixture
Match the fixture wires to the house wires. Connect black to black, white to white, and green or bare copper to the ground wire. Twist the wire ends together and secure them with wire nuts. Make sure connections are tight and no copper shows outside the nuts.
Mount The Fixture To The Ceiling Or Wall
Attach the fixture base to the electrical box using screws. Hold the fixture steady and align it with the mounting holes. Tighten the screws to secure the fixture firmly, but do not overtighten and crack the fixture.
Install Bulbs And Test The Light
Insert the correct bulbs into the fixture sockets. Turn the power back on at the breaker. Test the light by using both 3 way switches to confirm they control the fixture properly.
Test The Switches
Testing the switches is a key step after installing a 3 way light switch. It ensures that both switches work correctly to control the light. This process helps catch wiring mistakes early. It also confirms safety before closing the switch boxes.
Testing is simple and only takes a few minutes. You will check each switch by turning the light on and off from both locations. Follow the steps carefully for accurate results.
Prepare For Testing
Turn the power back on at the circuit breaker. Make sure the light fixture is connected properly. Have a helper ready to operate the other switch if needed. Keep a flashlight handy in case of a dark room.
Test Each Switch Individually
Flip the first switch up and down. Watch the light to see if it turns on and off. Repeat this with the second switch. Both switches should control the light independently.
Test Both Switches Together
Turn on the light with the first switch. Then use the second switch to turn it off. Switch back and forth between the two. The light should respond every time without delay.
Troubleshoot Common Issues
If the light does not respond correctly, turn off the power. Check the wiring connections carefully. Look for loose or swapped wires. Tighten any loose screws and fix the wiring as needed. Repeat the test after corrections.
Troubleshooting Common Issues
Troubleshooting common issues helps fix problems with a 3 way light switch. Small mistakes can cause the switch to not work correctly. Knowing what to check saves time and frustration. This section shows easy ways to find and solve common problems.
Check For Loose Or Disconnected Wires
Loose wires often cause the switch to stop working. Turn off the power before touching wires. Look inside the switch box for any wires that are not tight. Push the wires back into the terminals firmly. Make sure all screws hold wires well.
Test The Switches With A Voltage Tester
A voltage tester shows if power flows through the switch. Turn off power, then remove the switch cover. Place the tester on the wires or terminals. No reading means no power or a bad connection. Replace the switch if no voltage passes through.
Verify Correct Wire Connections
Wrong wiring is a common cause of failure. Compare your wiring to the instructions or a wiring diagram. Confirm the traveler wires connect between the two switches. The common terminal must be attached to the right wire. Fix any wires in the wrong place.
Inspect The Light Fixture And Bulbs
The problem may be the light, not the switch. Check if the bulb is burned out or loose. Try a new bulb to see if the light works. Examine the fixture wiring for damage or loose connections. Repair or replace the fixture if needed.
Look For Breaks In The Circuit
Broken wires or tripped breakers stop the circuit. Check your home’s breaker panel for tripped switches. Reset any breakers that are off. Inspect visible wiring for damage or cuts. Fix any breaks to restore power to the switches.
Frequently Asked Questions
What Tools Are Needed To Install A 3 Way Light Switch?
You need a screwdriver, voltage tester, wire stripper, electrical tape, and the 3 way switch itself. Safety gear like gloves is also recommended.
How Do 3 Way Switches Control One Light?
3 way switches use traveler wires to allow two switches to control one light from different locations.
Can I Install A 3 Way Switch Without An Electrician?
Yes, if you follow safety guidelines and wiring instructions carefully, you can install a 3 way switch yourself.
What Is The Difference Between A 3 Way And 4 Way Switch?
A 3 way switch controls one light from two locations; a 4 way adds control from additional points.
Conclusion
Installing a 3 way light switch can save you time and effort. It lets you control lights from two places easily. Always follow safety rules during installation. Take your time to connect wires correctly. Test the switch before finishing the job.
This simple upgrade improves home convenience a lot. Keep this guide handy for future reference. Enjoy better lighting control in your rooms.