Are you ready to upgrade your home lighting with a Leviton light switch but not sure where to start? Installing a new switch might seem tricky, but with the right steps, you can do it yourself quickly and safely.
Imagine controlling your lights with ease and adding a modern touch to any room—all without waiting for an electrician. In this guide, you’ll find simple, clear instructions that anyone can follow. Keep reading, and by the end, you’ll have your Leviton light switch installed like a pro.
Tools And Materials Needed
Installing a Leviton light switch requires the right tools and materials. Having everything ready makes the job easier and safer. This section lists all essentials for a smooth installation.
Essential Tools For Installing A Leviton Light Switch
You need a screwdriver, either flathead or Phillips, for removing screws. A voltage tester is crucial to ensure the power is off. Wire strippers help remove insulation from wires cleanly. Needle-nose pliers allow you to bend and hold wires in place. A flashlight or headlamp can improve visibility inside the electrical box.
Materials Needed For The Installation
Start with the Leviton light switch itself. Use electrical tape to secure wire connections. Wire nuts are necessary to join wires safely. Have a wall plate ready to cover the switch. Make sure you have the right screws to attach the switch and plate firmly.
Safety Equipment To Consider
Wear insulated gloves to protect against electric shock. Safety glasses shield your eyes from debris. A dust mask is helpful if the area is dusty or old paint chips fall. Having these safety items reduces risks during installation.
Safety Precautions
Safety is the top priority when installing a Leviton light switch. Electricity can cause serious injury or damage. Taking the right precautions helps keep you safe and prevents accidents.
Always prepare your workspace and tools before starting. Knowing how to work safely makes the installation easier and safer.
Turn Off The Power
Switch off the circuit breaker that controls the light switch. Double-check by testing the switch to ensure no power flows. This step stops electric shocks during installation.
Use A Voltage Tester
Use a voltage tester to confirm the wires have no current. This tool shows if electricity is still running through the wires. Never skip this step for your safety.
Wear Protective Gear
Wear insulated gloves to protect your hands from shocks. Safety glasses guard your eyes from dust or sparks. Proper gear reduces the risk of injury.
Work In A Dry Area
Avoid installing the switch in wet or damp places. Water and electricity do not mix and can cause shocks. Keep your hands dry while working.
Follow Manufacturer Instructions
Read the Leviton switch manual carefully. Follow each step to avoid mistakes. Manufacturer guides provide important safety tips and correct procedures.
Turn Off Power
Turning off the power is the first and most important step before installing a Leviton light switch. It keeps you safe from electric shocks and prevents damage to your electrical system. Always take this step seriously.
Never start any electrical work without cutting the power supply. This simple action protects you and your home.
Locate The Circuit Breaker
Find your home’s main electrical panel. Look for the circuit breaker that controls the room or area where you will install the switch. It usually has labels, but if not, you may need to test to find the right one.
Switch Off The Correct Breaker
Flip the breaker to the OFF position. This stops power from flowing to the switch box. Double-check by trying to turn on the light connected to the switch. It should stay off.
Use A Voltage Tester
Before touching any wires, use a voltage tester. It confirms that no electricity is flowing. Test all wires inside the switch box to be sure. Safety first.
Keep The Breaker Off During Installation
Do not turn the breaker back on until the switch is fully installed. Leaving the power off avoids accidents. Work calmly and carefully.
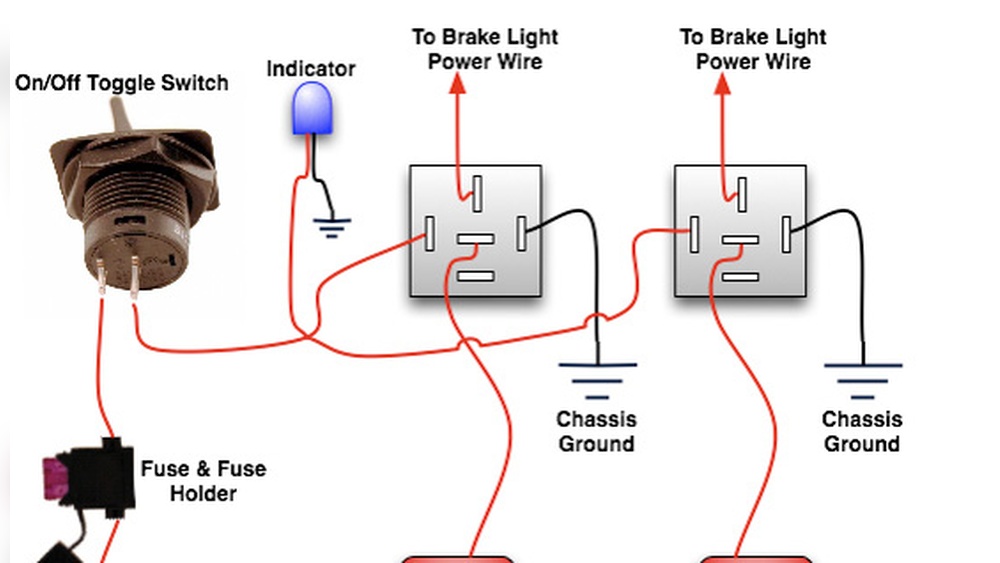
Credit: www.electricaltechnology.org
Remove Old Switch
Removing the old switch is the first step in installing a Leviton light switch. This step ensures safety and prepares the wall for the new device. Take your time and follow each step carefully to avoid damage or injury.
Turn Off Power At The Circuit Breaker
Safety comes first. Find your home’s circuit breaker box. Flip the switch to turn off power to the light switch you want to replace. Use a voltage tester to double-check that no electricity flows to the switch.
Remove The Switch Cover Plate
Use a screwdriver to take off the cover plate. This exposes the screws holding the switch in place. Keep the screws safe for later use.
Unscrew And Pull Out The Old Switch
Loosen the screws that hold the switch to the electrical box. Carefully pull the switch out. You will see the wires connected to the back of the switch.
Note The Wiring Setup
Look closely at how the wires connect. Take a photo or draw a diagram. This helps when connecting the new Leviton switch. Label the wires if needed.
Disconnect The Wires
Loosen the screws or remove the wire nuts holding the wires. Gently pull the wires free from the old switch. Keep the wires straight and untangled to ease installation of the new switch.
Identify Wires
Identifying wires is the first important step in installing a Leviton light switch. Properly knowing each wire helps ensure a safe and correct installation. Mistaking wires can cause electrical problems or damage the switch.
Before starting, turn off the power at the circuit breaker. Use a voltage tester to confirm the wires are not live. Safety first.
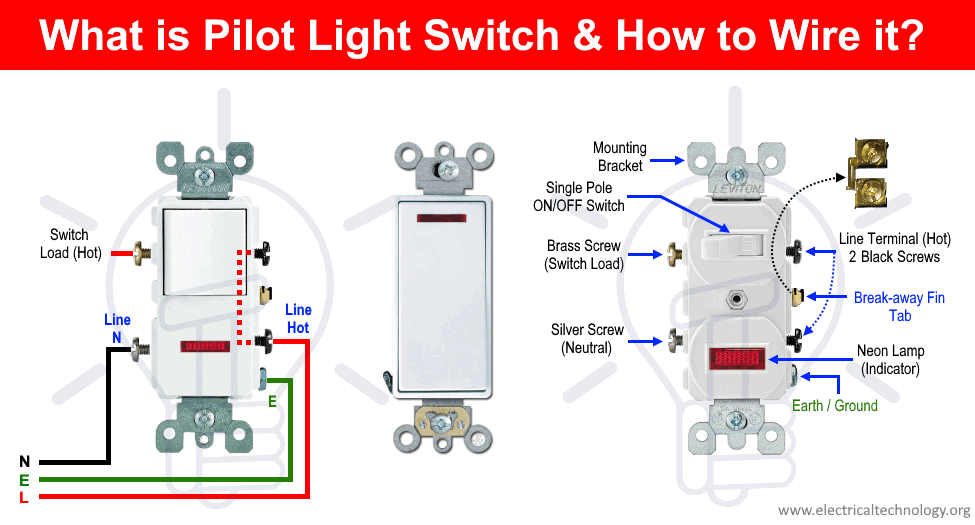
Identify The Hot Wire
The hot wire carries electricity from the power source to the switch. It is usually black or red. Use a voltage tester to find the hot wire. It will show a live current when the power is on.
Identify The Neutral Wire
The neutral wire completes the electrical circuit. It is typically white. Not all switches require connection to the neutral wire, but Leviton switches often do. Check your switch instructions.
Identify The Ground Wire
The ground wire protects from electrical shock. It is usually green or bare copper. Connect the ground wire to the green screw on the switch. This step is important for safety.
Identify The Load Wire
The load wire carries power from the switch to the light fixture. It is often black or red. This wire connects to the switch’s load terminal. Mark the wires before disconnecting the old switch.
Connect New Switch
Connecting the new Leviton light switch is a key step in the installation process. It involves wiring the switch properly for safe and effective operation. Follow each step carefully to avoid mistakes and ensure the switch works well.
Focus on attaching the ground wire, connecting the line and load wires, and securing the neutral wire if your switch has one. Each part is important for electrical safety and switch performance.
Attach Ground Wire
Locate the green or bare copper ground wire in the electrical box. Attach this wire to the green grounding screw on the switch. Tighten the screw firmly to hold the wire in place. Grounding helps prevent electrical shocks and protects your home.
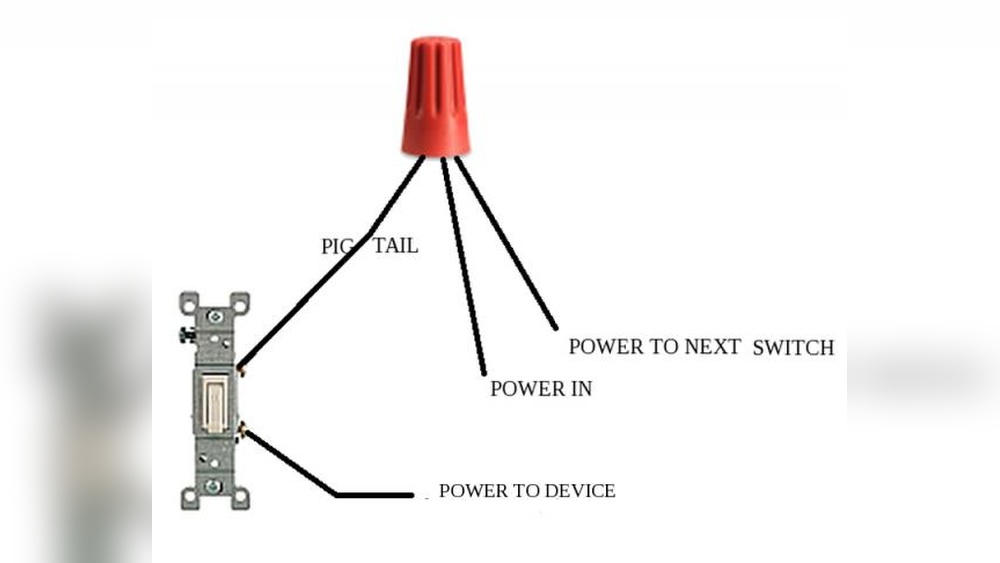
Connect Line And Load Wires
Identify the line wire, which brings power from the electrical panel. Connect it to the terminal labeled “Line” or “Hot” on the switch. Next, find the load wire that leads to the light fixture. Attach it to the terminal marked “Load.” Secure both wires tightly under the screws to avoid loose connections.
Secure Neutral Wire If Present
Some Leviton switches require a neutral wire for proper function. Look for the white neutral wire in the box. Connect it to the switch’s neutral terminal, usually marked as such. Make sure the wire is snug and does not touch other terminals. This connection completes the circuit and allows smart features to work.
Mount The Switch
Mounting the Leviton light switch is a key step in completing your installation. This part ensures the switch sits securely in the electrical box. It also helps align the switch for easy use and a clean look.
Take time to position the switch correctly before tightening the screws. Proper mounting prevents loose connections and switch wobbling. Follow the steps carefully for a safe and neat setup.
Align The Switch With The Electrical Box
Place the switch inside the electrical box. Check that the switch is straight and flush with the wall. Misalignment can cause problems when attaching the cover plate.
Secure The Switch With Mounting Screws
Use the screws that came with the switch. Insert them into the holes on the switch’s mounting ears. Tighten them evenly to hold the switch firmly in place.
Double-check The Switch Position
After tightening, ensure the switch does not move. The toggle or rocker should move smoothly. Adjust the screws if the switch feels loose or crooked.
Restore Power And Test
Restoring power and testing your Leviton light switch finishes the installation. This step confirms the switch works correctly. It also ensures safety before full use.
Turn the power back on carefully. Avoid touching wires or terminals during this process. Always use the circuit breaker to restore electricity.
Turn On The Circuit Breaker
Find the correct breaker in your electrical panel. Flip it to the ON position. This action restores power to the switch and the connected light.
Test The Light Switch Operation
Press the switch to turn the light on and off. Check if the light responds without flickering or delay. If the light does not work, recheck your wiring.
Check For Safety And Secure Fit
Make sure the switch is firmly mounted in the wall box. Look for any loose parts or exposed wires. A secure switch prevents electrical hazards.
Troubleshooting Tips
Troubleshooting a Leviton light switch can save time and effort. Simple checks often fix common problems. This guide helps identify and solve typical issues.
Checking The Power Supply
Start by verifying the circuit breaker is on. A tripped breaker stops power flow. Use a voltage tester to confirm power at the switch. No power means the problem is outside the switch.
Inspecting The Wiring Connections
Loose wires cause flickering or no light. Turn off power before touching wires. Ensure all wires are tightly connected to terminals. Look for damaged or frayed wires. Replace any unsafe wiring immediately.
Testing The Switch Functionality
Use a multimeter to check the switch’s continuity. Press the switch and watch the meter. No change means a faulty switch. Replace the switch if it does not work.
Resetting The Switch
Some Leviton switches have a reset button. Hold the button for a few seconds. This can clear minor electronic glitches. Check the manual for reset instructions.
Confirming Load Compatibility
Match the switch type with your light load. Dimmer switches need dimmable bulbs. LED bulbs may not work with some switches. Use bulbs recommended by Leviton for best results.
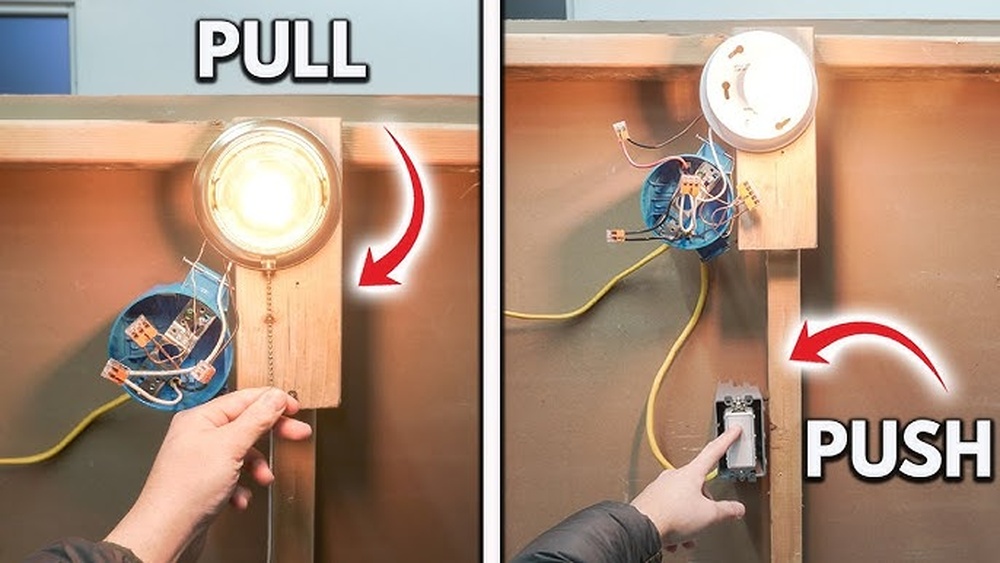
Credit: www.youtube.com

Credit: diy.stackexchange.com
Frequently Asked Questions
What Tools Are Needed To Install A Leviton Light Switch?
You need a screwdriver, voltage tester, wire stripper, and electrical tape. These tools ensure safe and proper installation of your Leviton switch.
How Do I Turn Off Power Before Installing The Switch?
Turn off the circuit breaker controlling the switch’s power. Use a voltage tester to confirm no electricity flows before starting.
Can I Replace Any Light Switch With A Leviton Switch?
Yes, most standard switches can be replaced with a Leviton switch. Ensure the new switch matches your wiring type and voltage.
How Do I Connect Wires To A Leviton Light Switch?
Connect black (hot) wires to brass screws and white (neutral) wires to silver screws. Tighten screws securely for a proper connection.
Conclusion
Installing a Leviton light switch can be simple and quick. Follow safety steps and use the right tools. Double-check your wiring before turning power back on. Test the switch to make sure it works well. You can save money by doing this yourself.
Enjoy better control over your lighting today. Keep your home safe and bright with ease.