Have you ever noticed your brake lights not turning on when you press the pedal? This can be a safety hazard and even lead to traffic tickets.
Installing a new brake light switch might seem tricky, but with the right steps, you can fix it yourself quickly and confidently. In this guide, you’ll learn exactly how to install a brake light switch, saving time and money. Keep reading, and by the end, you’ll have the skills to get your brake lights working perfectly again.
Signs Of A Faulty Brake Light Switch
The brake light switch plays a key role in your car’s safety. It controls the brake lights that warn drivers behind you. A faulty switch can cause problems that may not be obvious at first. Spotting the signs early helps you fix the issue fast. This keeps you and others safe on the road.
Common Symptoms
Brake lights that do not turn on are a clear sign of a faulty switch. Sometimes, the lights stay on even when the brake is not pressed. The cruise control may stop working correctly. Your car’s shift lock might fail to release. These symptoms often point to a bad brake light switch.
Safety Risks
Broken brake lights increase the chance of rear-end collisions. Drivers behind you cannot see when you slow down. This causes dangerous driving situations. Malfunctioning cruise control can lead to unexpected acceleration. Faulty brake switches may also prevent the car from starting safely. Repairing the switch reduces these risks greatly.
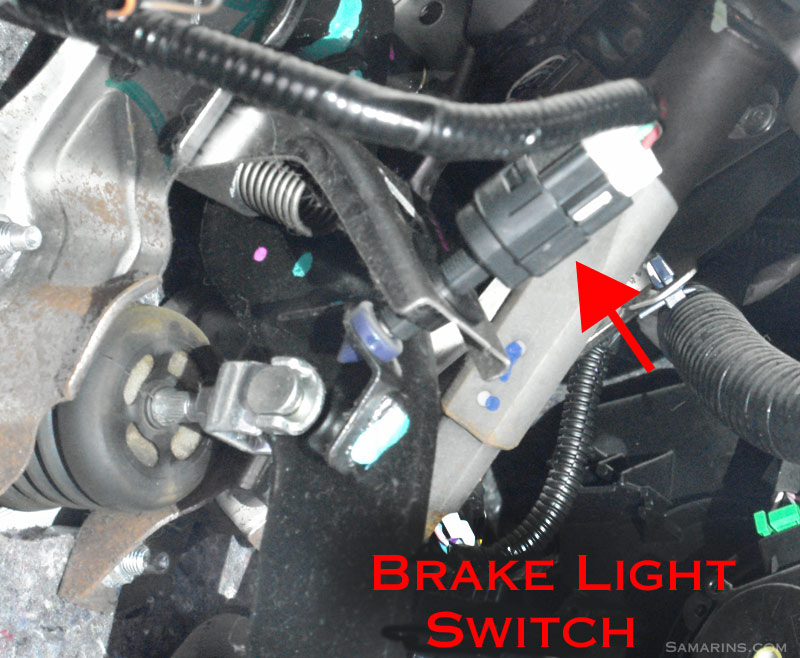
Credit: www.samarins.com
Tools And Materials Needed
Preparing the right tools and materials makes installing a brake light switch easier. Having everything ready saves time and avoids frustration. This list covers what you need for a smooth installation process.
Essential Tools
You will need a few basic tools to start. A screwdriver, usually Phillips or flathead, helps remove panels. A wrench or socket set fits bolts and nuts. Needle-nose pliers assist with small clips and connectors. A multimeter can check electrical connections for safety. Gloves protect your hands during the work.
Replacement Parts
The main part needed is the new brake light switch. Make sure it matches your vehicle’s make and model. Sometimes, new clips or connectors come with the switch. Keep the old switch handy to compare during installation. A small amount of electrical tape can secure loose wires if needed.
Locating The Brake Light Switch
Finding the brake light switch is the first step in installing a new one. This small part controls the brake lights, signaling when you press the brake pedal. Knowing its location helps save time and effort during replacement.
The brake light switch sits near the brake pedal. It often looks like a small button or sensor. Identifying its position is key before starting the installation.
Typical Switch Position
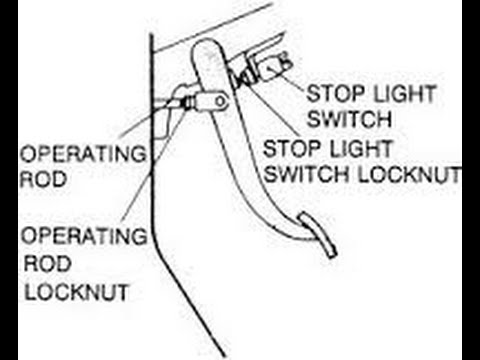
The brake light switch is usually mounted on the brake pedal arm. It sits just above the pedal itself. When you press the pedal, the switch activates the brake lights.
In many cars, the switch is attached to the brake pedal bracket. It may be hidden behind plastic panels or under the dashboard. The switch often has wires connected to it, leading to the vehicle’s electrical system.
Accessing The Switch
Accessing the brake light switch requires clearing space around the brake pedal. Remove any panels blocking your view or reach. Use a flashlight to see clearly in tight spaces.
Sometimes, you need to move the brake pedal slightly to reach the switch. Be careful not to force any parts. Keep tools handy for loosening or tightening screws and clips.
Removing The Old Brake Light Switch
Removing the old brake light switch is the first important step in installing a new one. This process ensures safety and prepares the vehicle for the new switch. Careful removal prevents damage to the electrical system and the brake pedal assembly.
Follow the steps carefully. Take your time. Safety first.
Disconnecting The Battery
Start by disconnecting the vehicle’s battery. This stops any electrical flow. It protects you from shocks and avoids short circuits. Use a wrench to loosen the negative terminal clamp. Then, remove the cable from the battery terminal. Keep the cable away from the battery to avoid accidental contact.
Unplugging The Connector
Locate the brake light switch under the dashboard near the brake pedal. Find the electrical connector attached to the switch. Press the tab or clip on the connector. Gently pull the connector away from the switch. Do not pull the wires. This step disconnects the switch from the vehicle’s wiring harness.
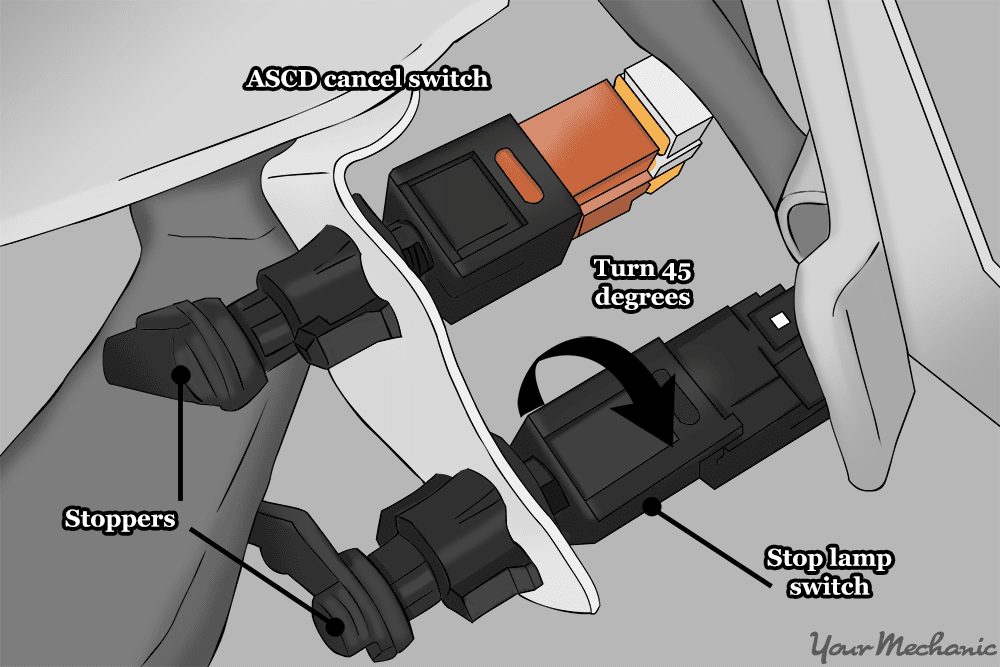
Detaching The Switch
Look for the mounting clip or screws holding the switch in place. Use your fingers or a screwdriver to release the switch. Carefully slide the switch away from the brake pedal arm. Some switches may twist to unlock. Remove the switch fully without forcing it. Check the area for any debris or damage before installing the new switch.
Installing The New Brake Light Switch
Installing the new brake light switch is a key step to restore your vehicle’s brake light function. This part triggers the brake lights when you press the pedal. Proper installation ensures safety and helps avoid traffic issues.
Follow these clear steps to place the switch correctly, secure it firmly, and reconnect the electrical connector. Take your time to do each part right for smooth operation.
Positioning The Switch
First, locate the brake pedal arm where the old switch was. Align the new switch so its plunger touches the pedal arm. The switch should be straight and not tilted. Proper positioning allows the switch to activate as the pedal moves.
Securing The Switch
Next, tighten the switch’s mounting nut or clip to hold it in place. Avoid over-tightening to prevent damage. The switch must stay steady and not move when the pedal is pressed or released. Check for smooth movement after securing.
Reconnecting The Connector
Finally, plug the electrical connector back into the switch. Make sure it clicks in firmly to ensure a good connection. Loose connectors can cause brake lights to fail. Test the brake lights by pressing the pedal to confirm the switch works.
Testing The New Brake Light Switch
Testing the new brake light switch is an important step. It ensures your brake lights work correctly. Proper brake lights keep you safe on the road. Follow these simple steps to check and adjust the switch.
Checking Brake Lights
Start by sitting in the driver’s seat. Press the brake pedal slowly. Have a friend watch the brake lights at the back. The lights should turn on immediately when you press the pedal. If the lights do not come on, check the switch connections. Make sure the switch is properly installed and has power.
Adjusting Switch If Needed
If the brake lights stay on or do not turn on right away, adjust the switch. Locate the brake light switch near the brake pedal arm. Loosen the mounting nut slightly. Move the switch up or down in small steps. Press the brake pedal each time to test the lights. Tighten the nut when the lights work correctly. Proper adjustment avoids false signals and ensures safety.
Tips For Maintenance And Longevity
Maintaining your brake light switch is key to keeping it working well for a long time. Simple care steps help avoid common problems. This saves time and money on repairs. Follow these tips to extend the life of your brake light switch and ensure safety on the road.
Regular Inspections
Check the brake light switch every few months. Look for signs of wear or damage. Make sure it moves freely and clicks when pressed. Test the brake lights to see if they turn on immediately. Clean any dirt or dust around the switch. This keeps the contacts clear and working well.
Preventive Measures
Avoid pressing the brake pedal too hard or too fast. Gentle use reduces stress on the switch. Keep the area around the switch dry. Moisture can cause corrosion and failure. Replace the switch if it shows signs of sticking or delay. Using quality replacement parts also helps maintain proper function.
Credit: adelaideepic.org
Credit: www.youtube.com
Frequently Asked Questions
What Tools Are Needed To Install A Brake Light Switch?
You will need a wrench, screwdriver, and possibly pliers. A multimeter helps test the switch’s functionality. Safety gloves and eye protection are also recommended.
How Do I Locate The Brake Light Switch In My Car?
The brake light switch is usually near the brake pedal arm. It mounts on the brake pedal bracket or close to the pedal assembly.
Can I Install A Brake Light Switch Myself?
Yes, with basic mechanical knowledge and proper tools. Follow the vehicle’s manual and ensure the switch is securely connected.
How Do I Test If The Brake Light Switch Works?
Use a multimeter to check for continuity when pressing the brake pedal. Alternatively, check if the brake lights illuminate when the pedal is pressed.
Conclusion
Installing a brake light switch is simpler than it seems. Follow the steps carefully for safety. Double-check connections before finishing the job. A working brake light switch keeps you and others safe. Regular checks help avoid unexpected problems on the road.
Take your time and stay patient during the process. Now, you can confidently handle this basic car repair. Keep your vehicle in good shape with small fixes like this. Safety matters most, so don’t skip this important step.