Are you looking to add a new power outlet in your room but only have a light switch nearby? Turning that switch box into a convenient receptacle can save you time and money.
In this guide, you’ll learn exactly how to add a receptacle from a light switch safely and easily—even if you’re not an expert. By the end, you’ll have the confidence to upgrade your space with a handy new outlet. Keep reading to discover the simple steps that will transform your walls and make your everyday life more convenient.
Tools And Materials Needed
Before adding a receptacle from a light switch, gather the right tools and materials. Having everything ready makes the work safer and faster. Each tool and material plays an important role in the process.
Tools help you cut, strip, and connect wires correctly. Materials ensure the new receptacle fits well and works safely. Below are the essential items needed for this task.
Basic Electrical Tools
Get a screwdriver set with flathead and Phillips heads. A wire stripper removes insulation without damaging wires. Needle-nose pliers help bend and hold wires firmly. A voltage tester checks if wires have power before you start. A utility knife can cut electrical tape or wire sheathing.
Materials For Wiring
Use electrical wire that matches your home’s wiring gauge. Wire nuts connect wires securely. Electrical tape insulates and protects wire connections. A new receptacle, often a duplex outlet, fits into the wall box. An electrical box may be needed if the switch box is full or unsuitable.
Safety Equipment
Wear insulated gloves to protect against electric shock. Safety glasses shield your eyes from debris. A flashlight helps if the power is off or the room is dark. Have a circuit breaker finder to identify the correct breaker to turn off.
Safety Precautions
Turn off the power at the breaker before starting any electrical work. Use a voltage tester to ensure no electricity flows in the wires. Wear insulated gloves to protect yourself from shocks.
Before adding a receptacle from a light switch, find the switch wiring first. This step is key to a safe and successful installation.
Start by turning off the power to the switch at the circuit breaker. This stops any risk of electric shock.
Remove the light switch cover plate carefully. Use a screwdriver to take out the screws holding it in place.
Next, pull the switch out from the wall box gently. Do not disconnect the wires yet. Look inside the box to see the wiring setup.
Identify The Hot, Neutral, And Ground Wires
Inside the box, find the black, white, and green or bare copper wires. Black is usually hot. White is neutral. Green or bare is ground.
Use a voltage tester to confirm the hot wire. This ensures you know which wire carries power.
Label each wire with tape for easy reference. This helps avoid confusion during wiring.
Check The Wire Capacity And Box Size
Look at the number of wires in the box. Make sure the box is big enough for an extra wire to the new receptacle.
Check wire size, usually 14 or 12 gauge. Match the wire size for the new receptacle wiring.
If the box is too small, replace it with a larger one to meet electrical code requirements.
Plan The Wire Route To The New Receptacle
Decide the path for the new wiring from the switch box to the receptacle location. Keep the route short and direct.
Check for obstacles like studs or pipes inside walls. Avoid drilling into these areas.
Measure the length of wire needed for a neat and safe installation.
Locate The Existing Light Switch Wiring
Turning off power and confirming it is the first step before working on any electrical project. This step keeps you safe and prevents electric shocks. Always treat wires as live until you know for sure they are not.
Electricity can be dangerous. Always take safety seriously. Double-checking power status helps avoid accidents. Use the right tools and follow proper steps.
Turn Off The Circuit Breaker
Locate the breaker panel in your home. Find the switch that controls the light switch circuit. Flip this switch to the “off” position. This stops electricity from flowing to that circuit.
Test The Switch For Power
Use a non-contact voltage tester to check the switch. Hold the tester near the wires or terminals. If the tester lights up or beeps, power is still on. If not, the power is off.
Use A Voltage Meter For Extra Safety
A voltage meter gives a clear reading of voltage levels. Touch its probes to the switch wires. A zero reading confirms no electricity flows. This step adds extra confidence before starting work.
Keep The Breaker Off While Working
Do not turn the breaker back on until all work finishes. Keep the area safe by keeping power off. This prevents accidental shocks during installation or wiring.

Credit: www.do-it-yourself-help.com
Turn Off Power And Confirm
Planning the receptacle location is the first step when adding a receptacle from a light switch. The right spot makes the outlet useful and safe. Think about where you need power most in the room. This helps avoid awkward cords and keeps the area neat.
Check the wall space near the switch. You want a place that is easy to reach and fits your needs. Avoid spots behind furniture or too close to doors. The goal is to have a convenient and practical outlet.
Consider Room Layout And Furniture Placement
Look at the furniture in the room. Place the receptacle where devices will be used most. Near a desk, TV, or bed works well. This reduces the need for long extension cords.
Check Electrical Code And Safety Rules
Follow local electrical codes. Some areas have rules about outlet height and distance. Keep the receptacle away from water sources like sinks. Safety is key when working with electricity.
Evaluate Existing Wiring And Switch Box Size
Inspect the wiring in the switch box. Make sure there is enough space for the new outlet wires. Overcrowded boxes can cause problems. Plan for a box that fits all wiring safely.
Plan For Future Needs
Think about future devices you may add. A well-placed receptacle saves time later. Consider extra outlets or USB ports. This adds value and convenience to your home.
Plan The Receptacle Location
Running new wiring is key to adding a receptacle from a light switch. It connects power safely and ensures the outlet works correctly.
Start by turning off the circuit breaker to avoid electric shocks. Safety first.
Choose The Right Wire Type And Size
Select a wire that matches the circuit’s amperage. Usually, 14-gauge wire works for 15-amp circuits.
Use wire with proper insulation for indoor use. This protects against damage and electrical hazards.
Measure And Cut The Wire Length
Measure the distance from the light switch box to the new receptacle box.
Leave some extra length for connections and future adjustments.
Cut the wire carefully using wire cutters. Avoid damaging the insulation.
Run The Wire Through Walls Or Conduits
Feed the wire through the wall cavity or conduit to reach the receptacle box.
Use a fish tape to guide the wire if needed. This helps in tight spaces.
Keep the wire neat and avoid sharp bends to prevent damage.
Secure The Wiring Properly
Attach the wire to studs or joists using wire staples.
Place staples gently to avoid crushing the wire.
Leave enough slack near boxes for easy connections later.
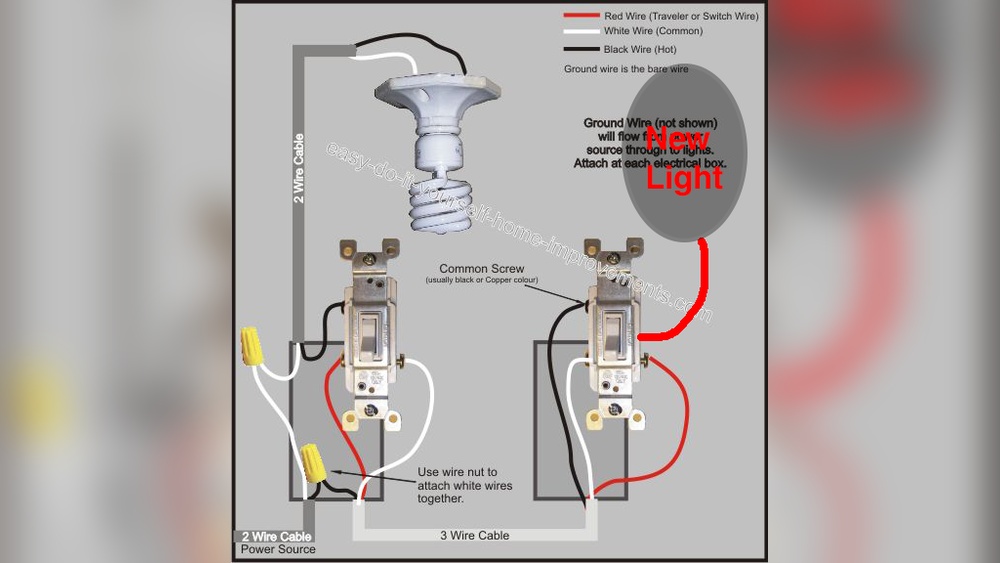
Credit: www.reddit.com
Run New Wiring To The Receptacle Box
Connecting wires at the light switch is a key step to add a new receptacle safely. It involves working with the existing wires and making secure connections. This ensures the new outlet receives power from the switch box.
Careful handling and clear understanding of wire functions are important. Take time to identify each wire and connect them properly. This process keeps your electrical system safe and functional.
Turn Off Power At The Circuit Breaker
Start by switching off power to the light switch circuit. Use a circuit tester to confirm no electricity flows. This prevents shocks and accidents during work.
Remove The Light Switch Cover Plate
Unscrew the cover plate carefully to expose the wires. Keep screws safe for reassembly. This gives access to the switch wiring.
Identify The Wires At The Switch
Look for the hot, neutral, and ground wires. Hot wires usually black or red. Neutral wires are white. Ground wires are green or bare copper.
Disconnect The Light Switch Wires
Loosen screws holding the switch wires. Gently pull wires free without damage. Keep track of where each wire was connected.
Connect The New Receptacle Wires
Attach the new outlet’s hot wire to the switch’s hot wire. Connect neutral wires together. Join ground wires securely with a wire nut.
Secure All Wire Connections
Twist wire nuts tightly over wire ends. Wrap electrical tape around wire nuts for extra safety. Push wires back into the box neatly.
Reinstall The Light Switch And Cover Plate
Reconnect the switch wires to their terminals. Screw the switch back into the box firmly. Replace the cover plate and tighten screws.
Connect Wires At The Light Switch
After installing a new receptacle from a light switch, restoring power is the next step. This step ensures the new outlet works correctly and safely. Testing the receptacle confirms it supplies electricity as intended.
Restoring power must be done carefully. Safety is the priority before checking the new outlet.
Turn The Circuit Breaker Back On
Locate the circuit breaker panel. Find the breaker that controls the area where you worked. Switch the breaker to the ON position. This action restores electricity to the circuit.
Do not rush this step. Confirm each breaker is correctly positioned. A wrong switch can cause power issues.
Use A Voltage Tester To Check The Outlet
Use a voltage tester or a receptacle tester. Place the tester’s probes into the outlet slots. The device will show if electricity flows properly. No light or signal means no power.
Testing confirms the outlet is live and safe to use.
Plug In A Small Device To Verify Function
Plug in a small device like a lamp or phone charger. The device turning on means the outlet works. This simple test shows the outlet is ready for daily use.
Do not use high-power devices at first. Start with low-power items to avoid overload.
Install The Receptacle And Cover Plate
Adding a receptacle from a light switch can be tricky. Problems may arise during or after installation. Troubleshooting common issues helps fix these problems quickly.
Understanding typical issues saves time and keeps your project safe. This section covers frequent problems and how to solve them step-by-step.
Check For Power Supply Problems
Ensure the circuit breaker is on. Sometimes breakers trip without notice. Use a voltage tester to check the wires. No power means no receptacle function. Confirm the light switch controls the right wires.
Verify Proper Wiring Connections
Loose or wrong connections cause the receptacle not to work. Tighten all wire nuts and screws. Match black wires to brass screws and white to silver. Ground wires must connect to the green screw. Double-check your wiring layout.
Test The Light Switch Operation
The switch might control the new receptacle. Turn the switch on and off. See if the receptacle powers on. A faulty switch can stop power flow. Replace the switch if it feels loose or breaks.
Inspect For Overloaded Circuits
Adding a receptacle increases circuit load. Too many devices on one circuit can trip breakers. Remove some devices to reduce load. Spread devices across different circuits if possible. An electrician can help with complex setups.

Credit: diy.stackexchange.com
Frequently Asked Questions
How Do I Safely Add A Receptacle From A Light Switch?
Turn off power at the circuit breaker before starting. Use a voltage tester to confirm power is off. Follow local electrical codes and use appropriate wire connectors for safety.
Can I Use The Existing Light Switch Wiring For A New Outlet?
Yes, you can tap into the switch’s wiring if it has a constant hot wire. Ensure the circuit can handle the extra load safely before proceeding.
What Tools Are Needed To Add A Receptacle From A Light Switch?
You’ll need a screwdriver, wire stripper, voltage tester, electrical box, receptacle, wire nuts, and electrical tape. These tools help ensure a safe and proper installation.
Is It Necessary To Get A Permit For This Electrical Work?
Permit requirements vary by location. Check local regulations before starting. Obtaining a permit ensures compliance with safety standards and legal codes.
Conclusion
Adding a receptacle from a light switch can save space and add convenience. Follow safety steps to avoid accidents. Use the right tools and materials for a smooth job. Double-check all connections before turning the power back on. This simple project can improve your room’s functionality.
Take your time and work carefully. Enjoy the new outlet and the extra power it provides.