Have you ever faced a flickering light or a switch that just won’t work right? Rewiring a light switch might sound tricky, but with the right steps, you can fix it yourself and save time and money.
Imagine the satisfaction of flipping a switch and seeing your lights shine bright again—all because you took control and handled the problem. In this guide, you’ll learn exactly how to rewire a light switch safely and easily, even if you’re new to electrical work.
Keep reading, and by the end, you’ll have the confidence to tackle this simple home fix on your own.
Safety First
Safety comes first when rewiring a light switch. Electricity can cause serious harm. Take steps to protect yourself before starting any work. Follow these safety tips carefully to avoid accidents and injuries.
Turn Off Power
Always switch off power at the circuit breaker. Do not rely only on the light switch. Use a voltage tester to confirm the power is off. This step is crucial to prevent electric shocks.
Use Proper Tools
Choose tools made for electrical work. Insulated screwdrivers and wire strippers reduce risk. Using the right tools helps you work safely and easily. Avoid makeshift tools that can cause accidents.
Wear Safety Gear
Wear rubber-soled shoes and safety glasses. Gloves made for electrical work add protection. Avoid loose clothing that might catch on wires. Safety gear keeps you safe from shocks and injuries.
Gather Materials
Gathering the right materials is the first step in rewiring a light switch. Having everything ready makes the process smoother and safer. It helps avoid interruptions and ensures you complete the task efficiently.
Types Of Light Switches
There are several types of light switches to consider. The most common is the single-pole switch. It controls one light or set of lights from one location. Another type is the three-way switch, which controls a light from two locations. Dimmer switches adjust the brightness of the light. Knowing your switch type helps you buy the correct replacement and tools.
Essential Tools
Some tools are necessary for rewiring a light switch. A screwdriver set, including flathead and Phillips, is vital. Wire strippers remove insulation without damaging the wire. A voltage tester ensures power is off before working. Needle-nose pliers help bend and hold wires. These tools make the job safer and easier.
Additional Supplies
Besides tools, you need a few extra supplies. Electrical tape insulates wire connections securely. Wire nuts join wires safely and prevent shorts. New light switch units replace old or faulty ones. Sometimes, extra wire is required for longer connections. Always choose supplies that meet safety standards for electrical work.
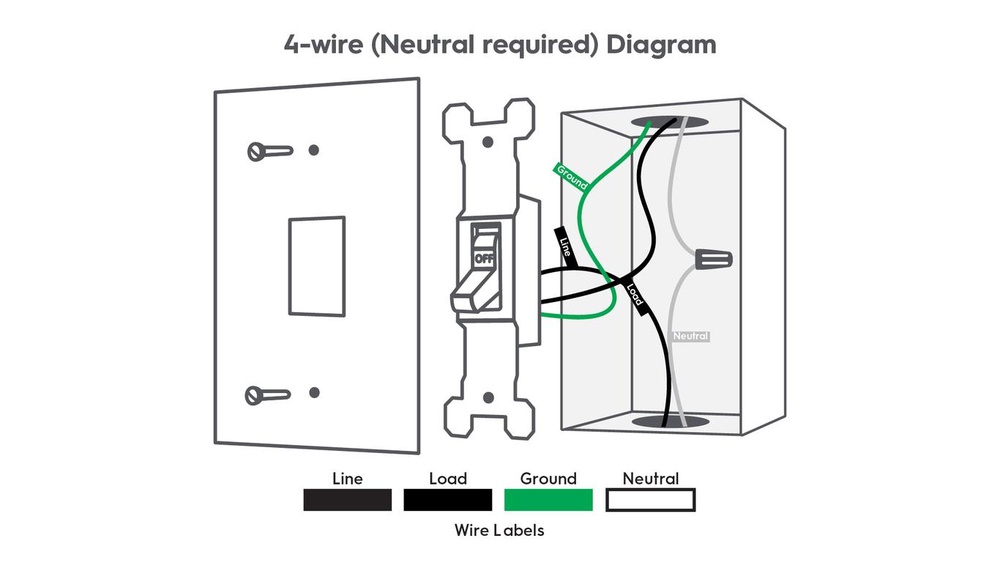
Identify Wiring Types
Before rewiring a light switch, knowing the wiring type is essential. Different switches use different wiring methods. Identifying the wiring type helps avoid mistakes and ensures safety. It also makes the rewiring process smoother and faster. Two common wiring types are single-pole and three-way switches. Each has its own wiring setup and function.
Single-pole Switch Wiring
A single-pole switch controls one light or set of lights from one location. It has two brass terminals and a ground screw. The black (hot) wire connects to one brass terminal. The other brass terminal connects to the light fixture’s black wire. The white (neutral) wires usually connect together in the box and do not attach to the switch. The ground wire connects to the green screw on the switch. This wiring setup is simple and common in many homes.
Three-way Switch Wiring
A three-way switch controls a light from two different locations. It has three terminals plus a ground screw. Two brass or copper-colored terminals are called traveler terminals. The common terminal is usually darker or black. The black (hot) wire connects to the common terminal on the first switch. Two traveler wires connect the traveler terminals between the two switches. The light fixture connects to the common terminal on the second switch. The white (neutral) wires connect together in the box. The ground wires connect to the switches and metal boxes if present.

Credit: diy.stackexchange.com
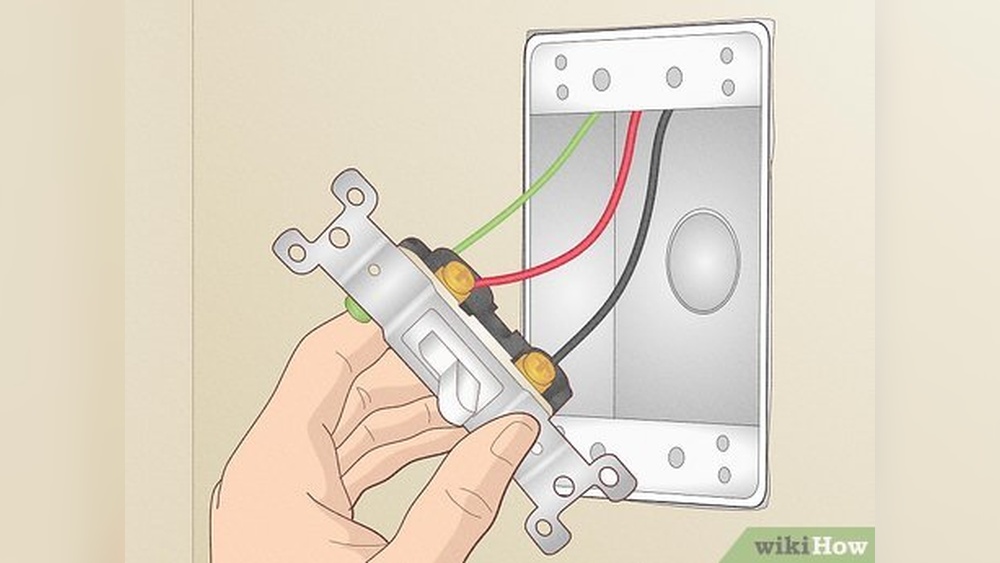
Remove Old Switch
Removing the old light switch is the first step in rewiring. It helps you see the wires clearly. This step is important for safety and makes the next work easier. Follow simple steps to take out the old switch without damage.
Unscrew Switch Plate
Start by turning off the power at the circuit breaker. Use a screwdriver to remove the screws holding the switch plate. Keep the screws in a safe place. Gently pull the plate away from the wall. This exposes the switch and wires behind it.
Disconnect Wires Safely
Use a voltage tester to make sure the power is off. Carefully loosen the screws holding the wires on the switch. Note the position of each wire for easy reconnection. Remove the wires one by one. Avoid touching wire ends with bare hands. Place the old switch aside safely.
Prepare New Switch
Preparing the new switch is an important step before installation. This step ensures the switch is ready to connect safely and work properly. Taking time to prepare the switch helps avoid mistakes and future problems.
Inspect New Switch
Check the new switch carefully. Look for any damage or defects on the body and terminals. Make sure the switch matches the old one in size and type. Confirm the switch is rated for the right voltage and current. This step prevents using the wrong switch that can cause failures or hazards.
Strip Wire Ends
Strip about half an inch of insulation from each wire end. Use a wire stripper for a clean, even strip. Avoid nicking or cutting the wire strands. Proper stripping ensures a solid connection to the switch terminals. Twisting the wire strands after stripping keeps them tight and easier to attach.
Connect Wires
Connecting wires is a key step in rewiring a light switch. It ensures the switch works safely and correctly. Take your time to connect each wire carefully. Follow the color codes and secure every wire firmly. This helps avoid electrical problems later.
Match Wire Colors
Identify the wire colors in your electrical box. Typically, black or red wires are live. White wires are neutral. Green or bare wires are ground. Connect wires of the same color together. This keeps the wiring safe and clear.
Attach Ground Wire
Find the ground wire, usually green or bare. Attach it to the green screw on the switch. This connection prevents electrical shocks. It is important for safety and follows electrical codes.
Secure Wire Connections
Use wire nuts or terminal screws to join wires. Twist wires tightly before securing. Make sure connections are firm and no copper shows. Loose wires can cause sparks or failures. Double-check every connection before closing the box.
Mount The Switch
Mounting the switch is the next key step in rewiring a light switch. This part secures the switch inside the electrical box. A properly mounted switch ensures safety and functionality.
Careful mounting prevents loose connections and avoids electrical hazards. Follow each step to mount the switch correctly and safely.
Align Switch In Box
Start by placing the switch into the electrical box. Make sure the switch aligns with the box’s screw holes. The switch should sit flat against the box surface. Check that no wires get pinched or bent. Proper alignment helps keep the switch steady and secure.
Tighten Screws
Next, use a screwdriver to tighten the mounting screws. Turn each screw slowly and evenly. Tighten until the switch feels firm but not forced. Avoid over-tightening to prevent damage to the switch or box. Secure screws keep the switch from moving or rattling over time.
Restore Power And Test
After rewiring a light switch, restoring power and testing are crucial steps. These steps confirm if the wiring is correct and the switch works safely. Always follow safety rules to avoid risks.
Turn Power On
Find the main circuit breaker panel. Flip the breaker switch for the light circuit back to the ON position. This restores electricity to the rewired switch. Watch for any sparks or unusual sounds. If you see or hear anything odd, turn off the power immediately.
Check Switch Function
Flip the light switch to the ON position. The light should turn on smoothly without flickering. Flip it OFF and ON several times to check consistency. If the light does not work, or flickers, turn off the power and check your wiring again. Testing ensures the switch is safe and operates correctly.
Troubleshooting Tips
Troubleshooting is key when rewiring a light switch. Small issues can stop the switch from working. Knowing common problems helps fix them fast. This section covers simple tips for common switch problems.
Switch Not Working
First, check the power supply. Use a voltage tester to see if the wires have power. Confirm the circuit breaker is on. Sometimes, a tripped breaker causes the switch to stop working. Also, check if the switch itself is faulty. Replace it if needed.
Flickering Light Issues
Flickering lights often mean a loose wire or bad connection. Turn off the power before checking. Tighten all wire screws on the switch. Inspect the light bulb and socket for damage. Replace the bulb if flickering continues.
Loose Connections
Loose connections cause many switch problems. Make sure all wires are secure under the screws. Strip the wire ends properly before attaching. Use the right screw size to hold wires tight. Loose wires can cause sparks or no power.

Credit: www.reddit.com

Credit: www.dummies.com
Frequently Asked Questions
How Do I Safely Turn Off Power Before Rewiring?
Always switch off the circuit breaker controlling the light switch. Use a voltage tester to confirm no electricity is flowing. This prevents electrical shocks and ensures a safe rewiring process.
What Tools Are Needed To Rewire A Light Switch?
You need a screwdriver, wire stripper, voltage tester, and electrical tape. These tools help you safely remove, strip, and connect wires during rewiring.
How Do I Identify The Correct Wires To Connect?
Typically, the black wire is live, white is neutral, and green or bare is ground. Confirm wire functions with a voltage tester before connecting them to the switch terminals.
Can I Rewire A Light Switch Without Professional Help?
Yes, if you follow safety precautions and understand wiring basics. However, consult an electrician if unsure to avoid hazards and code violations.
Conclusion
Rewiring a light switch can save time and money. Always turn off the power before you start. Follow each step carefully for safety. Use the right tools and check your work twice. This simple skill helps you fix switches at home.
Practice makes the process easier and faster. Feel confident in handling basic electrical tasks now. Stay safe and take your time during the job. You can keep your lights working without calling a pro.