If you’re struggling with a stubborn Kwikset two-sided key deadbolt, you’re not alone. Removing this type of lock can be tricky, especially if you’ve never done it before.
But don’t worry—this guide will walk you through each simple step to get it done quickly and safely. By the end, you’ll have the confidence to remove your deadbolt without damaging your door or lock. Ready to take control and tackle this task yourself?
Keep reading, and you’ll see how easy it can be.
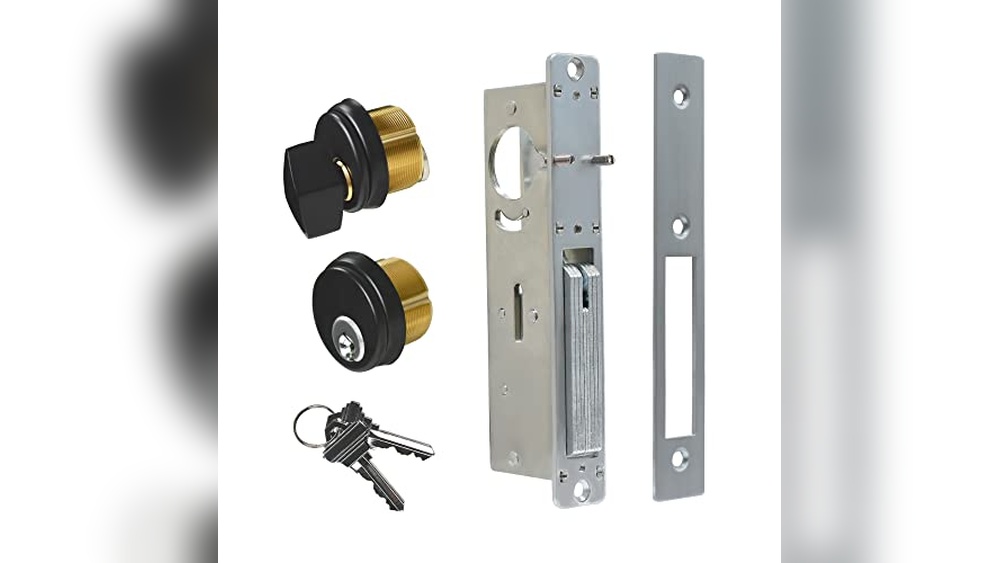
Tools Needed
Removing a Kwikset two-sided key deadbolt needs the right tools. Having these tools ready makes the job easier and faster. It helps avoid damage to the lock or door.
Gather all tools before starting. This saves time and keeps you focused on the task.
Phillips Head Screwdriver
This tool removes screws holding the deadbolt in place. Most Kwikset models use Phillips screws. A good screwdriver fits well to avoid stripping screws.
Flathead Screwdriver
Use this to pry off covers or trim pieces gently. It helps reach parts hidden under the lock faceplate. It also works to push small tabs or release clips.
Allen Wrench
Some Kwikset deadbolts have small hex screws. An Allen wrench fits these screws perfectly. Keep several sizes handy to match different models.
Pliers
Pliers grip small parts tightly. They help remove stubborn screws or pull out broken pieces. Needle-nose pliers are best for tight spaces.
Tape Or Marker
Use tape to mark screw positions or parts. A marker can label pieces for easy reassembly. This prevents confusion during the process.
Credit: www.kwikset.com
Locate The Screws
Locating the screws is the first step in removing a Kwikset two-sided key deadbolt. These screws hold the lock firmly on the door. Finding them correctly helps you remove the lock smoothly without damage.
Kwikset deadbolts usually have screws visible on the inside part of the lock. These screws connect the exterior and interior sides. Knowing their location saves time and effort during removal.
Check The Interior Side Of The Door
Look at the inside knob or thumb turn of the deadbolt. The screws are often hidden under a small cover plate. Remove this cover carefully to see the screws.
Identify The Mounting Screws
Mounting screws are long and go through the door. They keep both sides of the lock together. You will need a screwdriver to remove these screws.
Look For Screws Near The Edge Of The Door
Sometimes screws are placed on the door’s edge near the latch. These screws hold the latch plate in place. Unscrew them to release the latch mechanism.
Remove Interior Plate
Removing the interior plate is a key step to take off a Kwikset two-sided key deadbolt. This plate holds the interior lock components in place. Taking it off carefully helps access the inner parts for repair or replacement.
Follow these steps to remove the interior plate safely and easily. Keep your tools ready and work patiently to avoid damage.
Gather Necessary Tools
Start by collecting a screwdriver that fits the screws on the interior plate. Most Kwikset deadbolts use a Phillips head screwdriver. Having the right tool makes the job smoother and faster.
Locate And Remove Screws
Look closely at the interior plate to find the screws holding it. Usually, two screws secure the plate to the door. Unscrew them carefully, keeping the screws safe for later use.
Gently Pull Off The Interior Plate
After removing the screws, hold the plate firmly and pull it away from the door. If it sticks, wiggle it slightly without forcing. This prevents damage to the door or lock parts.
Set The Interior Plate Aside
Place the removed plate on a clean surface. Keep it with the screws and other small parts. This helps keep all pieces organized for reassembly later.

Credit: www.reddit.com
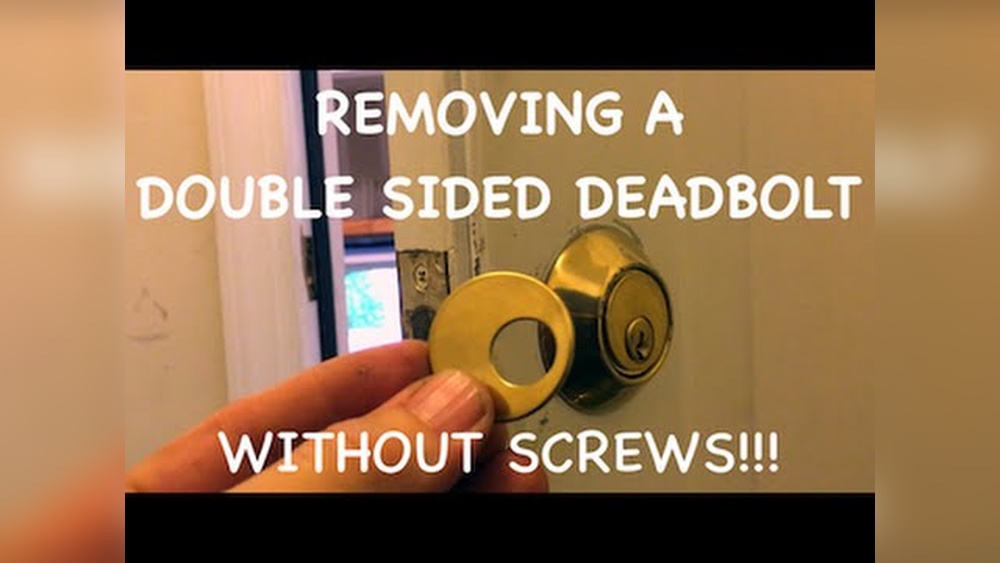
Detach Exterior Lock
Detaching the exterior lock of a Kwikset two-sided key deadbolt is the first step. This process allows safe removal and replacement without damage. Follow simple steps to remove the exterior lock smoothly.
Remove The Screws Holding The Exterior Plate
Start by locating the screws on the exterior side of the door. These screws hold the lock plate firmly in place. Use a screwdriver to turn each screw counterclockwise. Keep the screws safe for later use.
Carefully Pull Off The Exterior Lock
Once screws are removed, gently pull the exterior lock away from the door. Do not force it; a smooth pull works best. The lock should come off easily if all screws are removed.
Disconnect The Tailpiece
Look for the tailpiece connected to the lock inside the door. This piece links the exterior lock to the internal mechanism. Slide it out carefully to fully detach the exterior lock.
Take Out Deadbolt
Removing a Kwikset two-sided key deadbolt may seem hard at first. The deadbolt is designed to keep your door secure. Taking it out requires patience and the right steps. This section guides you through the process clearly and simply.
Gather Necessary Tools
Start by collecting the tools needed. You will need a screwdriver, usually a Phillips head. A flathead screwdriver may also help. Keep a flashlight nearby for better visibility. Having the right tools makes the job easier and faster.
Remove Interior Thumb Turn
Find the screws on the interior thumb turn. These screws hold the deadbolt in place. Use the screwdriver to remove them carefully. Keep the screws safe for reassembly or disposal. Then, gently pull the thumb turn away from the door.
Unscrew The Exterior Keyed Side
Next, go to the outside of the door. Locate the screws on the exterior keyed side. Use the screwdriver to remove these screws. Hold the exterior side firmly while unscrewing. After removing screws, pull the exterior side off the door.
Pull Out The Deadbolt Mechanism
Once both sides are off, look inside the door edge. You will see the deadbolt mechanism. Use the screwdriver to remove screws holding the mechanism. Carefully pull the deadbolt straight out of the door. Keep parts organized for easy reinstallation or disposal.
Inspect And Clean Components
Inspecting and cleaning the components of your Kwikset two-sided key deadbolt is essential before removal. Dirt, dust, and rust can affect the lock’s function and make removal harder. A clean lock also helps you see if any parts need replacement.
Take your time to carefully check each piece. This step ensures smooth removal and keeps the lock in good condition if you plan to reinstall it.
Check The Exterior Hardware
Start by examining the outside parts of the deadbolt. Look for dirt, rust, or damage on the lock face and keyhole. Use a soft cloth to wipe away dust and grime. Avoid harsh chemicals that can harm the finish.
Inspect The Interior Mechanism
Remove the screws holding the interior plate. Gently pull off the plate to see the inner parts. Look for worn or broken components. Clean inside with a dry brush or compressed air to remove debris.
Clean The Key Cylinder
Insert the key and turn it slowly. This helps loosen dirt inside the cylinder. Use a lubricant made for locks to spray inside the keyhole. Wipe off any excess lubricant to prevent buildup.
Examine The Bolt And Strike Plate
Check the bolt for smooth movement. Clean any dirt or rust from the bolt surface. Also, inspect the strike plate on the door frame. Remove debris and make sure it is properly aligned.
Tips For Reinstallation
Reinstalling a Kwikset two-sided key deadbolt can be simple with the right approach. Careful steps ensure the lock works smoothly and lasts long. Follow these tips to make the reinstallation process easier and effective.
Prepare All Parts Before Starting
Gather every piece of the lock before you begin. Check for screws, the latch, and the key cylinder. Make sure nothing is missing or damaged. Having all parts ready saves time and avoids frustration.
Align The Deadbolt Correctly
Put the deadbolt in the door hole carefully. Make sure it slides in without force. The bolt should move smoothly when you turn the key. Proper alignment prevents jams and damage.
Tighten Screws Firmly But Gently
Use a screwdriver to tighten screws evenly. Avoid over-tightening to prevent stripping or breaking. Tight screws keep the lock stable and secure during use.
Test The Lock Before Final Assembly
Turn the key and handle to check the lock’s operation. Make sure the bolt extends and retracts freely. Testing early helps spot problems before finishing the job.
Lubricate Moving Parts For Smooth Action
Apply a small amount of graphite or silicone lubricant to the bolt. This reduces friction and wear. Lubrication keeps the lock working quietly and smoothly over time.

Credit: www.youtube.com
Frequently Asked Questions
How Do I Remove A Kwikset Two-sided Key Deadbolt?
First, remove the interior screws holding the lock. Then, pull off both sides carefully. Finally, detach the latch mechanism from the door edge.
What Tools Are Needed To Remove Kwikset Deadbolt?
You need a Phillips screwdriver and possibly a flathead. A small pry tool may help with tight spots. These tools ensure easy and safe removal.
Can I Remove The Kwikset Deadbolt Without Damaging The Door?
Yes, by unscrewing carefully and pulling components gently. Avoid force to prevent scratches or holes. Proper steps preserve your door’s finish and integrity.
How Long Does It Take To Remove This Deadbolt?
Removing a Kwikset two-sided deadbolt usually takes 10 to 15 minutes. Experience and correct tools can speed up the process.
Conclusion
Removing a Kwikset two-sided key deadbolt can be simple with the right steps. Take your time and follow each part carefully. Use basic tools and be gentle to avoid damage. Once done, check that the new lock works smoothly. This guide helps you save money and do the job yourself.
Feel confident handling your door locks now. Keep this method handy for future lock changes or repairs.