Have you ever needed to hold papers together but didn’t have a clip or staple handy? Making a paper fastener yourself is easier than you think.
You’ll discover simple steps to create a strong and reliable fastener using just a few materials. By the end, you’ll have a handy skill that saves time and keeps your documents organized. Ready to learn how? Let’s dive in!
Materials Needed
Gathering the right materials is the first step to making a paper fastener. Simple items found at home or school work best. These tools help you create a strong and useful fastener. Below are the materials you need to prepare before starting.
Paper
Choose a sturdy paper for the fastener’s base. Cardstock or construction paper works well. Thin paper may tear easily, so avoid it.
Brads Or Split Pins
Brads hold the papers together and allow movement. Find brads in craft stores or office supply shops. Make sure they fit the paper thickness.
Scissors
Sharp scissors cut paper and small holes. Use scissors that handle fine cutting tasks. Keep them clean and safe to use.
Hole Punch
A hole punch creates holes for the brads. Use a single or double hole punch. The holes should be the right size for the brads.
Ruler
A ruler helps measure paper and mark hole positions. Use a clear ruler for accuracy. It keeps your work neat and even.
Pencil
Use a pencil to mark holes and cut lines. Light marks are easy to erase later. A sharp pencil makes precise marks.
Choosing The Right Paper
Choosing the right paper is key to making a paper fastener that works well. The type of paper affects how strong and neat your fastener will be. Different papers have different thickness and texture. These differences change how easy it is to fold, punch, or hold the fastener in place.
Picking the best paper makes your project easier and the final fastener more durable. This section helps you understand which papers fit best for making paper fasteners.
Understanding Paper Weight And Thickness
Paper weight means how heavy a sheet of paper is. Heavier paper is thicker and stronger. Thin paper can tear easily when you punch holes or fold it. Use medium or heavy paper for a firm fastener.
Choosing Paper Texture
Paper texture is how smooth or rough the paper feels. Smooth paper is easier to fold and looks cleaner. Rough paper may hold the fastener better but can be hard to fold neatly. Pick the texture that fits your fastener style.
Considering Paper Color And Design
Color and design do not affect strength but can change the look. Bright or patterned paper can make your fastener stand out. Plain white or light colors work well for formal uses. Choose colors that suit your project’s purpose.
Testing Paper Durability
Try folding and punching holes in a small paper sample first. This test shows if the paper can handle the fastener process. If the paper tears or bends badly, pick a stronger type. Testing saves time and gives better results.
Cutting The Paper Strips
Cutting the paper strips is an important step in making a paper fastener. Clean, straight strips help the fastener hold papers together firmly. Using the right tools and techniques makes the process easier and the result better.
Use sturdy paper for the strips. Cardstock or construction paper works well. Thin paper may tear easily and not hold the fastener tightly.
Measuring And Marking Strips
Measure the strips carefully. Mark lines with a pencil to cut straight. Keep the strips the same width for a neat look.
Cutting The Strips Neatly
Use scissors or a craft knife for cutting. Cut slowly along the marked lines. Avoid jagged edges by making smooth cuts.
Using A Paper Cutter
A paper cutter provides clean, straight edges quickly. Align the paper properly before cutting. This tool is useful for making many strips of the same size.

Credit: www.amberdohrenwend.com
Folding Techniques
Folding techniques are key to making a strong paper fastener. Proper folds create neat edges and help the fastener hold papers tightly. Each fold adds structure and keeps everything in place.
Simple folds work best for beginners. They save time and reduce errors. Learning basic folds builds confidence to try more complex shapes later.
Basic Fold For A Paper Fastener
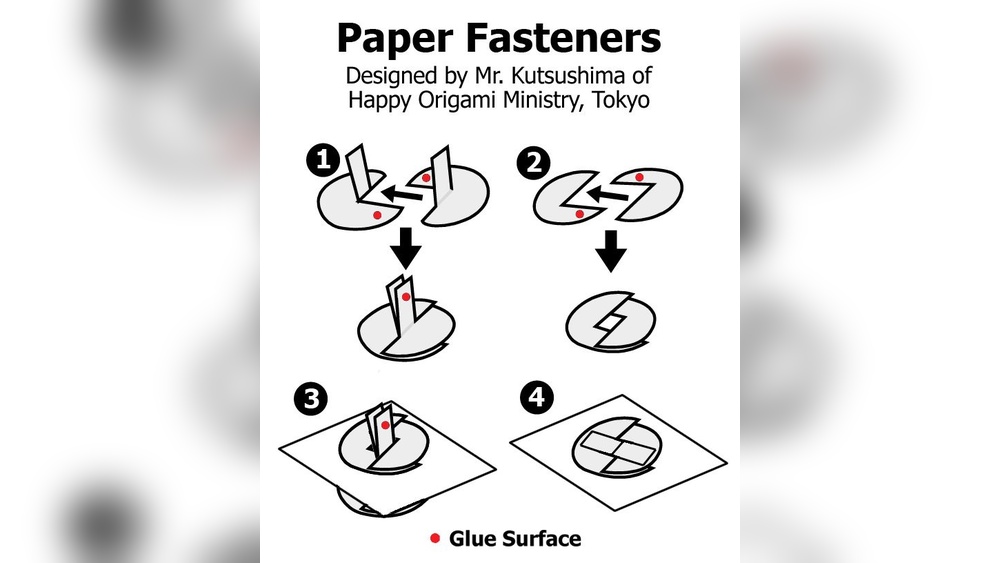
Start with a square piece of paper. Fold it in half diagonally to form a triangle. Press the fold firmly to create a sharp edge. This fold forms the fastener’s base.
Creating A Lock Fold
Fold one corner of the triangle towards the center. Repeat on the opposite side. These folds lock the fastener’s parts together. They prevent the papers from slipping out.
Final Fold For Stability
Fold the bottom tip upward inside the fastener. This fold adds strength and keeps the fastener tight. Press all folds firmly to finish the fastener.
Creating The Fastener Loop
Creating the fastener loop is a key step in making a paper fastener. This loop holds the papers together firmly. It must be tight but easy to open when needed.
Follow simple steps to shape the loop correctly. A well-made loop ensures the fastener works smoothly. It also keeps papers neat and organized.
Preparing The Paper Strip
Cut a strip of paper about 1 inch wide and 6 inches long. The strip should be strong but flexible. Use paper that will not tear easily. Fold the strip in half lengthwise to add strength. This fold helps the loop keep its shape.
Forming The Loop Shape
Bend the folded strip into a small circle. The ends of the strip should overlap slightly. This overlap allows you to secure the loop tightly. Make sure the loop is not too big. A tight loop holds papers better.
Securing The Loop Ends
Use glue or tape to fix the overlapping ends. Press firmly for a few seconds. Let the glue dry before using the fastener. If using tape, wrap it around the ends twice. This keeps the loop from coming apart.

Credit: www.amberdohrenwend.com
Securing The Fastener
Securing the fastener is a key step to keep papers together. It makes sure your documents stay neat and organized. A well-secured fastener holds papers firmly without damage. This section explains how to secure the fastener properly for best results.
Insert The Fastener Through The Paper
First, punch holes through the papers you want to fasten. Align the holes carefully to match the fastener prongs. Push the prongs through all the holes. Make sure the fastener goes straight and does not bend.
Bend The Prongs To Lock The Papers
After inserting, bend the prongs outward to hold papers tight. Use your fingers or a small tool to press the prongs flat. Bending prongs prevents papers from slipping out. Press gently to avoid tearing the paper.
Trim Excess Prong Length
If prongs are too long, trim them with scissors or a cutter. Cut close to the bend for a neat finish. Removing extra length avoids catching on other objects. This step keeps your papers tidy and safe.
Attaching To Documents
Attaching paper fasteners to documents helps keep papers neat and secure. This simple method holds pages together without damage. It allows easy addition or removal of sheets. Follow these clear steps to attach your fastener correctly.
Preparing The Document
Stack the papers evenly. Align all edges for a clean look. Choose the corner or edge where you want to place the fastener. Mark the spot lightly with a pencil.
Making Holes For The Fastener
Use a hole punch or sharp tool. Create two holes close together on the marked spot. Make sure holes fit the fastener prongs well. Avoid making holes too big or uneven.
Inserting The Fastener
Push the prongs through the holes carefully. Spread the prongs apart on the backside of the papers. Press them flat to hold the sheets firmly.
Check that the fastener holds all pages tightly. Adjust the prongs if needed. Make sure papers do not slip or tear. Now your documents stay organized and secure.
Tips For Quick Organization
Organizing papers quickly saves time and reduces stress. A simple paper fastener helps keep documents neat and easy to find. Using a few smart tips can speed up the process.
Use Color-coded Fasteners
Choose fasteners in different colors for each type of paper. This makes sorting easy and fast. You can spot what you need without opening every stack.
Label Each Fastener Clearly
Write short labels on the fasteners. Use clear, simple words. This helps you identify papers at a glance and keeps things organized.
Group Papers By Topic
Keep related papers together with one fastener. Grouping by topic saves time when searching later. It also prevents mixing different subjects.
Keep Fasteners Handy
Store your paper fasteners in a reachable spot. This allows quick access and encourages regular use. Having them nearby supports faster organization.
Reuse Fasteners When Possible
Take off fasteners gently and reuse them. This saves money and keeps your supplies ready. Reusable fasteners make organizing simple and eco-friendly.
Troubleshooting Common Issues
Troubleshooting common issues with paper fasteners helps you save time and materials. Small problems can stop your project. Fixing these problems is easy with clear steps.
Incorrect Hole Size
Make sure the holes are not too big or too small. Too big holes make the fastener loose. Too small holes make it hard to insert the fastener. Use a hole punch that fits the fastener size exactly.
Fastener Legs Not Closing Properly
Bend the legs gently but firmly. If the legs are too stiff, warm them slightly with your fingers. Avoid bending too hard to prevent breaking. Smooth legs hold papers tightly.
Papers Slipping Out Of Fastener
Check the number of papers in the fastener. Too many papers make it hard to close properly. Use fewer sheets or a longer fastener. Align papers before fastening for a better hold.
Fastener Breaking Or Bending
Use a fastener made of strong metal. Thin or weak fasteners break easily. Avoid forcing the fastener through thick stacks. Replace damaged fasteners to keep your work neat.

Credit: www.youtube.com
Frequently Asked Questions
What Materials Are Needed To Make A Paper Fastener?
You need a brass fastener, paper sheets, a hole puncher, and scissors. These items help you securely bind papers together quickly and efficiently.
How Do You Punch Holes For A Paper Fastener?
Use a hole puncher to create holes aligned on all paper sheets. Make sure holes are evenly spaced for a neat and firm binding.
Can I Reuse A Paper Fastener Multiple Times?
Yes, paper fasteners are reusable. Simply unbend the prongs to separate papers and bend them back to reattach as needed.
What Are Common Uses For Paper Fasteners?
Paper fasteners organize documents, hold craft projects, and secure reports. They are ideal for temporarily binding papers without damaging them.
Conclusion
Making a paper fastener is simple and useful. You only need a few basic materials. Follow the easy steps to create your own fastener. It helps keep papers neat and together. Save money by making fasteners at home. Practice a few times to get better.
Use your fastener for school, work, or crafts. Enjoy organizing your papers quickly and easily. Try this fun project and see the results yourself.