Are you tired of that bulky double light switch taking up space on your wall? Changing it to a single switch can simplify your setup and give your room a cleaner look.
But if you’re worried about the hassle or don’t know where to start, you’re not alone. In this guide, you’ll discover easy steps to make the switch safely and quickly—even if you’ve never done electrical work before. By the end, you’ll have the confidence to tackle this simple home upgrade yourself.
Ready to make your lighting control easier? Let’s dive in.

Credit: www.youtube.com
Tools And Materials Needed
Changing a double light switch to a single switch requires the right tools and materials. Having them ready makes the job easier and safer. This section lists everything needed for the task. Use only quality tools for the best results.
Basic Tools
You need a screwdriver set with flathead and Phillips heads. A voltage tester is crucial to check power before touching wires. Wire strippers help remove insulation cleanly. Needle-nose pliers allow easy wire bending and pulling.
Electrical Materials
Purchase a single light switch rated for your circuit voltage. Get electrical tape to wrap wire connections. Wire nuts will secure the wires together safely. Use new switch cover plates to finish the look.
Safety Gear
Wear insulated gloves to protect from electric shocks. Safety glasses shield your eyes from debris. Use a flashlight or headlamp for better visibility in dark spaces.
Safety First
Safety is the most important part of changing a double light switch to a single. Electricity can be dangerous if not handled correctly. Taking the right safety steps protects you from shocks and accidents. Always prepare before starting any electrical work.
Turn Off The Power
Switch off the circuit breaker that controls the light switch. Do not trust the wall switch to cut power. Use a voltage tester to check the wires. Make sure no electricity is flowing before touching anything.
Use Proper Tools And Gear
Wear insulated gloves to protect your hands. Use tools with insulated handles. Keep your workspace dry and clean. Avoid metal jewelry that can cause shorts or shocks.
Work Slowly And Carefully
Take your time to avoid mistakes. Label wires to remember their place. Do not force any parts or wires. Double-check connections before restoring power.
Know When To Call A Professional
Some wiring setups are complex and risky. If unsure about any step, hire a licensed electrician. It saves time and ensures safety.
Turn Off Power
Before starting any electrical work, safety is the top priority. Turning off power stops electricity flow to the switch. This step prevents shocks or accidents during the switch change. Never skip this step to keep yourself safe.
Electricity can be dangerous. Even a small mistake can cause injury. Taking time to turn off power is a smart and responsible action.
Locate The Circuit Breaker
Find your home’s circuit breaker box. It is usually in the basement, garage, or utility room. Look for a panel with switches or fuses. This box controls power to different parts of your home.
Identify The Correct Switch
Look for the breaker labeled for the light switch. It might say “lights,” “living room,” or “bedroom.” If the label is unclear, turn off the main breaker to cut all power. This ensures total safety.
Turn Off The Breaker
Flip the breaker switch to the OFF position. This stops electricity from reaching the double switch. Double-check that the switch feels firm in the OFF spot. Do not rely on guesswork here.
Test The Power Is Off
Use a non-contact voltage tester or plug in a lamp. Turn on the light switch to check for power. If the tester or lamp does not turn on, power is off. This confirms safety before touching wires.

Credit: www.diynot.com
Remove Double Switch Cover
Removing the double switch cover is the first step in changing a double light switch to a single switch. This step allows access to the screws and wiring behind the cover. Always ensure the power is off before starting this task.
Use a screwdriver to carefully take off the cover. Keep the screws safe for later use. The cover might be tight, so gently pry it loose to avoid damage.
Turn Off Power At The Circuit Breaker
Switch off the power to the light switch from the circuit breaker box. This stops any electric shock risk while working. Double-check by trying to turn on the lights before touching the switch.
Unscrew The Switch Cover Plate
Find the screws holding the cover plate in place. Use a flathead or Phillips screwdriver to remove them. Place the screws somewhere safe to avoid losing them.
Remove The Cover Plate Carefully
Pull the cover plate away from the wall gently. Avoid forcing it, as this can crack the plate. Set the plate aside once it is free from the wall.
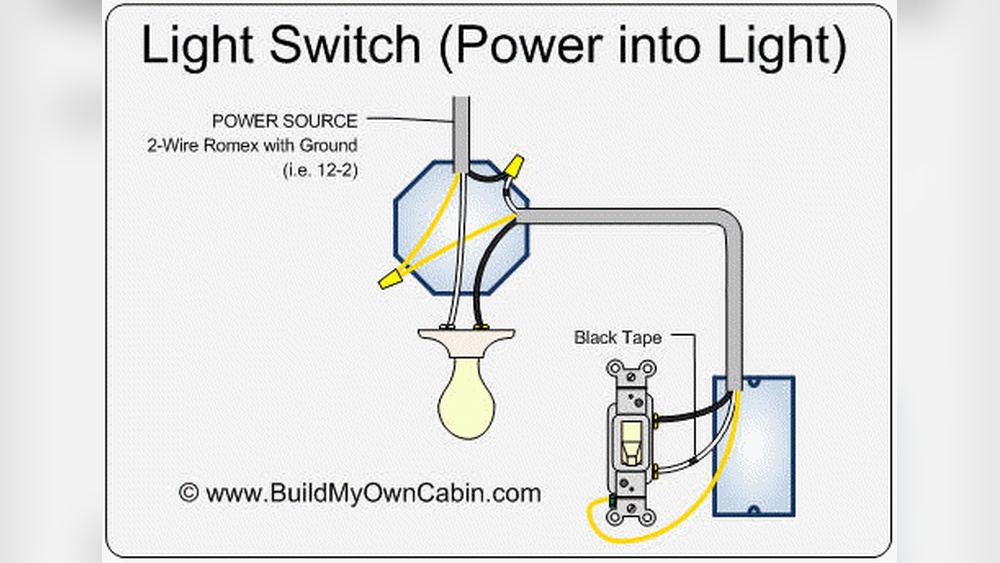
Identify Wiring Setup
Before changing a double light switch to a single, knowing the wiring setup is crucial. This step ensures safety and smooth work. Wiring can differ based on the home’s age and electrical design. Understanding each wire’s role helps avoid mistakes and damage.
Take time to study the wires inside the switch box. Identify which wires control each switch in the double setup. This knowledge guides the removal of one switch and the connection of the remaining switch to power and lights.
Turn Off Power At The Circuit Breaker
Safety first. Switch off the circuit breaker that controls the switch. Confirm the power is off using a voltage tester. Never work on live wires.
Remove The Switch Cover And Double Switch
Unscrew the switch cover plate. Carefully pull the double switch out from the wall box. Note the wire colors and their positions.
Identify Line, Load, And Traveler Wires
Look for the line wire bringing power in. Load wires connect to the lights. Traveler wires may link the two switches. Label each wire with tape for clarity.
Take Photos Or Sketch The Wiring
Document the wiring setup before disconnecting. Photos or sketches help during reassembly. This visual aid prevents confusion later.
Disconnect Double Switch
Disconnecting a double light switch is the first step to changing it to a single switch. This process needs care and attention to avoid any electrical issues. Safety is very important here. Always turn off the power before touching any wires.
Turn Off Power At The Circuit Breaker
Find your home’s circuit breaker panel. Switch off the breaker that controls the double light switch. This stops electricity from flowing to the switch. Use a tester to confirm the power is off.
Remove The Switch Cover Plate
Use a screwdriver to take off the cover plate. This exposes the screws holding the switch in place. Keep the screws safe for later use. Be gentle to avoid damaging the wall.
Unscrew And Pull Out The Double Switch
Remove the screws that secure the switch. Carefully pull the switch out from the wall box. You will see wires connected to the switch terminals. Do not pull the wires hard.
Note Wire Positions And Connections
Look closely at how wires connect to the switch. Take a photo or write down each wire’s position. This helps during reconnection to the single switch. Remember, wires are usually color-coded.
Disconnect The Wires From The Double Switch
Use a screwdriver to loosen terminal screws. Gently disconnect each wire from the switch. Avoid touching wire ends together. Keep wires separated to prevent shorts.
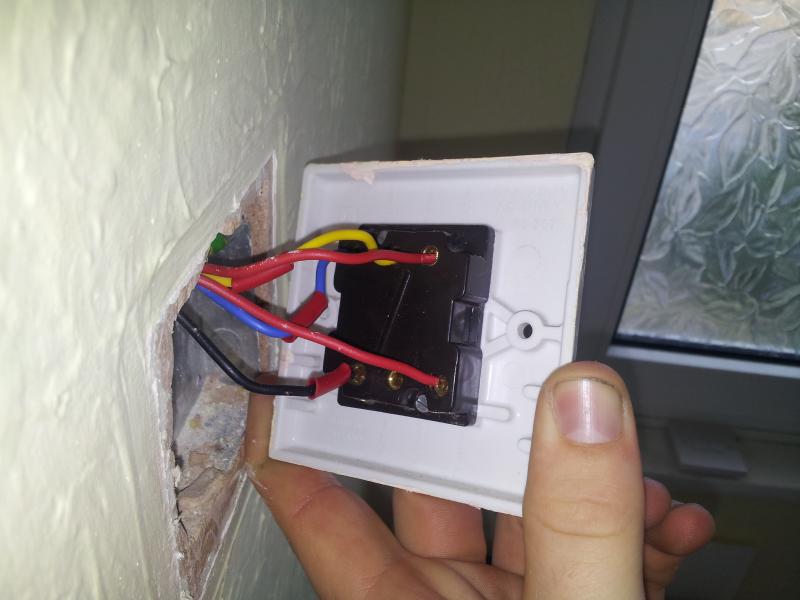
Connect Single Switch
Connecting a single switch after removing a double switch is a simple task. It requires careful handling of wires and basic knowledge of electrical work. This section explains how to connect the single switch safely and correctly.
Identify The Wires
First, find the wires in the switch box. Usually, there are a live wire, a load wire, and a ground wire. The live wire carries power, and the load wire goes to the light. The ground wire keeps everything safe.
Turn Off The Power
Always turn off the power at the circuit breaker. This prevents electric shock. Use a tester to check no electricity flows to the wires before touching them.
Connect The Wires To The Single Switch
Attach the live wire to the switch’s common terminal. Connect the load wire to the other terminal. Attach the ground wire to the green screw on the switch. Tighten all screws firmly.
Secure The Switch In The Box
Push the wires gently back into the box. Screw the switch into place. Make sure it is tight and straight. Attach the switch cover plate to finish.
Turn the power back on at the breaker. Test the switch by turning the light on and off. If it works, the connection is correct and safe.
Credit: www.diynot.com
Secure Switch And Cover
Securing the switch and cover is an important step after changing a double light switch to a single. It keeps everything safe and prevents accidents. A loose switch or cover can cause electrical problems or damage.
Take time to fix the switch firmly in place. This ensures the switch works well and does not wiggle. Next, attach the cover plate securely. The cover protects wires and gives a neat look.
Check Switch Alignment
Make sure the switch fits straight in the box. A tilted switch can cause the cover plate not to fit right. Adjust the switch by tightening or loosening the screws.
Secure Switch Screws
Use a screwdriver to tighten the switch screws. Do not overtighten. The switch should be firm but not cracked. Check that it does not move when you press it.
Attach The Cover Plate
Place the cover plate over the switch. Align it with the screw holes. Insert the screws and tighten them gently. The plate should sit flush with the wall.
Final Safety Check
After securing, press the switch a few times. Make sure it moves smoothly. Look for any gaps around the cover plate. Fix any loose parts before finishing.
Restore Power And Test
After wiring your single light switch, restoring power is the next step. This step ensures your switch works correctly and safely. Testing the switch confirms the light operates as expected. Follow careful steps to avoid electrical problems and keep safe.
Restore Power
Go to your home’s breaker box. Find the breaker that controls the switch’s circuit. Flip it back to the “on” position. This action restores electricity to the switch. Make sure the breaker stays in the “on” position. Do not force the switch if it feels stuck.
Test The Switch
Return to the switch and turn it on. Watch if the connected light bulb lights up. Turn the switch off to see if the light goes out. Repeat this a few times to check consistency. If the light does not respond, turn off power again. Double-check your wiring for any loose connections.
Safety Tips After Testing
Do not touch wires or terminals after restoring power. Use a dry hand when operating the switch. Keep the switch cover plate attached to avoid contact. If you notice sparks or smell burning, turn off the power immediately. Call a professional electrician if unsure about safety.
Troubleshooting Tips
Troubleshooting helps solve common problems when changing a double light switch to a single. It saves time and ensures safety. Knowing what to check can avoid damage and confusion.
Check Power Supply
Turn off the power at the breaker box before starting work. Use a voltage tester to confirm no electricity flows to the switch. This step prevents shocks and accidents.
Verify Wiring Connections
Double-check all wires before removing the double switch. Note which wire connects to which terminal. Label wires if needed. Wrong connections cause the switch to fail.
Inspect Switch Compatibility
Make sure the new single switch fits the old wiring setup. Some double switches have extra wires. Using the wrong switch may cause flickering or no light.
Test Switch Operation
After installing, turn the power back on and test the switch. If the light does not turn on, recheck the wiring. A loose wire often causes failure.
Look For Damaged Components
Examine wires and the switch for wear or damage. Replace any frayed wires or cracked switch parts. Damaged parts lead to poor performance and hazards.
Frequently Asked Questions
How Do I Safely Turn Off Power Before Changing Switches?
Always switch off the circuit breaker before starting. Use a voltage tester to confirm no electricity flows. Safety first prevents shocks and accidents during the switch replacement.
Can I Replace A Double Switch With A Single One?
Yes, you can replace a double switch with a single switch. Remove the double switch carefully, then connect the wires to the single switch terminals. Ensure proper wiring to avoid electrical issues.
What Tools Are Needed To Change The Switch Type?
You will need a screwdriver, voltage tester, wire stripper, and electrical tape. These tools help safely remove and install the switch, ensuring secure and proper connections.
Will Changing The Switch Affect My Lighting Circuit?
Changing from double to single switch only controls one light or fixture. Make sure to disconnect or cap off unused wires safely to avoid electrical hazards.
Conclusion
Changing a double light switch to a single is simple with the right steps. Always turn off power before starting work. Take your time to follow instructions carefully. Use the right tools for safety and ease. Check that wires are connected properly before finishing.
A single switch can make your space look cleaner. This small change can improve your home’s style. Trust your skills and work safely. You can do this project yourself with patience. Enjoy your updated lighting setup!