Have you ever wished you could brighten up your room without adding more switches? What if you could control two lights with just one switch, saving space and making your home more convenient?
Adding another light to an existing switch is easier than you might think, and you don’t need to be an expert electrician to do it. You’ll discover simple, step-by-step instructions to help you expand your lighting setup safely and efficiently.
Keep reading, and soon you’ll have a smarter, brighter home with just a few easy changes.
Tools And Materials Needed
Adding another light to an existing switch needs specific tools and materials. Having the right items makes the job safer and easier. Prepare everything before starting the work. This saves time and prevents mistakes.
Essential Tools
- Voltage tester to check if wires are live
- Wire stripper to remove insulation from wires
- Phillips and flathead screwdrivers for screws
- Needle-nose pliers to bend and twist wires
- Electrical tape to cover wire connections
- Drill with bits for making holes
- Flashlight or work light for clear visibility
Required Materials
- Electrical wire matching existing wire gauge
- Wire nuts to connect wires securely
- Light fixture or bulb with socket
- Switch compatible with the current setup
- Electrical box if adding a new fixture
- Wall plate to cover the switch

Credit: www.do-it-yourself-help.com
Safety Precautions
Safety is the top priority when adding a new light to an existing switch. Handling electrical wiring can be risky without the right precautions. Taking simple safety steps can prevent accidents and injuries.
Before starting, always prepare your workspace and tools. Make sure your hands are dry and wear rubber-soled shoes. Avoid working in wet or damp conditions. Safety gear like gloves and goggles adds extra protection.
Power Shutoff
Turn off the power at the main circuit breaker. This cuts electricity to the switch and light fixture. Never rely on just the wall switch to stop the current.
Lock the breaker box or place a warning note to keep others from turning it back on. Double-check that the power is off before touching any wires.
Testing For Live Wires
Use a voltage tester or multimeter to check for live wires. Test all wires in the switch box, even if they look inactive.
Hold the tester near each wire. No light or sound means the wire is safe to handle. If the tester shows power, do not touch the wires.
Planning The Wiring
Planning the wiring is the first step to add another light to an existing switch. It helps avoid mistakes and ensures safety. Proper planning saves time and effort during installation. Understanding the current setup and where the new light will go is essential.
Locating Existing Switch
Find the switch that controls the current light. Turn off power from the breaker for safety. Remove the switch cover carefully. Check the wires connected to the switch. Note the wire colors and positions. This helps connect the new light correctly.
Determining Light Placement
Choose a spot for the new light that fits your needs. Consider the room’s layout and where light is needed most. Avoid placing the light too close to the existing one. Think about wiring length and ease of access. Mark the spot clearly on the wall or ceiling.
Choosing Wiring Route
Plan the path for the new wiring from the switch to the new light. Look for the shortest, safest route to reduce wire length. Avoid areas with heat or water pipes. Use walls, ceilings, or floors to hide wires. Keep wires away from sharp edges and moving parts.

Credit: diy.stackexchange.com
Turning Off Power Safely
Turning off power safely is the first step before adding another light to a switch. Safety cannot be ignored while working with electricity. It protects you from electric shock and damage to your home wiring. Follow simple steps to ensure the power is off and stay safe throughout your project.
Locate The Circuit Breaker
Find the main electrical panel in your home. It is usually in the basement, garage, or utility room. The circuit breaker controls electricity to different parts of your house. Identify the breaker that powers the light switch you want to work on.
Switch Off The Correct Breaker
Turn the breaker handle to the OFF position. This stops electricity from flowing to the light switch and wires. Double-check by toggling the switch on and off. Make sure the light connected to that switch does not turn on.
Test For Power
Use a non-contact voltage tester or a multimeter to check for electricity. Hold the tester near the wires or switch terminals. If the tester stays off, the power is safely off. Never trust the breaker alone without testing.
Inform Others And Keep The Area Clear
Tell family members or housemates about the power shutdown. Place a note on the breaker box as a warning. Clear the work area of any water or flammable materials. A safe environment reduces risks during your electrical work.
Removing The Existing Switch Cover
Start by turning off the power at the circuit breaker to ensure safety. Carefully remove the screws holding the switch cover and take off the cover plate. This exposes the switch and wiring for adding another light.
Turn Off The Power
Safety first. Switch off the power from the circuit breaker. This stops electricity flow to the switch. Use a voltage tester to confirm no power is running.
Remove The Switch Cover Screws
Use a screwdriver to take out the screws holding the cover. Keep the screws safe for later. Gently pull the cover away from the wall.
Inspect The Switch And Wiring
Look at the switch and wires inside. Check for any damage or wear. Note how the wires connect to the switch for reassembly.
Identifying Wires In The Switch Box
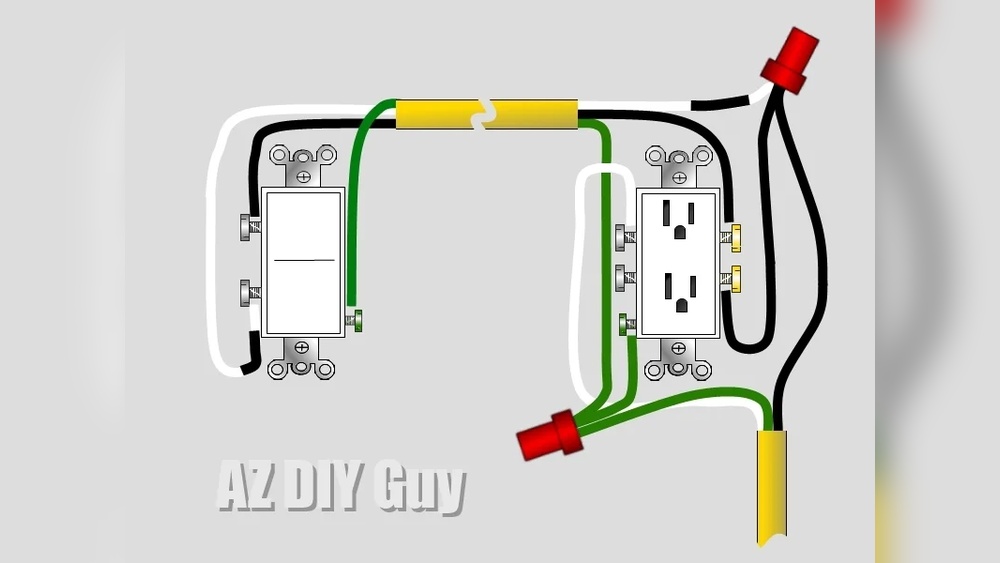
Identifying wires in the switch box is the first step to add another light. This step ensures safety and proper connection. It helps to know each wire’s role before working with them. Use a voltage tester to check wires carefully.
Switch boxes usually have three main wires. They are live, neutral, and ground. Each wire has a specific color and function. Knowing these makes the installation easier and safer.
Live Wire
The live wire carries electricity from the power source. It is often black or red in color. This wire connects to the switch terminal. It controls the flow of power to the light. Always test the live wire to confirm it is hot.
Neutral Wire
The neutral wire completes the electrical circuit. It usually appears white or light gray. It does not connect directly to the switch. Instead, it links to the light fixture and the electrical panel. This wire carries current back to the source safely.
Ground Wire
The ground wire protects against electrical shocks. It is green or bare copper. This wire connects to the switch box or grounding screw. It provides a safe path for electricity if a fault occurs. Never ignore the ground wire during installation.
Running New Wire To The Additional Light
Running new wire to add another light to an existing switch needs careful planning and safety. This step connects the new light fixture to your home’s electrical system. You must follow electrical codes and use the right tools. Understanding how to run wire helps you avoid common mistakes and ensures the light works safely and well.
Drilling And Fishing Wire
Start by drilling holes through the studs or joists. Use a drill bit that fits the wire size. Drill near the existing switch box or light fixture. Next, fish the wire through the wall or ceiling cavity. Use a fish tape or wire puller to guide the cable. Be gentle to avoid damaging the wire insulation. Make sure the wire reaches the new light location without sharp bends.
Securing Wiring
Secure the wire every few feet with wire staples or clips. Do not pinch or crush the wire. Keep the wiring neat and away from sharp edges. Leave some slack near the boxes for easy connections. Follow local electrical codes for staple spacing. Proper securing prevents wire movement and reduces wear over time.

Credit: www.finehomebuilding.com
Connecting The Wires
Connecting the wires is the key step to add another light to an existing switch. Proper connections ensure safety and that the new light works well. Each wire has a role: live, neutral, and ground. Understanding how to connect them is important for success and safety.
Connecting Live Wires
Locate the live wire in your switch box. This wire carries power from the breaker. Use a voltage tester to confirm it is live. Twist the new light’s live wire together with the existing live wire. Use a wire connector to secure the joint tightly. Make sure no bare wire shows outside the connector.
Connecting Neutral And Ground Wires
Find the neutral wires in the box. These are usually white. Connect the new light’s neutral wire with the existing neutral wires. Secure with a wire connector. Next, locate the ground wires, often green or bare copper. Connect the new light’s ground wire to these ground wires. This step protects against electrical faults. Tighten all connections firmly for safety.
Installing The New Light Fixture
Installing the new light fixture is a key step in adding another light to your existing switch. It involves securely fixing the fixture and making the right electrical connections. Follow clear steps to ensure safety and functionality. Take your time and check your work carefully.
Mounting The Fixture
Start by turning off the power at the circuit breaker. Use a voltage tester to confirm no electricity flows. Attach the mounting bracket to the electrical box. Use screws provided with the fixture for a firm fit. Hold the fixture close to the wall or ceiling. Align it with the mounting bracket. Secure the fixture with screws or nuts. Check that it is tight and does not wobble. A steady fixture lasts longer and looks better.
Connecting Fixture Wires
Match each wire from the fixture to the wire in the electrical box. Usually, black wires are live, white wires are neutral, and green or bare wires are ground. Twist the matching wires together clockwise. Use wire nuts to cover and secure each connection. Tug gently on each wire to ensure it is tight. Wrap electrical tape around the wire nuts for extra safety. Push the wires carefully into the box. Avoid sharp bends or pinches. Proper connections prevent shorts and electrical hazards.
Testing The New Setup
After adding another light to your existing switch, testing the new setup is important. This step ensures everything works safely and correctly. Testing also helps find any wiring mistakes early. Follow these simple steps to check your work.
Restoring Power
First, turn the power back on at the circuit breaker. Make sure the breaker is fully switched on. Avoid touching any wires while power is on. Use a voltage tester to confirm the switch has power. This step is crucial for safety and function.
Switch Operation Check
Next, flip the switch to test the lights. Both the old and new lights should turn on and off. Check if the new light stays bright without flickering. Try the switch a few times to ensure steady operation. If the lights do not work, turn off the power and recheck your wiring.
Troubleshooting Common Issues
Troubleshooting is key when adding another light to an existing switch. Problems can stop your new setup from working properly. This section helps you fix common issues fast and easy. Follow the steps below to solve typical problems.
Light Not Turning On
Check if the light bulb is screwed in tightly. A loose bulb often causes no light. Confirm the bulb is not burned out. Try a new bulb to rule this out. Make sure the power is on at the breaker. Sometimes breakers switch off without notice. Inspect your wiring connections. Loose or wrong wires can stop the light from working. Use a voltage tester to check for power at the fixture. No power means a wiring or switch problem.
Switch Issues
Test the switch to see if it works properly. A faulty switch can block electricity flow. Turn off power before removing the switch cover. Look for loose wires or signs of damage. Tighten any loose screws holding wires in place. Replace the switch if it looks worn or broken. Check if the switch matches the wiring setup. Some switches need special wiring to work correctly. Use a continuity tester to confirm the switch’s function. A bad switch shows no continuity when toggled.
Frequently Asked Questions
How Do I Add A Light To An Existing Switch?
To add a light, first turn off power at the breaker. Run new wiring from the switch to the new light fixture. Connect the wires properly using wire nuts. Finally, secure the fixture and restore power to test the light.
Can I Use The Same Switch For Two Lights?
Yes, you can control two lights with one switch. Ensure the switch and wiring can handle the total load. Connect both lights in parallel to the switch. This setup allows both lights to turn on and off simultaneously.
What Tools Are Needed To Add Another Light?
You need a voltage tester, wire stripper, screwdriver, electrical tape, and wire nuts. A drill may help for mounting the fixture. Always use tools designed for electrical work to ensure safety and accuracy.
Is It Safe To Add A Light Without An Electrician?
Yes, if you follow safety rules and local codes. Turn off power before starting. Use proper tools and materials. If unsure about wiring, consult a professional to avoid hazards.
Conclusion
Adding another light to an existing switch can brighten your space easily. Follow the steps carefully to stay safe and avoid mistakes. Always turn off power before starting any work. Use the right tools and check your wiring twice. This small project can improve your room’s lighting quickly.
Take your time and ask for help if needed. Enjoy the new light and the cozy feel it brings. Simple changes like this make your home more comfortable and inviting.