Are you ready to take control of your home lighting but unsure how to connect your Leviton light switch? You’re in the right place.
Connecting a Leviton light switch might seem tricky at first, but with the right steps, you’ll have it up and running quickly. Imagine flipping a switch that works perfectly every time, saving you time and frustration. Keep reading, and you’ll discover simple, clear instructions that make the whole process easy—even if you’re not an expert.
Let’s get started and make your lighting work exactly the way you want.

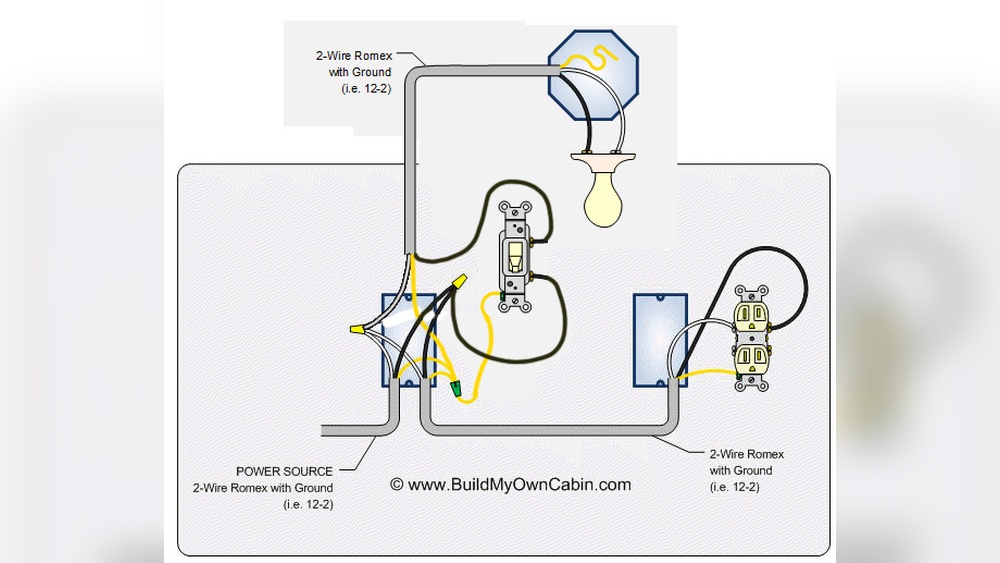
Credit: diy.stackexchange.com
Tools Needed
Preparing the right tools makes connecting a Leviton light switch easier and safer. Using correct tools helps prevent mistakes and damage. Below are the essential tools needed for this task.
Flathead Screwdriver
This tool helps remove switch plate covers and loosen screws. It fits into small slots, making it easy to pry open covers carefully.
Phillips Head Screwdriver
Many Leviton switches have screws with a cross shape. The Phillips screwdriver fits these screws perfectly for tightening or loosening.
Wire Strippers
Wire strippers remove insulation from wires without cutting the metal inside. They ensure clean, safe wire ends for connection.
Voltage Tester
A voltage tester checks if wires have electricity. It ensures power is off before touching wires, keeping you safe.
Needle-nose Pliers
These pliers bend or hold wires in tight spaces. They help wrap wires around screws or pull wires through openings.
Electrical Tape
Electrical tape insulates wire connections. It protects wires from short circuits and keeps connections secure.
Safety First
Safety is the top priority when working with electrical devices. A Leviton light switch connects to your home’s wiring, carrying electric current. Mistakes can cause shocks or fires. Taking safety steps protects you and your home. Read these key tips before starting any installation.
Turn Off Power At The Circuit Breaker
Always switch off the power at the main circuit breaker. Do not rely on the wall switch alone. Use a voltage tester to make sure the wires have no current. This step prevents electric shock during the work.
Use Proper Tools And Equipment
Choose insulated tools designed for electrical work. Avoid using damaged or worn tools. Wear rubber-soled shoes and avoid standing on wet surfaces. These habits reduce the risk of electric shock.
Read The Manufacturer’s Instructions
Follow the instructions included with your Leviton switch. Each model may have unique wiring requirements. Clear understanding helps avoid wiring errors and ensures proper function.
Work In A Well-lit Area
Good lighting helps you see wires and connections clearly. It reduces mistakes and speeds up installation. Use a flashlight or portable lamp if needed.
Double Check All Connections
Before restoring power, verify every wire is connected properly. Loose or wrong connections can cause shorts or damage. Tighten screws and secure wires firmly.
Identify Your Switch Type
Identifying your Leviton light switch type is the first step in a safe and correct installation. Different switches serve different purposes and have unique wiring needs. Knowing your switch type helps avoid confusion and errors during the connection process. It also ensures your new switch will work correctly with your existing wiring setup.
Single-pole Switch
A single-pole switch controls one light or device from one location. It has two terminals plus a ground screw. The switch interrupts the hot wire to turn the light on or off. This type is common in most homes. It’s simple to identify because it usually has just two wires connected to it. The single-pole switch is easy to install and replace.
Three-way Switch
A three-way switch controls a light from two different locations. It has three terminals plus a ground screw. These terminals include one common and two traveler screws. The wiring is more complex than a single-pole switch. You will see three wires connected instead of two. This switch type is often used in hallways or staircases. Understanding this helps you connect your Leviton switch properly.
Credit: www.youtube.com
Turn Off Power
Turning off the power is the first and most important step before working on your Leviton light switch. It keeps you safe from electric shocks and prevents damage to the wiring. Always treat electricity with care.
Take your time and follow the steps carefully. Safety is the top priority when handling electrical devices.
Locate The Circuit Breaker
Find the main electrical panel in your home. It is usually in the basement, garage, or utility room. Open the panel door to see the circuit breakers.
Identify The Correct Breaker
Look for the breaker that controls the room with the light switch. Breakers often have labels. If not, check for the one that matches the switch’s circuit.
Turn Off The Breaker
Flip the switch on the breaker to the OFF position. This cuts off power to the light switch. Double-check by flipping the switch in the room to see if the light turns off.
Use A Voltage Tester
Before touching wires, use a voltage tester to confirm no electricity flows. Test the wires connected to the switch. No voltage means it is safe to proceed.
Remove Old Switch
Removing the old switch is the first step to install a Leviton light switch. This process ensures safety and makes the new installation easier. Follow each step carefully to avoid any electrical problems.
Turn Off Power At The Circuit Breaker
Locate your home’s circuit breaker panel. Switch off the power for the room where the light switch is. Double-check by flipping the light switch to see if the light turns off. Safety first!
Remove The Switch Cover Plate
Use a screwdriver to remove the screws on the cover plate. Take off the cover plate gently. Set it aside to avoid losing the screws.
Unscrew The Old Switch
Unscrew the screws holding the switch to the electrical box. Pull the switch out carefully. Avoid touching any wires to prevent shocks.
Note Wire Placement
Look closely at the wires connected to the switch. Take a photo or write down where each wire goes. This helps when connecting the new switch.
Disconnect The Wires
Loosen the screws holding the wires on the switch. Carefully remove the wires. Keep the wires from touching each other or the box.
Wiring The Leviton Switch
Wiring the Leviton light switch is a key step in installing it correctly. It ensures the switch works safely and controls the light properly. This process involves connecting different wires to the switch. Each wire has a special job in the circuit. Understanding these roles makes the wiring task easier.
Follow each step carefully. Use the right tools and safety measures. Turn off the power before starting. This prevents electric shock and damage. Let’s look at how to connect each wire for your Leviton switch.
Connect Ground Wire
The ground wire is usually green or bare copper. It protects you from electric shock by directing current safely to the ground. Attach the ground wire to the green screw on the switch. Make sure the connection is tight. This step is important for safety.
Attach Line And Load Wires
Identify the line wire that brings power from the breaker box. It is often black or red. Connect this wire to the terminal marked “Line” or “Hot.” Next, find the load wire going to the light fixture. Attach it to the terminal marked “Load.” Check that both wires are firmly secured. Loose wires can cause problems or hazards.
Handle Traveler Wires For Three-way
Three-way switches have two traveler wires. These wires let you control a light from two places. Traveler wires are usually red and black. Connect them to the traveler terminals on the switch. These terminals are often brass-colored screws. Keep the traveler wires connected to the correct screws. This setup allows the switch to work smoothly.
Secure The Switch
Securing the Leviton light switch is a crucial step in the installation process. A properly secured switch ensures safety and reliable operation. It also prevents the switch from becoming loose or causing electrical problems over time.
This step involves fixing the switch firmly into the electrical box and making sure all connections stay intact. The switch should sit flush against the wall without any gaps.
Prepare The Electrical Box
Check the electrical box for any debris or loose wires. Clean it to create a stable surface. Make sure the wires are neatly arranged inside the box. This helps prevent pinching or damage when the switch is secured.
Align The Switch Correctly
Place the Leviton switch inside the electrical box carefully. The switch should be level and straight. Proper alignment keeps the switch easy to operate and maintains the look of your wall.
Tighten The Mounting Screws
Use a screwdriver to tighten the screws that hold the switch in place. Tighten until the switch is secure but avoid over-tightening. Over-tightening can crack the switch or damage the box.
Test The Stability
After tightening, gently wiggle the switch to check for movement. A secure switch will not move or feel loose. If it moves, tighten the screws a little more until the switch is stable.
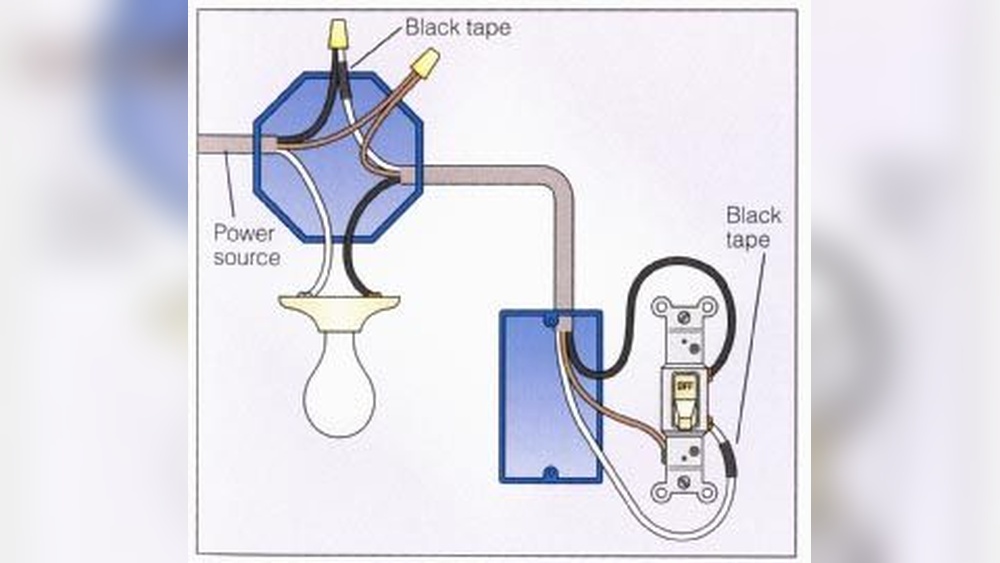
Credit: www.electricaltechnology.org
Restore Power And Test
Restoring power and testing the Leviton light switch is the final step after installation. It ensures the switch works properly and the circuit is safe. This step confirms your wiring is correct and the light operates as expected.
Always be cautious when restoring power. Safety first. Double-check that all connections are secure and no wires are exposed. Only then proceed to turn the power back on.
Turn On The Circuit Breaker
Locate the circuit breaker that controls the switch. Flip it to the ON position. This restores power to the switch and the connected light fixture.
Listen for any unusual sounds. No sparks or smells should be present. If anything seems off, turn the breaker off immediately.
Test The Light Switch Operation
Press the switch to turn the light on. The light should illuminate instantly. Press the switch again to turn the light off.
Check for any flickering or delay in response. The switch should operate smoothly without noise or resistance.
Verify Additional Features
If your Leviton switch has extra features like dimming or smart controls, test them now. Adjust brightness or connect to your app if needed. Confirm all functions respond correctly.
Troubleshooting Tips
Troubleshooting Leviton light switches can help fix common issues fast. Problems often arise from wiring errors or power supply issues. Understanding basic checks saves time and frustration.
Follow simple steps to identify and solve typical problems. These tips help ensure your switch works correctly and safely.
Check The Power Supply
First, make sure the power is on. Use a voltage tester to confirm electricity flows to the switch. No power means the problem is in the circuit or breaker.
Verify Proper Wiring
Loose or wrong wires cause many switch issues. Turn off power, remove the switch cover, and inspect the wires. Tighten loose connections and match wires to the switch terminals.
Test The Switch Function
Press the switch and listen for a click sound. No sound may mean the switch is faulty. Try replacing the switch with a new one to test.
Check For Overloaded Circuits
Too many devices on one circuit can cause the switch to fail. Unplug some devices and test the switch again. If it works, reduce the load on that circuit.
Examine The Switch Type
Leviton switches come in different types for specific uses. Confirm you use the correct switch type for your wiring and light fixture. A mismatch can cause malfunction.
Maintenance Advice
Proper maintenance helps your Leviton light switch work well for years. It keeps the switch safe and prevents problems. Regular checks can find issues early. This saves time and money later.
Cleaning The Switch Surface
Keep the switch clean by wiping it with a dry cloth. Avoid water or liquid cleaners. Moisture can damage the switch. Dust can build up and block the switch’s function. Clean at least once a month.
Checking For Loose Connections
Turn off the power before checking the switch. Use a screwdriver to gently tighten screws if loose. Loose wires cause flickering or power loss. Check connections every six months for safety.
Inspecting For Damage Or Wear
Look for cracks or discoloration on the switch. Damage can cause electrical hazards. Replace the switch if it looks worn or broken. Do this check once a year to stay safe.
Testing The Switch Regularly
Test the switch by turning it on and off. Make sure lights respond immediately. Slow or no response means a problem. Test monthly to catch issues early and keep lights working well.
Frequently Asked Questions
How Do I Wire A Leviton Light Switch Safely?
Turn off the power at the circuit breaker first. Connect the black (hot) wire to the switch’s black terminal. Attach the white (neutral) wire to the white terminal if present. Connect the ground wire to the green terminal. Secure all connections tightly and mount the switch.
Can I Replace A Standard Switch With A Leviton Switch?
Yes, Leviton switches can replace standard switches if wiring matches. Ensure power is off before removal. Connect wires according to Leviton instructions. Confirm compatibility with your circuit type for safety and optimal performance.
What Tools Are Needed To Install A Leviton Switch?
You need a flathead and Phillips screwdriver, wire stripper, voltage tester, and needle-nose pliers. These tools help safely remove the old switch, strip wires, test power, and install the new Leviton switch efficiently.
How To Troubleshoot A Leviton Switch Not Working?
Check if the circuit breaker is on and power is supplied. Verify all wire connections are secure. Use a voltage tester to confirm power at the switch. Replace the switch if it remains unresponsive.
Conclusion
Connecting a Leviton light switch is simple and safe. Follow each step carefully to avoid mistakes. Always turn off power before starting the work. Double-check your wiring to ensure it matches the instructions. Test the switch after installation to confirm it works well.
Taking your time leads to better results and safety. You can enjoy easy control of your lights with confidence. Keep this guide handy for future reference.