Have you ever wondered why your lights turn on too early or stay on too long? Adjusting your light sensor switch can fix this easily, saving you energy and money.
You’ll learn simple steps to fine-tune your light sensor switch for perfect timing. By the end, you’ll have full control over your lighting, making your home smarter and more efficient. Keep reading to discover how easy it is to make this small change with big benefits.
Credit: topgreener.com
Choosing The Right Light Sensor Switch
Choosing the right light sensor switch is important for saving energy and improving convenience. A good switch fits your needs and environment. Understanding the types and key factors helps you pick the best option.
Types Of Light Sensor Switches
There are several types of light sensor switches. Some turn lights on and off based on daylight. Others detect motion or occupancy. Photoelectric switches respond to natural light changes. Motion sensor switches activate lights when they sense movement. Each type suits different uses and locations.
Factors To Consider Before Purchase
Think about where you will install the switch. Indoor or outdoor use affects the choice. Check the sensor’s range and sensitivity. Match it to the area size and lighting needs. Look for compatibility with your existing lighting system. Also, consider power source and installation ease. Choose a durable model for outdoor places.
Preparing For Installation
Preparing for the installation of a light sensor switch is an important first step. It ensures the process goes smoothly and safely. Proper preparation helps avoid mistakes and saves time.
This section covers the essential tools and materials you need. It also highlights important safety precautions to follow before starting the installation.
Tools And Materials Needed
- Screwdriver (flathead and Phillips)
- Wire stripper or cutter
- Voltage tester
- Electrical tape
- Light sensor switch unit
- Wire connectors
- Safety gloves
- Instruction manual of the light sensor switch
Safety Precautions
Turn off the power at the circuit breaker before starting work.
Use a voltage tester to confirm no electricity flows to the wires.
Wear safety gloves to protect your hands from sharp edges.
Follow the manufacturer’s instructions closely to avoid damage.
Work in a dry area to reduce the risk of electric shock.
Installing The Light Sensor Switch
Installing a light sensor switch is simple and improves your home’s energy use. This device turns lights on or off based on natural light. Proper installation ensures it works correctly and lasts longer.
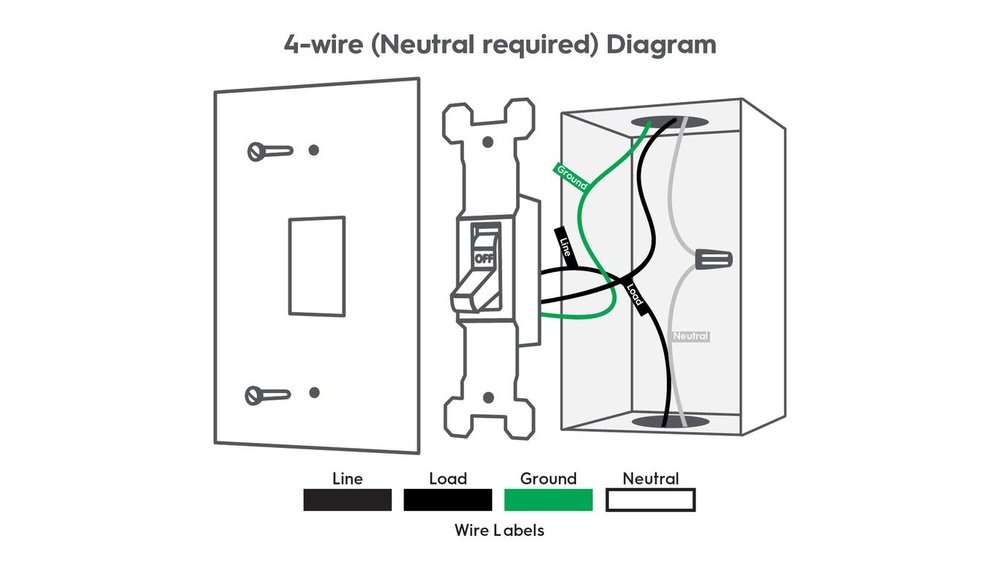
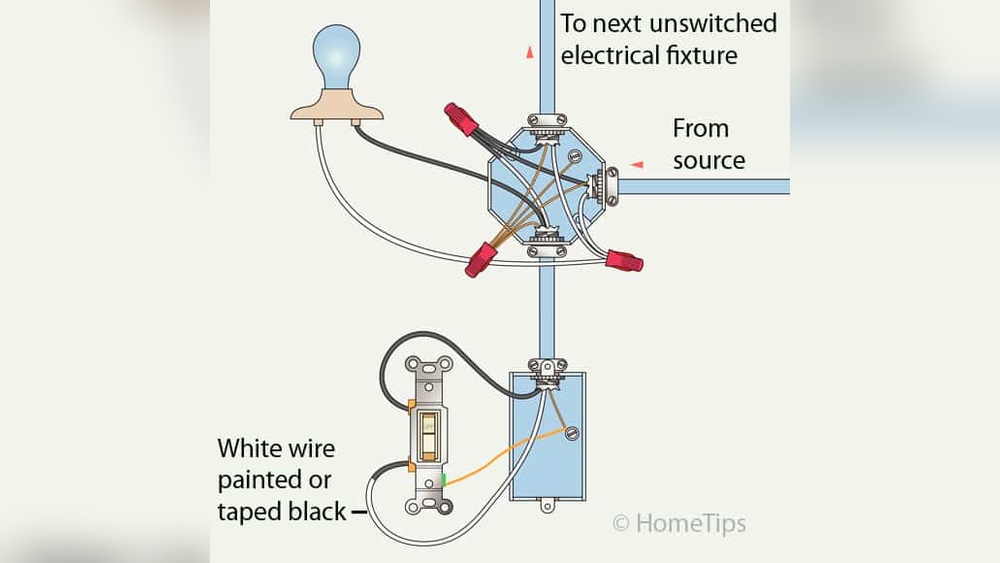
Wiring Basics
Turn off the power before starting any wiring. Use a voltage tester to confirm no electricity flows. Connect the sensor switch wires to the house wires. Match the colors: black to black, white to white, and green or bare wire to ground. Secure all connections with wire nuts. Follow the sensor switch manual for specific wiring details.
Mounting The Sensor
Choose a spot with clear access to daylight. Avoid places near artificial lights or shadows. Mount the sensor at the recommended height, usually around six to eight feet. Use screws or mounting brackets included in the package. Make sure the sensor lens faces the open sky or window. Check the sensor’s angle to detect light accurately.
Credit: www.rayzeek.com
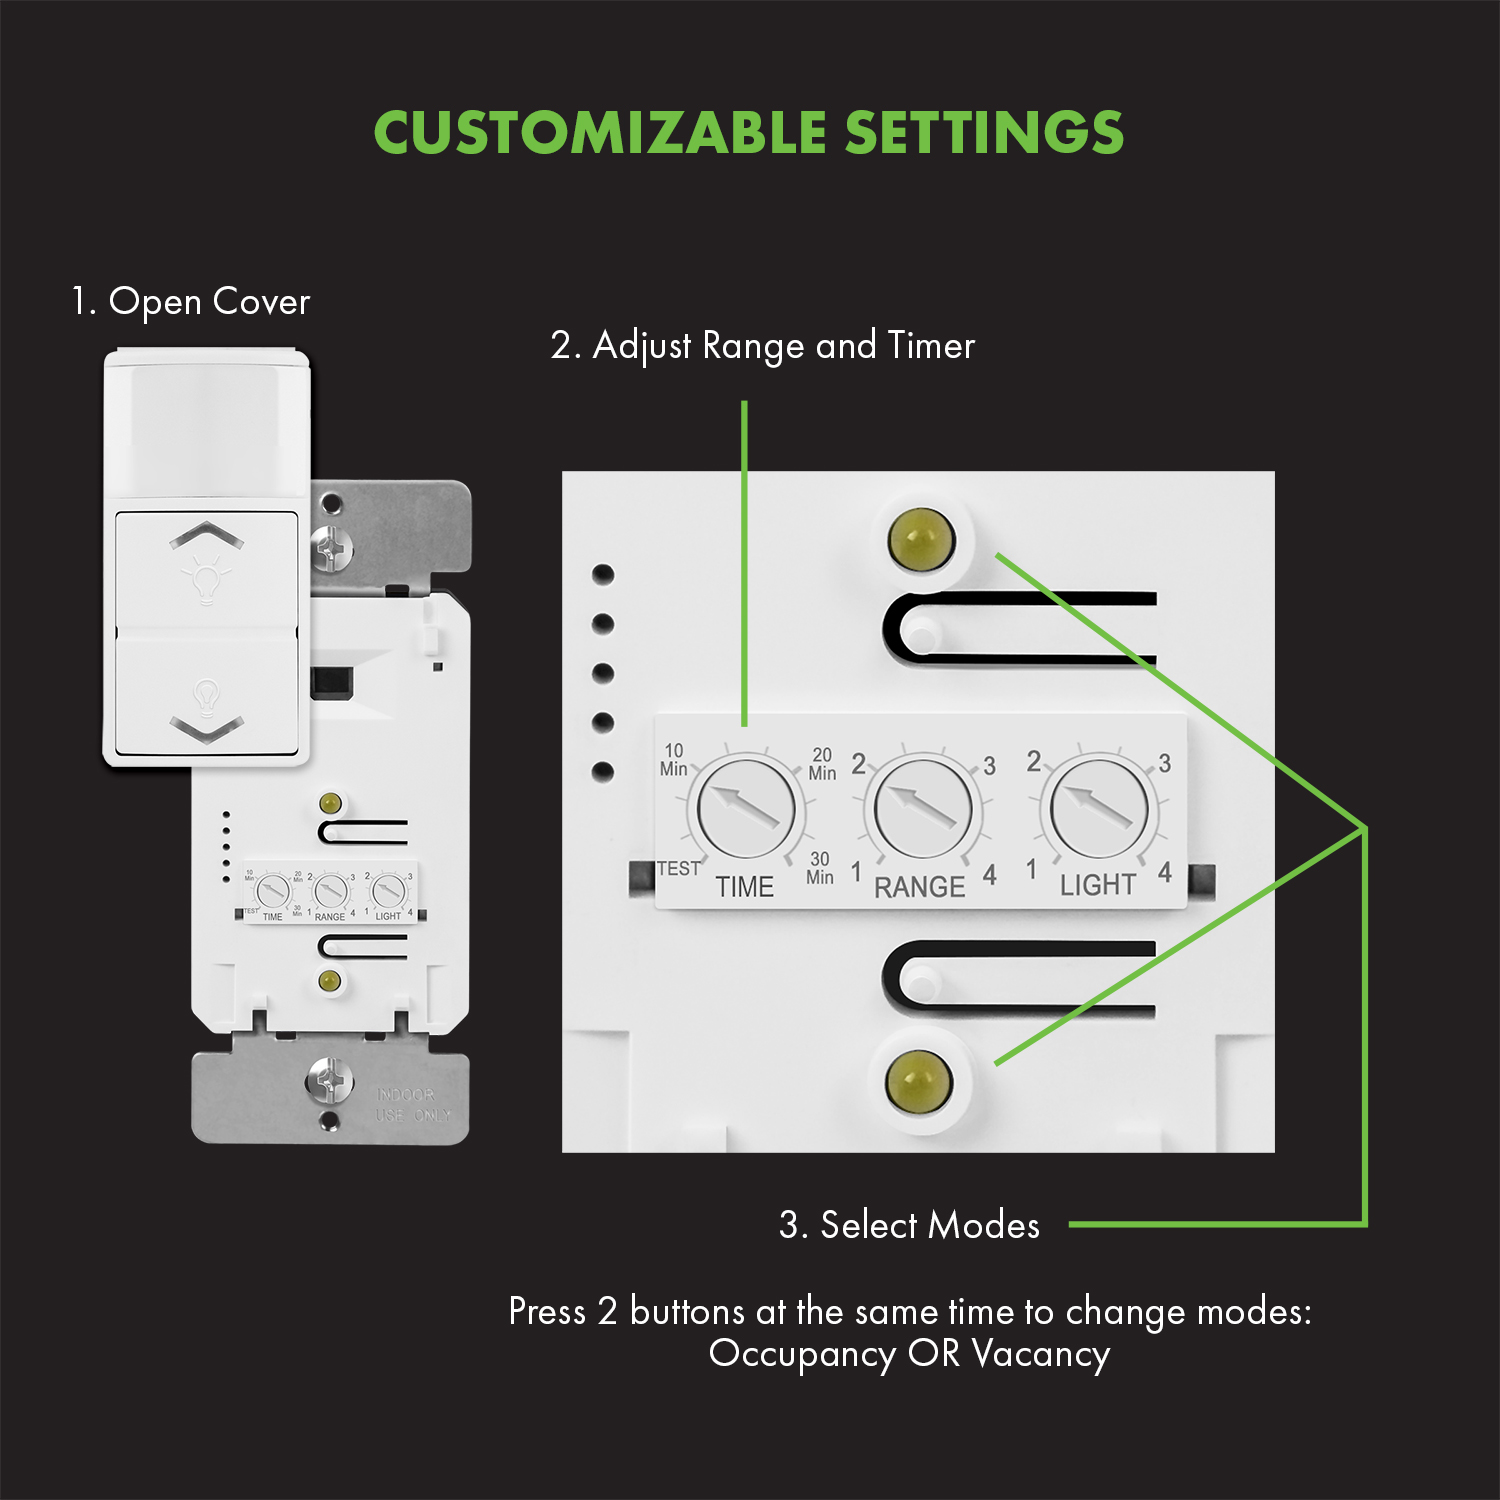
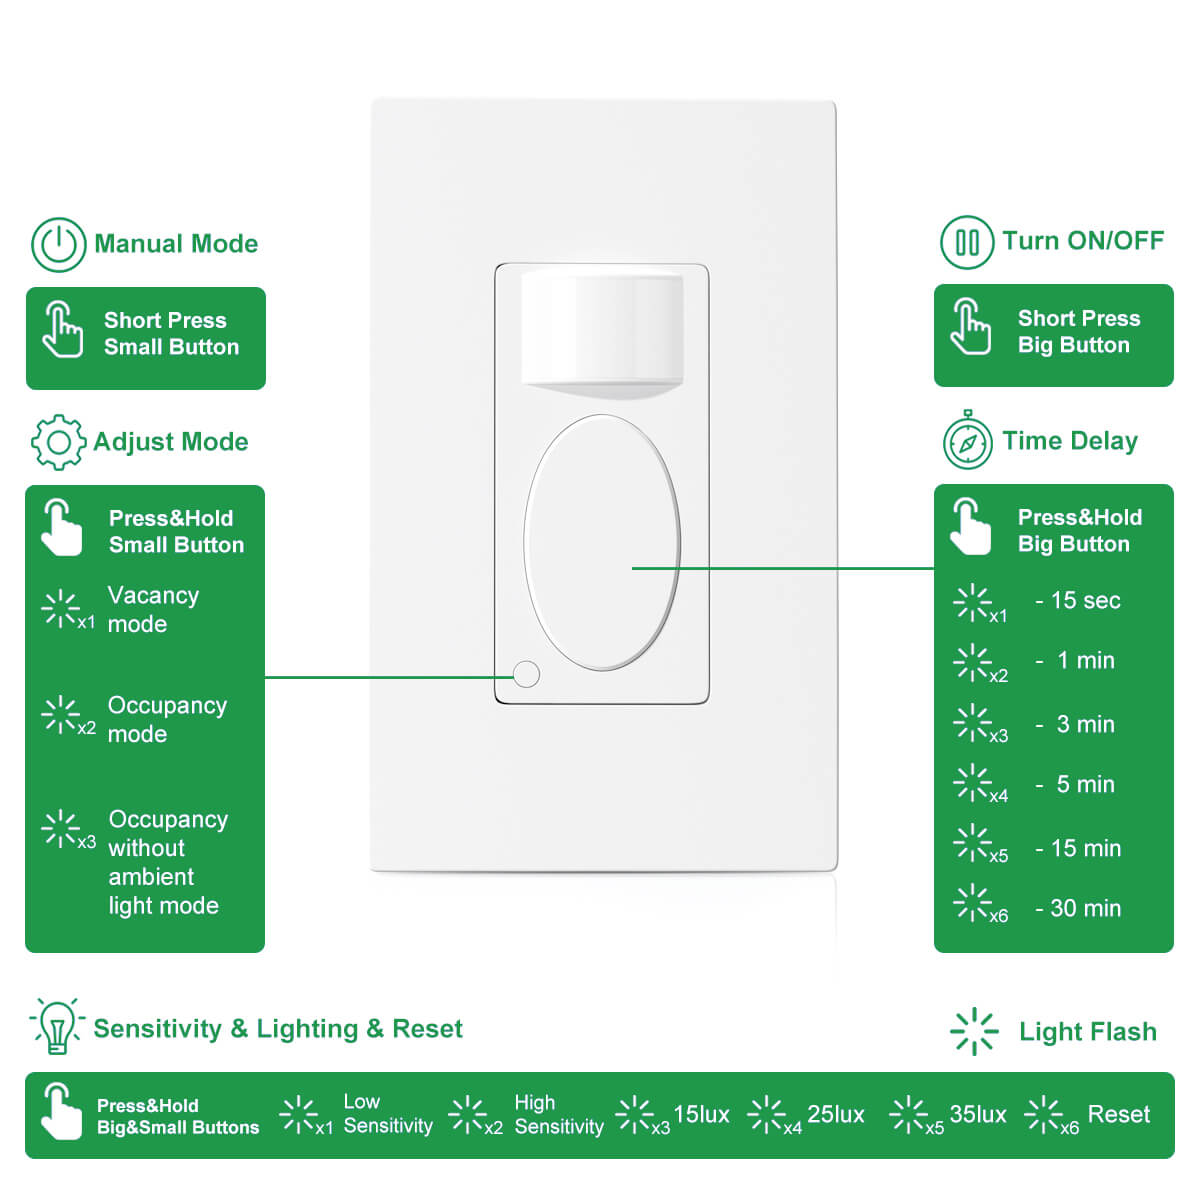
Adjusting Sensitivity Settings
Adjusting the sensitivity settings of a light sensor switch helps control how it reacts to light changes. Proper sensitivity ensures the switch turns on or off at the right time. It avoids false triggers from small light changes or shadows. This section guides you through locating and setting these sensitivity controls.
Locating The Sensitivity Controls
Most light sensor switches have sensitivity controls on the device itself. Look for small dials or sliders near the sensor or inside the cover. Some models use buttons to adjust sensitivity instead of dials. Check the user manual if you cannot find the controls. A flashlight may help you see inside darker areas.
Setting Sensitivity Levels
Start with a medium sensitivity level. Turn the dial or slider slowly to increase or decrease sensitivity. High sensitivity means the switch reacts to slight light changes. Low sensitivity avoids false triggers but may delay switching. Test the switch after each adjustment. Adjust until the switch works well for your environment.
Calibrating Light Detection
Calibrating light detection is key to making your light sensor switch work well. It helps the sensor know when to turn on or off based on light levels. Proper calibration saves energy and improves comfort. You can adjust settings to fit your space and needs.
This process is simple and quick. It involves changing the light threshold and testing the sensor in different conditions. These steps ensure the sensor reacts correctly to light changes around it.
Adjusting Light Threshold
The light threshold is the level of brightness that triggers the sensor. Adjust it to match your environment. Turn the adjustment knob or use a small screwdriver to change the setting. Set it higher for darker rooms and lower for brighter areas. Check the sensor’s manual for exact instructions. This step controls when lights turn on or off.
Testing In Different Lighting Conditions
Test the sensor at different times of the day. Try it in bright sunlight, shade, and artificial light. Watch how the sensor reacts. Make small adjustments if the light turns on too soon or too late. Testing helps find the perfect balance. Repeat tests after any changes in your room lighting or furniture layout.

Credit: www.youtube.com
Troubleshooting Common Issues
Troubleshooting common issues with a light sensor switch helps keep your lighting working well. Understanding simple fixes saves time and effort. Many problems occur due to small errors or settings that need adjustment.
Sensor Not Activating
Check if the sensor lens is clean and free of dirt. Dirt blocks the sensor from detecting light or motion. Make sure the switch has power and is properly connected. Look for loose wires or a tripped circuit breaker. Test the sensor in different lighting conditions. Some sensors do not work well in very bright or very dark settings.
Light Staying On Or Off Unexpectedly
Adjust the sensitivity settings on the sensor. High sensitivity can cause the light to stay on too long. Low sensitivity might keep the light off when it should turn on. Check the timer settings. The light might be set to stay on for a long period. Make sure no objects block the sensor’s view. Shadows or obstructions can confuse the sensor and cause wrong responses.
Maintaining Your Light Sensor Switch
Maintaining your light sensor switch ensures it works well every day. A clean, well-checked sensor reacts correctly to light changes. This saves energy and keeps your space well-lit at the right times. Simple care steps can extend the sensor’s life and improve its accuracy.
Cleaning Tips
Dust and dirt can block the sensor’s light detector. Use a soft cloth to wipe the sensor gently. Avoid wetting the sensor or using harsh cleaners. Clean the sensor at least once a month. This helps keep the sensor sensitive and responsive.
Regular Checks For Optimal Performance
Test the sensor switch regularly to check if it works properly. Observe if the lights turn on and off at the right times. Adjust the sensor’s settings if needed to match your environment. Replace the sensor if it shows signs of damage or stops working. Regular checks help avoid unexpected failures.
Frequently Asked Questions
How Do I Calibrate A Light Sensor Switch?
To calibrate, locate the adjustment dial on the sensor. Turn it slowly to set the desired light threshold. Test by covering the sensor to ensure the switch activates in low light.
Can I Adjust The Sensitivity Of The Light Sensor?
Yes, most light sensor switches allow sensitivity adjustment. This lets you control how much light triggers the switch. Use the dial or screws marked for sensitivity to fine-tune the sensor.
Why Isn’t My Light Sensor Switch Turning On?
Check if the sensor is properly powered and clean. Ensure it’s not blocked by dirt or shadows. Adjust the threshold if ambient light is too bright to activate the switch.
How Do I Set The Light Sensor Switch For Nighttime Use?
Set the sensor’s threshold to activate at low light levels. Adjust the dial until the switch turns on when it gets dark. Test during dusk to confirm proper operation.
Conclusion
Adjusting a light sensor switch is easier than it seems. Start by reading the instructions carefully. Set the sensitivity and timing to fit your needs. Test the sensor in different lighting conditions. Small changes can make a big difference in performance.
Regular checks help keep the switch working well. This simple task can save energy and improve comfort. Take your time and adjust step by step. Soon, your light sensor switch will work just right.