Are you ready to take control of your home’s lighting and save money on installation costs? Installing a single pole light switch is easier than you might think—and you don’t need to be an expert to do it.
In this guide, you’ll discover simple, step-by-step instructions that make the process clear and stress-free. Imagine flipping a switch you installed yourself, knowing you handled it safely and correctly. Keep reading to unlock the confidence and skills you need to upgrade your lighting today!
:max_bytes(150000):strip_icc()/how-to-wire-and-install-single-pole-switches-1152330-05-2de77af170364a6fb3846f30634a5cd3.jpg)
Credit: www.thespruce.com
Tools And Materials Needed
Installing a single pole light switch is a simple task. The right tools and materials make the job easier and safer. Prepare everything before starting. This saves time and avoids frustration.
Basic Tools
You need a few basic tools to install the switch. A screwdriver is essential to remove and install screws. Use a flathead or Phillips, depending on your switch type.
A wire stripper helps remove insulation from wires safely. Needle-nose pliers bend wires for better connections. A voltage tester checks if the power is off before you start.
Materials Needed
The main material is the single pole switch itself. Choose one that matches your home’s electrical rating. Electrical tape helps secure wire connections and insulates them.
Wire connectors, also called wire nuts, join wires safely. You may need additional electrical wires if the existing ones are too short or damaged.
Safety Gear
Safety is important. Use insulated gloves to protect your hands. Safety goggles keep dust and debris out of your eyes. Always turn off the power at the breaker box before working.
Safety Precautions
Working with electricity needs care. Safety precautions protect you from shocks and accidents. Before installing a single pole light switch, follow these steps to keep safe. They help avoid dangers and make the job easier.
Turn Off Power At The Circuit Breaker
Always switch off the power at the circuit breaker. This stops electricity from flowing to the switch. Use a tester to confirm no power is running. Never trust the switch position alone.
Use Insulated Tools
Choose tools with insulated handles. They prevent electric shocks if wires are live. Avoid metal tools without insulation. Safety comes first during any electrical work.
Wear Safety Gear
Wear rubber-soled shoes and safety glasses. Shoes stop electricity from grounding through your body. Glasses protect your eyes from sparks or debris. This gear reduces injury risks.
Work In A Dry Area
Make sure the work area is dry. Water conducts electricity and increases shock risk. Never touch wires with wet hands. Dry surroundings keep you safer.
Follow Wiring Instructions Carefully
Read the switch wiring guide before starting. Connect wires as directed to avoid shorts or failures. Proper wiring prevents future hazards and switch damage.
Turn Off Power Supply
Turning off the power supply is the first and most important step. It keeps you safe from electric shocks. Never start working on a light switch without cutting the power.
Electricity can cause serious injury or even death. Taking this safety measure protects you and your home. Always treat electricity with respect and care.
Locate The Main Circuit Breaker
Find your home’s electrical panel. It is usually in the basement, garage, or a utility room. Look for the main circuit breaker switch that controls power to your house.
Switch Off The Power
Flip the main switch to the “off” position. This stops electricity from flowing to the light switch you will work on. Confirm that the power is off before continuing.
Test The Power Is Off
Use a voltage tester or a non-contact voltage detector. Place the tester near the wires or switch terminals. If the tester shows no power, it is safe to proceed.
Double Check For Safety
Turn on the light switch to see if the light stays off. If the light does not turn on, the power is successfully off. Never skip this step to avoid accidents.
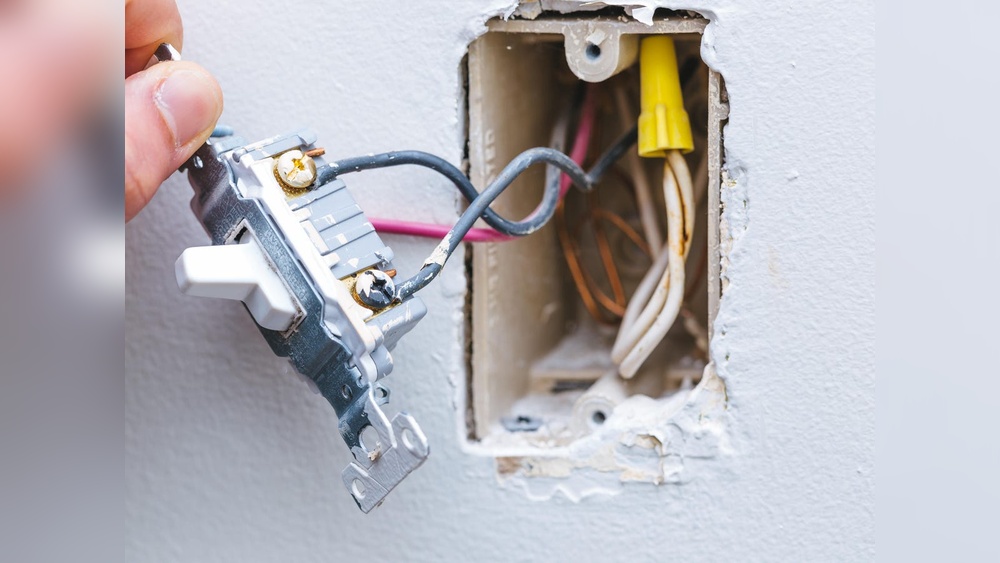
Remove Old Switch
Removing the old switch is the first step in installing a new single pole light switch. Safety matters most. Turn off the power at the breaker box to avoid electric shock. Use a voltage tester to confirm no electricity flows to the switch.
After ensuring power is off, remove the switch cover plate. This exposes the screws holding the switch in place. Unscrew them carefully to avoid stripping or damaging the screws.
Disconnect The Wires
Note the position of each wire before disconnecting. You may take a photo for reference. Loosen the terminal screws or release wires from push-in connectors. Gently pull the wires free without damaging them.
Remove The Old Switch From The Box
Once wires disconnect, pull the old switch out of the electrical box. Handle it carefully to avoid contact with other wires. Set the switch aside for proper disposal or recycling.
Inspect The Wiring And Box
Check wires for damage or wear. Look inside the box for any signs of moisture or corrosion. Repair or replace damaged components before installing the new switch.
Identify Wiring
Identifying wiring is the first step in installing a single pole light switch. It ensures you connect the right wires to the switch. This step is important for safety and proper function of the light. Take your time and check each wire carefully.
Turn Off Power At The Circuit Breaker
Before touching any wires, switch off the power to the room. Find the correct circuit breaker and turn it off. Use a voltage tester to confirm the power is off. Never work on wires with power on.
Locate The Wires In The Switch Box
Remove the old switch cover and pull out the switch gently. You will see several wires inside the box. Usually, there are black, white, and bare copper or green wires. Each has a different role.
Identify The Hot Wire
The hot wire carries electricity from the power source. It is usually black or red. Use a voltage tester to find which wire is live. This wire connects to one of the switch terminals.
Identify The Load Wire
The load wire goes to the light fixture. It is often black or red as well. It connects to the other terminal on the switch. Knowing this wire helps control the light properly.
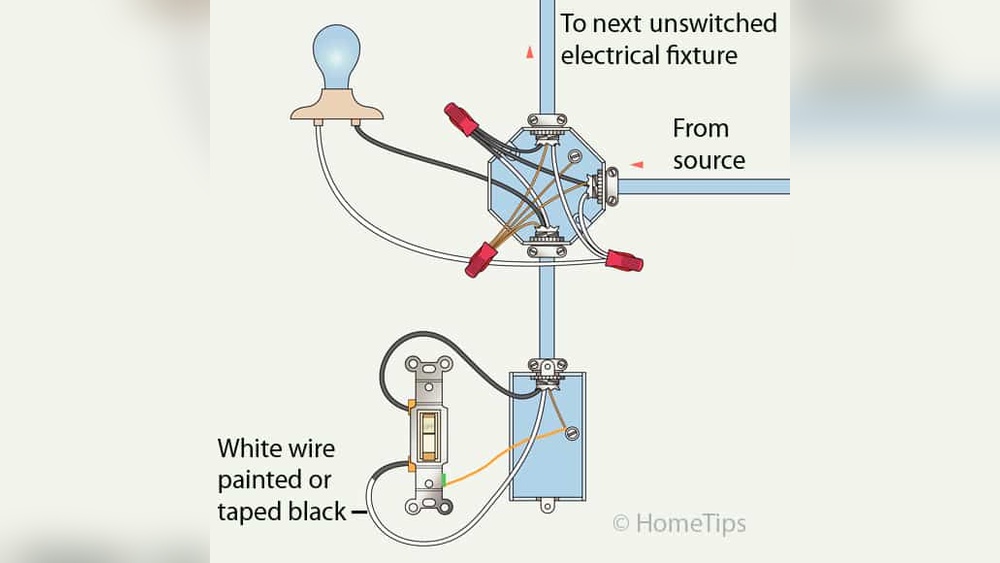
Find The Neutral And Ground Wires
Neutral wires are usually white and carry current back to the panel. Ground wires are bare copper or green. They connect to the switch box or switch ground terminal. These wires are vital for safety.
Connect New Switch
Connecting the new single pole light switch is a key step in your installation. This part links the switch to the electrical circuit. Proper connections ensure the switch works safely and correctly.
Follow each step carefully to avoid mistakes. Use tools like a screwdriver and wire stripper. Turn off the power before starting to keep safe.
Identify The Wires
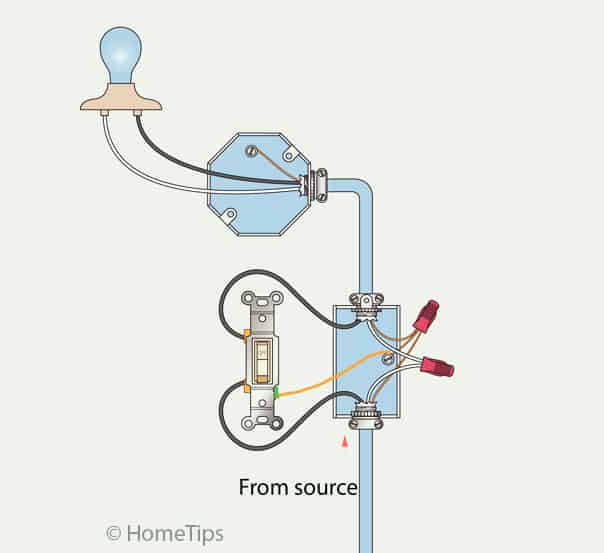
Look at the wires coming from the wall. Usually, there are two black wires and one green or copper wire. The black wires carry power. The green or copper wire is the ground.
Note which wire goes where. This helps connect the switch properly.
Attach The Ground Wire
Connect the green or bare copper wire to the green screw on the switch. This is the ground wire. It protects against electrical shocks.
Make sure the connection is tight and secure.
Connect The Hot Wires
Attach the two black wires to the brass screws on the switch. It does not matter which black wire goes to which screw.
Tighten the screws firmly. Loose wires can cause problems.
Double Check Connections
Look over all wires and screws. Ensure no wires are loose or touching each other. This prevents short circuits.
Use electrical tape on screws if needed for extra safety.
Secure The Switch
Installing a single pole light switch is simple and safe with the right steps. Turn off power first, then connect wires to the switch terminals. Secure the switch in the box and attach the cover plate for a clean finish.
Prepare The Switch Box
Start by making sure the switch box is clean. Remove any debris or dust inside. Check for loose wires or damaged parts. A tidy box helps secure the switch firmly. This step prevents future problems and keeps the installation safe.
Attach The Switch To The Box
Hold the switch in place inside the box. Align the screw holes with the box holes. Use a screwdriver to tighten the screws. Tighten until the switch feels steady. Avoid overtightening to prevent damage to the switch or box.
Check The Switch Position
Make sure the switch is straight and flush with the wall. Adjust if it tilts or sits unevenly. A well-positioned switch looks neat and works better. This small detail improves both safety and appearance.
Secure The Wall Plate
Place the wall plate over the switch. Line up the plate holes with the switch screws. Tighten the screws carefully to hold the plate. Do not force the screws too much. A secure plate protects the switch and wiring.
Restore Power And Test
Restoring power and testing the switch is the final step in installing a single pole light switch. This step ensures your new switch works correctly and safely controls the light. Taking time to test helps avoid electrical problems and saves future repairs.
Restore Power To The Circuit
Go to your electrical panel. Find the circuit breaker for the light switch. Flip the breaker to the ON position. This restores electricity to the switch and light fixture. Be careful not to touch any wires while doing this.
Test The Light Switch
Go back to the installed switch. Flip the switch ON. Check if the light turns on. Flip the switch OFF. Confirm the light goes off. The switch should work smoothly without any flicker or delay.
Troubleshoot If Needed
If the light does not turn on, turn off the power again. Check all wire connections are tight and correct. Look for loose wires or wrong connections. Restore power and test again. Repeat until the switch works properly.
Troubleshooting Tips
Troubleshooting is key when installing a single pole light switch. Small mistakes can stop the switch from working. Simple checks can save time and effort. This section offers easy tips to fix common problems.
Follow these steps carefully. They help you find and solve issues quickly. Keep tools handy and stay safe while testing the switch.
Check The Power Source
Make sure the power is off before working. Use a voltage tester to confirm no electricity flows. Sometimes the breaker may not be off. Double-check the right switch in the panel.
Verify Wire Connections
Loose wires cause the switch to fail. Tighten each wire on the terminal screws. Match the wires to the correct terminals. The black (hot) wire goes to the switch. The white (neutral) wires usually connect in the box, not the switch.
Test The Switch Itself
A faulty switch might be the problem. Remove the switch and test it with a multimeter. Check for continuity when toggled on. Replace the switch if it shows no continuity.
Inspect The Light Fixture
The issue may not be the switch. Look at the light bulb and fixture. Replace a burnt-out bulb. Make sure the fixture wires are secure and not damaged.
Look For Loose Or Damaged Wiring
Old or damaged wiring can cause trouble. Examine wires for cracks or frays. Replace any damaged wires. Poor connections can create sparks or shorts.
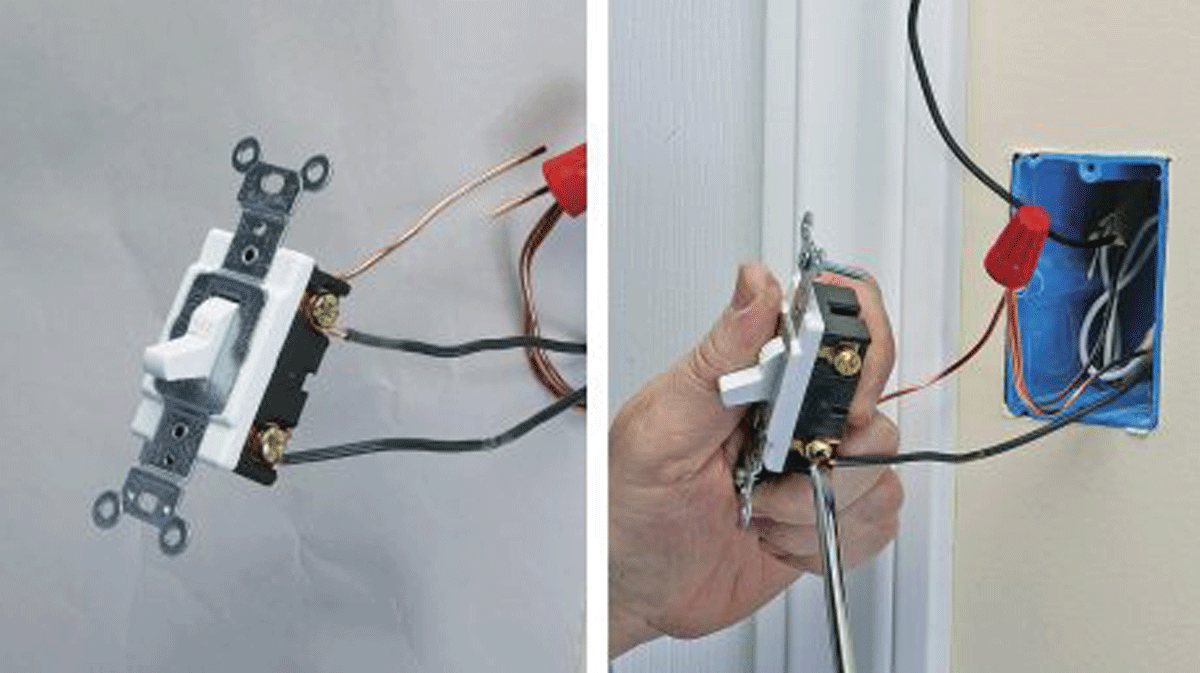
Credit: www.finehomebuilding.com
Credit: www.hometips.com
Frequently Asked Questions
What Tools Are Needed To Install A Single Pole Light Switch?
You need a screwdriver, voltage tester, wire stripper, and electrical tape. These tools help safely remove the old switch and connect wires correctly.
How Do I Turn Off Power Before Installation?
Switch off the circuit breaker for the specific light switch. Use a voltage tester to confirm no electricity flows to the wires.
How To Identify The Wires In A Single Pole Switch?
Look for the line (hot) wire, load wire, and ground wire. The line wire brings power, the load controls the light, and ground ensures safety.
Can A Single Pole Switch Control Two Lights?
Yes, a single pole switch can control multiple lights connected in parallel. Ensure the circuit can handle the total wattage safely.
Conclusion
Installing a single pole light switch is simple with the right steps. Always turn off power before starting any work. Use a voltage tester to check wires for safety. Connect wires carefully to the correct terminals. Secure the switch and cover plate tightly.
Test the switch to ensure it works well. This task saves money and gives you control of your lights. Take your time, follow instructions, and enjoy your new switch. Safety first, and you will do great.