Have you ever stood in a room, flicking a light switch only to realize the other switch controls the same light? That’s a three way light switch at work.
But what happens when one of these switches stops working? You might feel unsure about how to fix it yourself. Don’t worry—changing a three way light switch is easier than you think. In this guide, you’ll learn simple, step-by-step instructions that anyone can follow.
By the end, you’ll save time, avoid costly electrician fees, and gain confidence in handling your home’s electrical needs. Ready to get started? Let’s dive in!
Tools And Materials Needed
Changing a three way light switch is easier with the right tools and materials. Having everything ready saves time and avoids frustration. This guide lists all essentials for a smooth project.
Basic Tools
You need a few basic tools for this job. A flathead screwdriver and a Phillips screwdriver help remove the switch cover and screws. A voltage tester ensures power is off for safety. Wire strippers prepare wires for connection. Needle-nose pliers help bend and hold wires.
Materials Required
Start with a new three way switch matching your old one. Use electrical tape for securing wire connections. Wire nuts connect wires safely and prevent shorts. Have extra wire ready if you need to extend cables.
Safety Equipment
Safety matters most. Wear insulated gloves to protect from electric shock. Safety glasses keep debris out of your eyes. Use a flashlight if your workspace is dark. Always turn off the circuit breaker before starting.

Credit: www.cnet.com
Safety Precautions
Safety is the first and most important step when changing a three-way light switch. Working with electricity can be dangerous without the right precautions. Taking simple safety steps protects you from shocks and injuries. Follow these tips to stay safe while working on your switch.
Turn Off The Power
Always switch off the power at the circuit breaker. Do not rely on the wall switch alone. Use a tester to confirm that no electricity flows to the switch.
Use Proper Tools
Choose insulated tools to reduce the risk of electric shock. Avoid using metal tools without insulation. Keep your tools in good condition and dry.
Wear Safety Gear
Wear rubber-soled shoes to avoid grounding yourself. Use safety glasses to protect your eyes from dust and debris. Gloves can also add a layer of protection.
Work In A Dry Area
Never work on electrical parts in wet or damp conditions. Water conducts electricity and increases shock risk. Make sure your work area is dry and well lit.
Follow Instructions Carefully
Read the switch instructions before starting. Understand the wiring diagram and steps. Do not guess or skip any step during installation.
Identify Your Switch Type
Identifying your switch type is the first step to change a three-way light switch. Knowing the type helps you handle the wiring safely. It also ensures the new switch works correctly. This section guides you to recognize different switches easily.
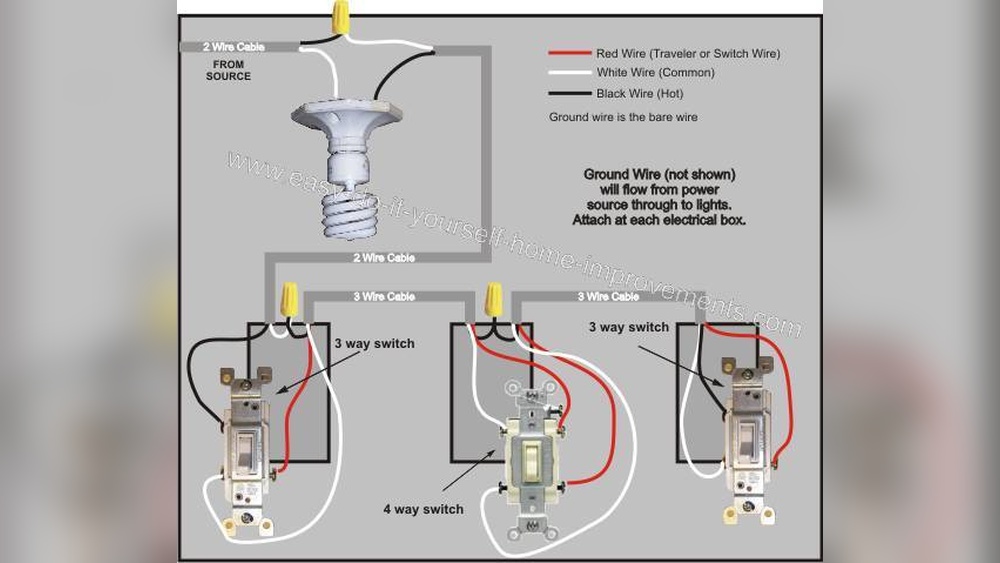
What Is A Three-way Switch?
A three-way switch controls one light from two places. It has three terminals for wires. These switches do not have an ON or OFF label. They work by connecting or disconnecting wires in different ways.
Spotting A Three-way Switch
Check the switch for three screws on the side. Two screws are brass, and one is darker or black. The darker screw is the common terminal. The other two are traveler terminals. This setup is unique to three-way switches.
Difference Between Single-pole And Three-way Switch
A single-pole switch has only two terminals. It controls a light from one place. A three-way switch has three terminals. This difference is easy to see by looking at the screws. It helps to avoid confusion during replacement.
Turn Off Power
Turning off the power is the first and most important step before changing a three way light switch. It keeps you safe from electric shocks. Always treat electricity with respect and caution.
Never skip this step. Even a small mistake can cause injury or damage. Take your time and be sure the power is completely off before starting.
Locate The Circuit Breaker
Find your home’s circuit breaker panel. It is usually in the basement, garage, or utility room. Look for the breaker that controls the lights in the room.
Switch Off The Correct Breaker
Flip the breaker switch to the OFF position. This stops the flow of electricity to the light switch you want to change. Double-check that you turned off the right breaker.
Verify Power Is Off
Use a voltage tester or a non-contact tester to check the wires. Touch the tester near the switch wires. If it shows no power, it is safe to work.
Use A Test Light For Extra Safety
Turn on the light switch. The test light should stay off. If it lights up, power is still on. Do not proceed until the power is off completely.
Remove The Old Switch
Removing the old three-way switch is the first step in the replacement process. It requires care and attention to avoid damaging wires or the wall. Follow each step closely to ensure safety and a smooth removal.
Unscrew The Wall Plate
Start by turning off the power at the breaker box. Use a screwdriver to remove the screws holding the wall plate. Take off the plate gently to expose the switch and wires behind it.
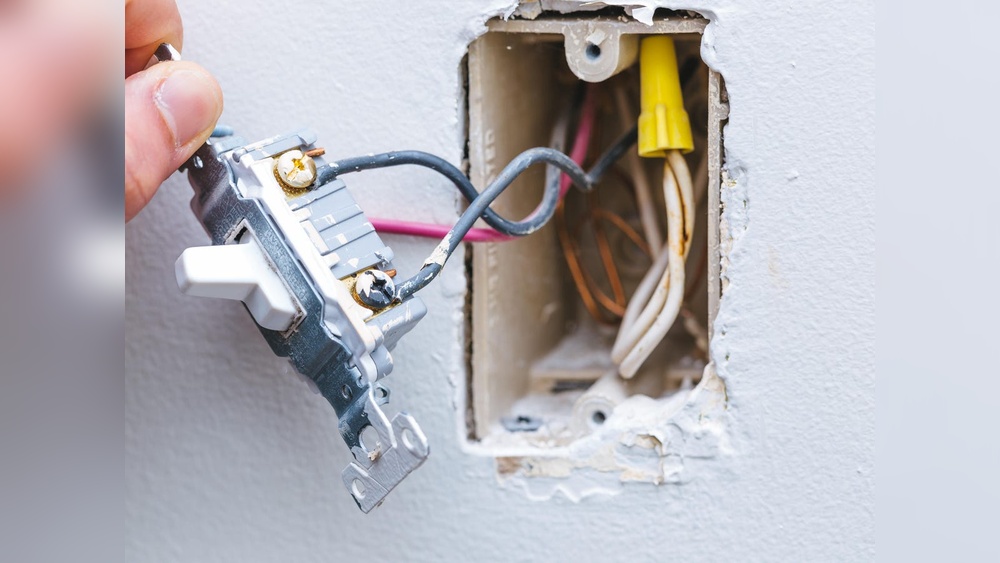
Detach The Switch From The Box
Next, unscrew the mounting screws that hold the switch in place. Pull the switch out carefully. Avoid pulling on the wires to prevent damage or disconnection.
Label The Wires
Use small pieces of tape or labels to mark each wire. Note where each wire connects on the old switch. This step helps during installation of the new switch and prevents wiring mistakes.
Connect The New Switch
Connecting the new three-way switch is a key step. It ensures your lights work properly from two locations. Follow these clear steps to connect the switch safely and correctly.
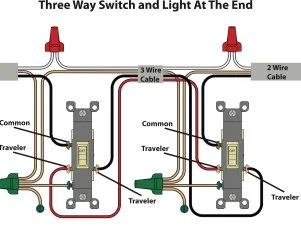
Match The Wires Correctly
First, identify the wires on the new switch. Usually, you will see three terminals: one common and two travelers. The common wire often has a different color or marking. Connect the common wire to the common terminal on the switch.
Next, connect the two traveler wires to the traveler terminals. These wires carry the current between switches. Make sure each wire goes to the right terminal to avoid problems later.
Secure The Connections
Tighten each terminal screw firmly. Loose connections can cause flickering or failure. Use a screwdriver to ensure all wires are snug. Avoid over-tightening, which can damage the wires or terminals.
Check that no bare wire is exposed outside the terminal. Exposed wires can cause shorts or shocks. Wrap any exposed copper with electrical tape for safety.
Attach The Switch To The Box
Carefully push the wires back into the electrical box. Make sure they are not pinched or bent sharply. Position the switch so the screw holes line up with the box.
Use screws to secure the switch firmly to the box. The switch should sit flush and not wobble. Finally, attach the switch cover plate and turn the power back on to test.
Test The New Switch
Testing the new three-way switch is crucial. It ensures the switch works correctly and safely. Before finishing the job, you must check every function of the switch. This step helps avoid future problems and saves time.
Turn The Power Back On
First, restore power at the circuit breaker. This step reactivates the electrical flow to your switch. Make sure the area is safe before continuing. Use caution as the wires now have electricity.
Test Each Switch Location
Operate both three-way switches to check the light. Flip each switch up and down several times. The light should turn on and off from both switches. This confirms the wiring is correct and the switch works well.
Check For Flickering Or Delays
Look for any flickering or slow response in the light. Flickering can mean loose wires or a bad connection. Delays might show a faulty switch or wiring issue. Fix any problems before closing the switch box.
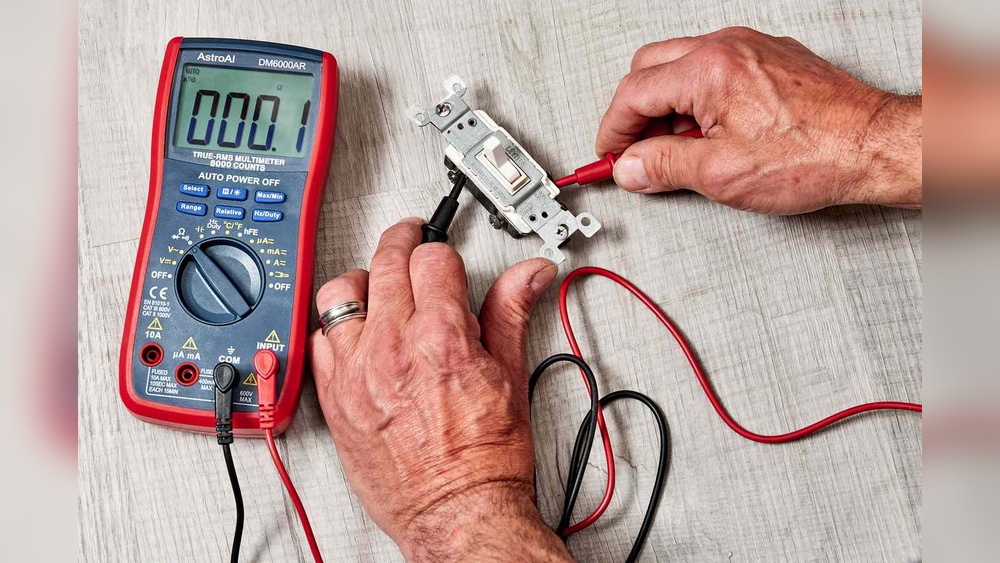
Use A Voltage Tester For Safety
Use a voltage tester to check for live wires around the switch. This tool shows if electricity flows properly. It also helps confirm no wires are loose or damaged. Safety is key during this testing step.
Secure The Switch And Cover Plate
After testing, turn off the power again. Tighten the switch screws and place the cover plate. Ensure everything fits snugly and safely. Restore power and do a final test to confirm all works well.

Credit: www.dummies.com
Reassemble The Wall Plate
After rewiring a three-way light switch, reassembling the wall plate is the next step. This task protects the wiring and gives your switch a clean, finished look. It also keeps the switch safe to use and prevents dust from entering the electrical box.
Take your time to align the wall plate correctly. A well-fitted plate helps keep the switch stable and looks neat on the wall.
Check The Switch Position
Make sure the switch is in its proper place inside the electrical box. It should sit flat and not tilt or stick out.
Hold the switch steady before placing the wall plate on top. This prevents wires from loosening.
Attach The Wall Plate Screws
Use the screws that came with your wall plate. Insert each screw into the holes carefully.
Tighten the screws with a screwdriver. Do not overtighten to avoid cracking the plate.
Test The Switch Function
After the wall plate is on, turn the power back on. Test both switches to ensure they work correctly.
The lights should turn on and off from both switch locations without any issues.
Troubleshooting Tips
Troubleshooting a three-way light switch can feel tricky. Problems may happen even after following all steps. Knowing common issues helps save time and effort. This section shares simple tips to find and fix errors fast.
Check Power Supply
Start by making sure power is off. Use a voltage tester on wires and terminals. Confirm power is off before touching anything. Sometimes, the breaker may not be fully off. Double-check to avoid shocks or damage.
Inspect Wire Connections
Loose or wrong wires cause most problems. Look for wires not tightly connected to terminals. Make sure traveler wires go to correct screws. Match wire colors with instructions. Tighten any loose screws to secure wires.
Test Switches Individually
Test each switch alone to find faults. Use a continuity tester or multimeter for this. Switches that do not change state need replacement. Testing switches separately helps spot which one fails.
Look For Damaged Wires
Check wires for cuts, burns, or frays. Damaged wires stop current flow or cause shorts. Replace any wire that looks worn or broken. Use electrical tape for small nicks, but replace serious damage.
Verify Correct Switch Type
Ensure both switches are three-way types. Using a single-pole switch breaks the circuit. Three-way switches have three terminals plus ground. Using correct switches is key to proper function.
Credit: prarambhika.com
Frequently Asked Questions
How Do You Identify A Three Way Light Switch?
A three way switch has three terminals and no on/off markings. It controls one light from two locations. Look for two switches controlling the same light fixture.
What Tools Are Needed To Change A Three Way Switch?
You need a screwdriver, voltage tester, wire stripper, electrical tape, and a new three way switch. Safety gloves and a flashlight are helpful.
How To Safely Turn Off Power Before Switching?
Turn off the circuit breaker controlling the switch. Use a voltage tester to confirm no power flows. Never start without ensuring power is off.
Can I Replace A Three Way Switch With A Single Pole Switch?
No, a single pole switch cannot replace a three way switch. They function differently and won’t control lights from two locations.
Conclusion
Changing a three-way light switch is easier than it seems. Take your time and follow each step carefully. Always turn off the power before starting work. Double-check your connections to avoid mistakes. Test the switch to make sure it works right.
With practice, this task becomes quicker and less confusing. Now, you can control lights from two places with confidence. Don’t forget safety first. Simple tools and clear steps make the job smooth. Try it yourself and save on electrician costs.