Are you tired of forgetting to turn off your lights and wasting energy? Installing a light switch timer can solve that problem easily and save you money on your electricity bill.
Imagine having your lights turn on and off automatically, exactly when you need them. In this guide, you’ll learn step-by-step how to install a light switch timer quickly and safely, even if you’re not an expert. Keep reading, and you’ll have full control over your lighting in no time.
Choosing The Right Timer
Choosing the right light switch timer is important for easy installation and good performance. The right timer helps save energy and controls lighting automatically. This section helps you pick the best timer for your needs. Consider the type, wiring compatibility, and features before buying.
Types Of Light Switch Timers
There are several types of light switch timers. Mechanical timers use a dial to set time. Digital timers offer precise control with a screen. Some timers have simple on/off settings. Others allow multiple programs for different days and times. Choose a type that matches your routine.
Compatibility With Existing Wiring
Check your home’s wiring before buying a timer. Some timers need a neutral wire for power. Older homes might not have this wire. Other timers work without a neutral wire. Make sure the timer fits your switch and wiring type. This avoids extra work and costs.
Features To Consider
Look for easy-to-use controls on the timer. Some have a manual override to turn lights on or off anytime. Timers with battery backup keep settings during power loss. Choose timers with clear displays and simple buttons. These features make daily use easier and more reliable.
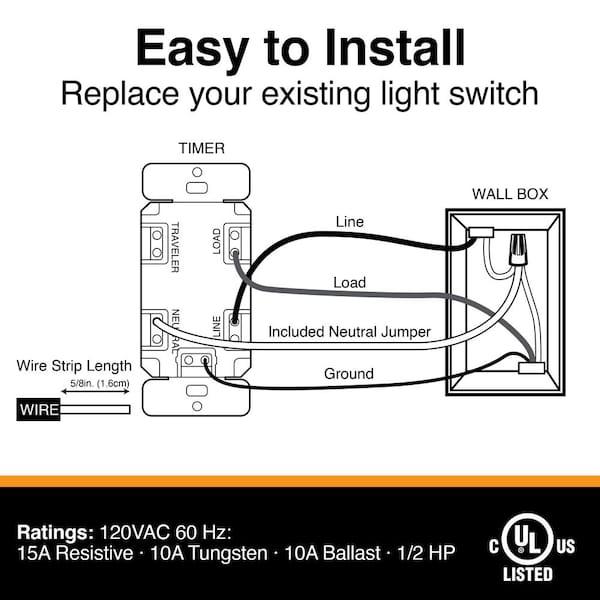
Credit: www.homedepot.com
Tools And Materials Needed
Installing a light switch timer requires specific tools and materials. Having the right items ready makes the job easier and safer. This section covers the essential tools, safety gear, and timer models you may need.
Essential Tools
A screwdriver set is necessary for removing and securing switch plates. Wire strippers help strip the insulation from electrical wires. A voltage tester ensures the power is off before working. Needle-nose pliers assist with bending and holding wires. A drill may be useful for mounting the timer unit. Keep electrical tape nearby to cover exposed wires safely.
Safety Equipment
Wear insulated gloves to protect against electric shock. Safety goggles shield your eyes from dust and debris. Use a sturdy ladder if the switch is high on the wall. Make sure the work area has good lighting. Always turn off the power at the circuit breaker before starting. These precautions reduce the risk of accidents during installation.
Timer Models And Accessories
Choose a timer that fits your switch type and power needs. Digital timers offer precise settings and easy programming. Mechanical timers are simple and budget-friendly. Check if the timer includes mounting screws and wire connectors. Some models come with a backplate for easy installation. Read the instructions to confirm compatibility with your wiring system.
Preparing For Installation
Preparing for the installation of a light switch timer is important for safety and success. This step ensures the process goes smoothly without risks. Taking your time during preparation helps avoid mistakes and protects your home’s electrical system.
Start by making sure the power is completely off. Then, carefully remove the old switch. Finally, check the wiring setup to confirm everything matches the new timer’s requirements.
Turning Off Power
Find the circuit breaker that controls the light switch. Flip the breaker to the off position. Use a voltage tester on the switch to confirm no power is present. This step is critical to avoid electric shock during installation.
Removing The Old Switch
Remove the switch cover plate using a screwdriver. Unscrew the old switch from the electrical box. Gently pull the switch out to expose the wires. Take note of how wires connect to the switch before disconnecting them.
Checking Wiring Setup
Examine the wires for damage or wear. Identify the live, neutral, and ground wires. Compare your setup with the timer’s wiring instructions. Ensure the wires match the timer’s terminals for safe installation.
Wiring The Timer Switch
Wiring the timer switch is a key step in installation. It controls when your lights turn on and off automatically. Proper wiring ensures safety and correct operation. Follow each step carefully to connect the wires properly.
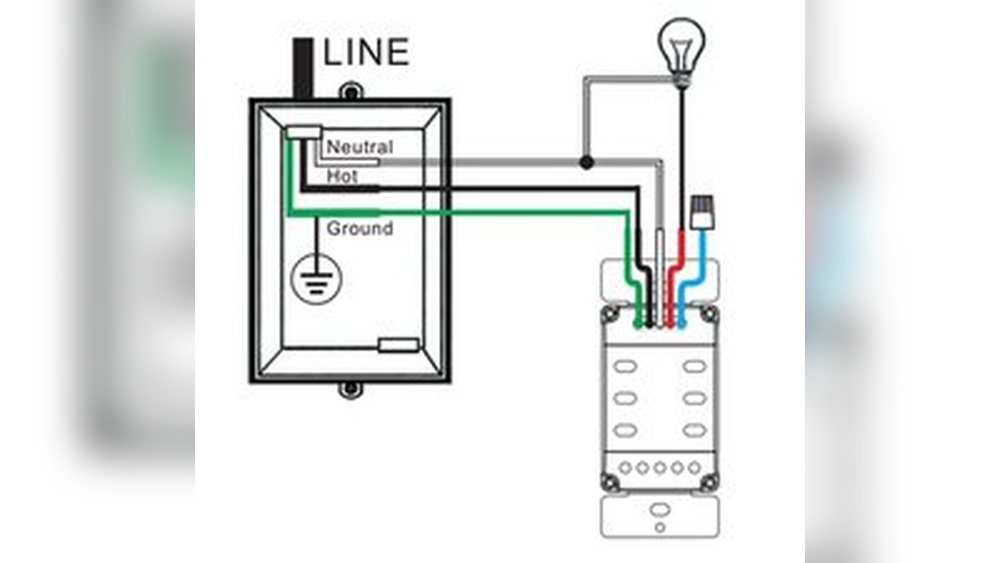
Identifying Wires
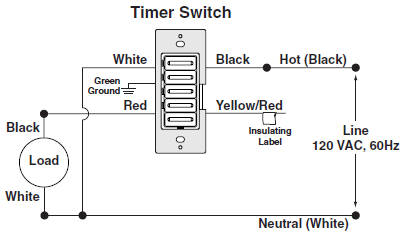
First, turn off the power at the circuit breaker. Use a voltage tester to confirm no electricity is flowing. Identify the wires in the switch box. You will usually see a hot wire, a load wire, a neutral wire, and a ground wire. The hot wire carries power from the breaker. The load wire goes to the light fixture. The neutral wire completes the circuit. The ground wire is for safety. Label each wire if needed to avoid confusion.
Connecting Wires To The Timer
Match the timer switch wires to the house wires. Connect the timer’s hot wire to the hot wire in the box. Attach the timer’s load wire to the load wire from the fixture. Connect the timer’s neutral wire to the neutral bundle in the box. Finally, connect the timer’s ground wire to the ground wire in the box. Use wire nuts to twist wires together firmly. Ensure no bare wire is exposed outside the nut.
Securing Connections
After connecting wires, tuck them neatly into the box. Make sure no wires are loose or touching. Tighten wire nuts and wrap them with electrical tape for extra security. Attach the timer switch to the electrical box using screws. Restore power and test the timer switch. The light should operate based on your settings. Secure connections prevent shorts and ensure long-term use.
Mounting The Timer Switch
Mounting the timer switch is a key step in installing your new light switch timer. Proper mounting ensures the switch works safely and looks neat. Take your time to place the switch carefully and secure it well. This helps avoid problems later and keeps your home safe.
Positioning The Switch
Choose a position that is easy to reach and use. The timer switch should be at the same height as your old switch. Make sure there is enough space around it for wiring. Avoid placing it near water or heat sources. Good positioning helps the timer work correctly and last longer.
Fixing The Switch To The Wall
Use the screws that come with the timer switch. Hold the switch against the wall box and align the holes. Screw it tightly but do not overtighten. Too much force can crack the switch or wall plate. Check that the switch sits flush and does not wobble. This keeps the switch steady and safe.
Replacing The Cover Plate
Put the cover plate over the mounted switch. Align the screw holes and insert the screws. Tighten the screws until the plate fits snugly against the wall. The cover plate protects the wiring inside and gives a clean look. Check that no wires are pinched or visible around the edges.
Setting Up The Timer
Setting up the timer is the key step after installing your light switch timer. This part controls when your lights turn on and off. Proper setup saves energy and adds convenience to your daily routine.
Start by understanding the basic functions of the timer. Most timers let you set the current time and the on/off schedules. Knowing these basics makes the setup easier and quicker.
Programming Basic Settings
Begin by setting the current day and time on the timer. This ensures the timer works accurately. Use the buttons on the device to adjust the clock. Next, set the on and off times. Choose the hours and minutes for when you want the light to turn on and off. Save these settings before moving on.
Using Advanced Features
Some timers offer extra options. These may include multiple on/off periods per day or random mode for security. Explore these features to match your needs. Adjust settings for weekdays and weekends separately if available. Use the manual override to control lights without changing the schedule.
Testing The Timer
After programming, test your timer to confirm it works. Manually switch the timer to “on” and “off” modes. Check if the light responds correctly. Let the timer run through a full cycle. Watch for any timing errors or glitches. Adjust settings if the timer does not perform as expected.
Troubleshooting Tips
Troubleshooting is part of installing a light switch timer. It helps fix small problems fast. Knowing common issues and solutions saves time. It also prevents damage to your timer or wiring.
Common Installation Issues
Sometimes the timer does not turn on the light. Check if the power is off before installation. Loose wires cause the timer to fail. Make sure wires are tight and connected correctly. The timer may reset unexpectedly if wires mix up.
Wrong timer settings can stop it from working. Follow the instruction manual for correct setup. A timer that does not keep time may have low batteries. Replace batteries if needed to keep it running.
Resetting The Timer
Resetting fixes many problems quickly. Find the reset button on your timer device. Press and hold it for a few seconds. This clears old settings and errors. After reset, set the timer again carefully. Reset helps if the timer freezes or acts strange.
When To Call A Professional
Call an electrician if you see sparks or smell burning. Faulty wiring can cause fire risks. If the timer still does not work after reset, get help. Complex wiring or damaged parts need expert care. Safety is important when dealing with electricity. Do not take risks with electrical problems.

Credit: mydome.co.uk
Enhancing Smart Lighting
Enhancing smart lighting with a light switch timer brings convenience and control to your home. It allows you to manage your lights automatically. This creates a more comfortable and efficient living space.
Smart lighting helps save energy and adds security. It lets you set the mood with ease. Installing a timer switch is a simple way to start smart lighting.
Integrating With Home Automation
Light switch timers fit easily into home automation systems. They connect with other smart devices like sensors and voice assistants. This lets you control lights from your phone or by voice. Integration makes your home smarter and easier to manage.
Energy-saving Benefits
Timers turn lights off when not needed. This reduces electricity waste and lowers bills. You can avoid leaving lights on by mistake. Using timers helps the environment by saving energy every day.
Scheduling Tips
Set your timer based on daily routines. Program lights to turn on at dusk and off at bedtime. Adjust schedules for weekends or special events. Regular updates keep your lighting system efficient and useful.
Credit: mydome.co.uk
Frequently Asked Questions
What Tools Are Needed To Install A Light Switch Timer?
You need a screwdriver, voltage tester, wire stripper, and electrical tape. These tools ensure safe and efficient installation. Always turn off power before starting.
How Do I Wire A Light Switch Timer Correctly?
Connect the timer’s line wire to the power source and load wire to the light. Follow the manufacturer’s wiring diagram carefully to avoid mistakes.
Can I Install A Light Switch Timer Myself Safely?
Yes, if you follow instructions and safety precautions. Turn off power, use proper tools, and double-check connections. When unsure, consult a professional electrician.
How Do I Program A Light Switch Timer?
Set current time, then program on/off schedules using the timer’s buttons or dial. Refer to the manual for specific steps and options.
Conclusion
Installing a light switch timer saves energy and adds convenience. Follow the steps carefully for a safe setup. Double-check your work before turning the power back on. Enjoy the benefits of automatic light control every day. Simple tools and a bit of patience make the job easy.
Keep your home smart and energy-efficient with this small change.