Are you ready to upgrade your firearm with a custom scope mount but unsure how to drill and tap the holes yourself? You’re in the right place.
Drilling and tapping for a scope mount might sound tricky, but with the right steps, tools, and tips, you can do it safely and accurately. Imagine having a perfectly mounted scope that stays secure every time you take a shot.
In this video guide, you’ll learn exactly how to make precise holes and threads, saving you money and giving you the confidence to handle your gear like a pro. Keep reading, and by the end, you’ll be ready to take control of your setup with ease.
Tools And Materials Needed
Drilling and tapping for a scope mount needs the right tools and materials. Using proper equipment helps create clean, strong holes and threads. It also makes the work easier and safer.
Gathering everything before starting saves time and prevents mistakes. Below are the key tools and materials required for this task.
Essential Drill Bits
Choose drill bits made of high-speed steel or cobalt for durability. The size must match the screw or bolt diameter. A pilot drill bit is useful to start the hole accurately. Sharp bits reduce the chance of mistakes and keep the metal clean.
Tapping Tools
A quality tap set is necessary for cutting threads inside the drilled hole. Use a tap wrench to turn the tap smoothly. Hand taps come in sets: taper, plug, and bottoming. These help create threads step-by-step for a perfect fit.
Safety Gear
Wear safety glasses to protect your eyes from metal chips. Gloves guard your hands but must allow good grip. Hearing protection is important if using power tools. A dust mask keeps metal dust from being inhaled.
Additional Supplies
Use cutting oil to cool the drill bit and tap. It helps produce clean threads and extends tool life. A center punch marks the drill point for accuracy. A ruler or caliper measures hole depth and size. Clean rags remove debris and oil after work.
Choosing The Right Scope Mount
Choosing the right scope mount is a key step before drilling and tapping your firearm. The mount holds your scope firmly in place. A good mount improves accuracy and makes shooting easier. Picking the wrong one can cause damage or poor performance. Consider the material, style, and compatibility to find the best fit.
Material Considerations
Scope mounts come in different materials like aluminum and steel. Aluminum mounts are light and rust-resistant. Steel mounts are stronger but heavier. Choose a material based on your needs and firearm type. A lighter mount suits hunting rifles. Steel works well for heavy, powerful guns. Durability and weight both matter for comfort and accuracy.
Mount Styles
Common styles include one-piece and two-piece mounts. One-piece mounts offer more stability and easier installation. Two-piece mounts allow more flexibility in scope placement. Picatinny and Weaver rails are popular mounting systems. Match the mount style to your shooting style. Consider ease of use and how secure the mount feels.
Compatibility With Firearm
Not all mounts fit every firearm. Check the firearm’s model and mounting system first. Some guns need special mounts or adapters. Ensure the mount aligns with the barrel and action. Proper fit prevents damage and keeps your scope steady. Always verify compatibility before drilling or tapping your gun.
Preparing The Firearm
Preparing the firearm is a crucial step before drilling and tapping for a scope mount. Proper preparation ensures accuracy and safety during the process. It also protects the firearm from damage and helps achieve a solid mount.
Cleaning The Surface
Start by cleaning the area where you will drill. Use a cloth to remove dirt, oil, and grease. A clean surface helps the drill bit stay steady. It also prevents slipping and mistakes.
Marking Drill Points
Identify the exact spots for drilling. Use a marker or punch to make small marks. These marks guide your drill bit and keep holes straight. Precise marks prevent errors and misalignment.
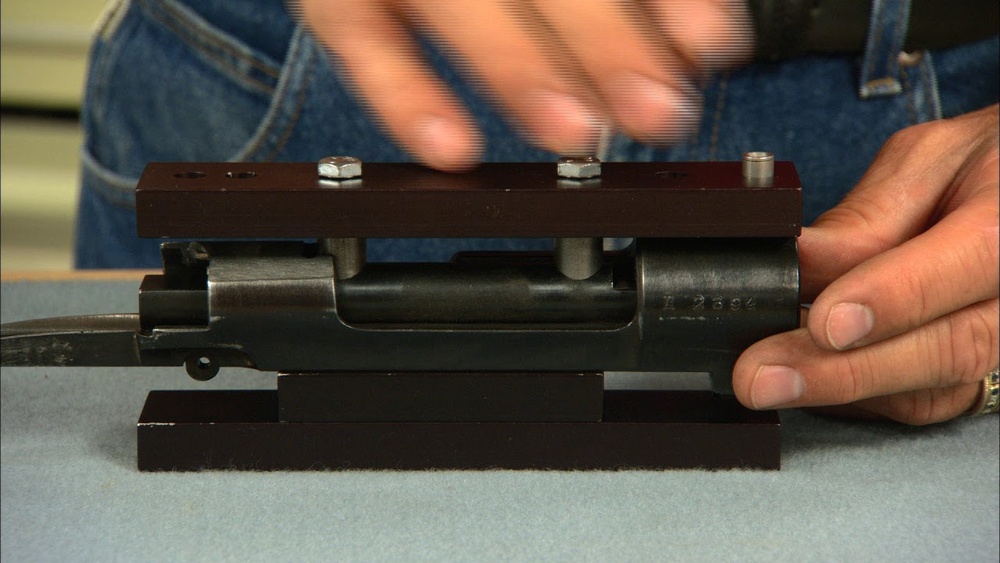
Securing The Firearm
Fix the firearm firmly in place. Use a vise or clamps to hold it steady. A secure grip stops movement during drilling. This step is important for safety and accuracy.

Credit: www.badacetactical.com
Drilling The Holes
Drilling the holes is a crucial step in mounting a scope securely. This process must be done with care to ensure the holes are perfectly aligned and sized. Proper drilling prevents damage to the rifle and helps the scope mount fit tightly.
Focus and steady hands improve accuracy. Each hole should be drilled slowly and precisely. Using the right tools and techniques makes the job easier and safer.
Selecting Drill Speed
Choose a drill speed that matches the metal type. Slow speeds work best for hard metals. Fast speeds may cause the bit to overheat and dull. Keep control by using medium to low speeds. This helps the drill bit cut cleanly without slipping.
Drilling Techniques
Start with a small pilot hole to guide the drill bit. This prevents the bit from wandering off the mark. Apply steady pressure but do not force the drill. Let the tool do the work. Use cutting oil to reduce heat and friction. Clear metal shavings often to keep the hole clean.
Avoiding Common Mistakes
Do not rush the drilling process. Rushing can cause uneven holes or damage. Avoid tilting the drill; keep it straight at all times. Use clamps to hold the rifle steady during drilling. Never reuse dull drill bits. They create rough holes and can break easily.
Tapping The Threads
Tapping the threads is a key step in installing a scope mount. It creates the internal threads needed for screws. This process must be done carefully to avoid damaging the metal or producing weak threads. Proper tapping ensures a strong hold for your scope mount. It also helps keep your scope steady during use.
Choosing The Correct Tap Size
Select the right tap size before starting. Check the screw size that fits your scope mount. The tap size must match the screw size exactly. Using a tap too large or small can ruin the hole. Always refer to the mount’s instructions or screw packaging for size details.
Lubrication Tips
Lubricate the tap to reduce friction. Use cutting oil or light machine oil. Apply oil to the tap and the hole before tapping. Lubrication helps the tap cut threads smoothly. It also prevents the tap from breaking inside the hole. Reapply oil if the tap feels dry during work.
Maintaining Tap Alignment
Keep the tap straight while turning it. Misalignment causes crooked threads or tap breakage. Use a tap wrench or guide to hold the tap steady. Start tapping slowly and carefully. Turn the tap a quarter turn forward, then back slightly. This clears metal shavings and keeps the threads clean.
Installing The Scope Mount
Installing the scope mount is a key step in setting up your rifle. It holds the scope steady and ensures accurate aiming. Taking time to install it correctly improves your shooting experience.
Follow each step carefully. This section guides you through aligning, securing, and tightening the mount. Each part matters for a strong, safe fit.
Aligning The Mount
Place the mount on the rifle’s rail or base. Check that it fits snugly and sits straight. The mount should line up with the barrel and not tilt to any side.
Look through the mount to make sure it allows a clear sightline. Adjust slightly until it feels balanced and centered. Proper alignment prevents scope damage and aids accuracy.
Securing With Screws
Use the screws that came with your mount. Insert them into the holes and start turning by hand. This keeps the mount in place without shifting.
Do not tighten fully yet. Screws need to hold the mount but allow small movement for final adjustments. Use a screwdriver or Allen wrench that fits well to avoid stripping screws.
Final Tightening Tips
Once aligned, tighten the screws evenly. Alternate between screws to apply equal pressure. Tighten a little at a time to avoid warping the mount.
Check the mount’s stability by gently trying to move it. If it shifts, loosen screws slightly and realign. Use a torque wrench if available to avoid over-tightening.
Testing And Adjustments
After drilling and tapping for your scope mount, testing and adjustments are key. This stage ensures your scope stays secure and shoots accurately. Small checks can prevent big problems later. Take your time and follow each step carefully.
Checking Mount Stability
Start by tightening all screws evenly. Use a torque wrench if you have one. The mount should not wobble or move. Try to twist it gently with your hand. If it shifts, loosen the screws and re-tighten. A firm mount keeps the scope steady and improves accuracy.
Sight Alignment
Look through the scope to check the sight picture. The crosshairs must line up with the target clearly. Adjust the scope until the view is centered. Use a flat surface or target paper to help. Proper alignment means your shots will hit where you aim.
Making Necessary Corrections
Note any misalignment or looseness during checks. Loosen screws slightly to adjust the mount or scope. Tighten screws again, then re-check stability and sight. Repeat until the scope stays firm and sights match perfectly. Correct adjustments improve shooting confidence and performance.

Credit: www.youtube.com
Maintenance And Care
Proper maintenance and care keep your scope mount secure and lasting longer. Regular attention prevents damage and ensures safe use. Small steps can save costly repairs or replacements.
Focus on cleaning, checking, and protecting the drilled and tapped holes. These actions keep the threads smooth and free from problems. A well-maintained mount stays reliable under all conditions.
Regular Inspection
Check the drilled and tapped areas before each use. Look for any signs of wear or damage on the threads. Tighten loose screws and bolts carefully to avoid stripping threads. Early fixes stop bigger issues later.
Cleaning Threads
Use a soft brush to remove dirt and debris from threads. Avoid harsh chemicals that can weaken metal surfaces. Light oil helps keep threads smooth and easy to tighten. Clean threads prevent cross-threading and ensure a tight fit.
Preventing Rust And Corrosion
Apply a thin layer of protective oil to metal parts. Store your scope mount in a dry place to avoid moisture buildup. Rust damages threads and makes mounting difficult. Regular care blocks corrosion and extends the mount’s life.

Credit: www.badacetactical.com
Frequently Asked Questions
What Tools Do I Need To Drill And Tap For Scope Mounts?
You need a drill, correct drill bit, tap set, center punch, and a clamp. These ensure precise holes and proper thread creation for secure mounting.
How Do I Choose The Right Drill Bit Size?
Select the drill bit size based on the tap size chart. Correct size prevents thread damage and ensures a tight fit for screws.
Can I Drill And Tap Scope Mounts On Any Rifle?
Most rifles with metal surfaces allow drilling and tapping. Always check the receiver material and manufacturer guidelines before proceeding to avoid damage.
How Do I Prevent Damage When Drilling Scope Mounts?
Use a center punch for accurate drilling and apply steady, moderate pressure. Lubricate the drill bit to reduce heat and avoid metal deformation.
Conclusion
Drilling and tapping for a scope mount takes time and care. Follow each step slowly and use the right tools. Check your work often to avoid mistakes. Practice on scrap material before working on your gun. Safety matters most—wear protective gear and work in a safe place.
With patience, you can install your scope mount securely. This helps improve your shooting accuracy and enjoyment. Keep learning and practicing to get better every time.