Are you tired of your automatic light switch turning on too early or off too late? Adjusting it to fit your needs can save energy and make your home more comfortable.
In this guide, you’ll learn simple steps to tweak your automatic light switch just the way you want. Whether you want your lights to respond better to movement or adjust to daylight changes, this article will help you get it right.
Keep reading to take control of your lighting and enjoy a smarter, more efficient home.
Credit: topgreener.com
Choosing The Right Location
Choosing the right location for an automatic light switch is key. It ensures the light works well and saves energy. Pick a spot that fits the room and your daily routine. Consider how people move and where light is most needed. A good location makes the switch more useful and smart.
Assessing Room Lighting Needs
Look at the room size and shape first. Large rooms may need more sensors or different spots. Think about tasks done in the room. Reading areas need brighter light. Hallways or closets might need softer or less light. Study natural light during the day. This helps decide where the switch can help most.
Avoiding Direct Sunlight And Shadows
Sunlight can confuse the sensor, causing it to turn on or off wrongly. Avoid placing the switch near windows or where sunlight hits directly. Shadows can also affect the sensor’s performance. Keep it away from objects that create moving shadows. This keeps the light switch steady and reliable every time.
Preparing The Switch For Adjustment
Preparing the automatic light switch for adjustment is an important first step. It ensures safety and makes the process smooth. Taking time to prepare helps avoid accidents and errors. Follow simple steps to get ready before you start adjusting.
Turning Off Power Safely
Always turn off the power before handling the switch. Go to the main circuit breaker panel. Find the breaker that controls the light switch. Flip it to the off position. Use a tester to check if the power is off. Never skip this step. It protects you from electric shock.
Gathering Necessary Tools
Collect all tools needed for the adjustment. Common tools include a screwdriver, voltage tester, and a small flashlight. Keep a ladder nearby if the switch is high. Having tools ready saves time. It also makes the job easier and safer.
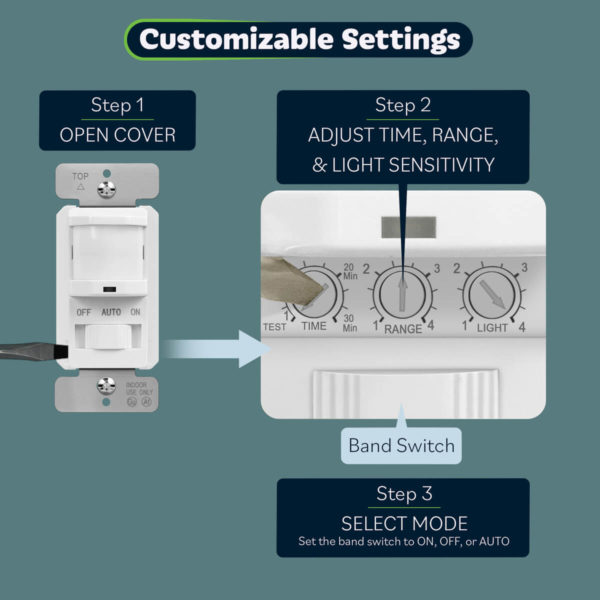
Adjusting Sensitivity Settings
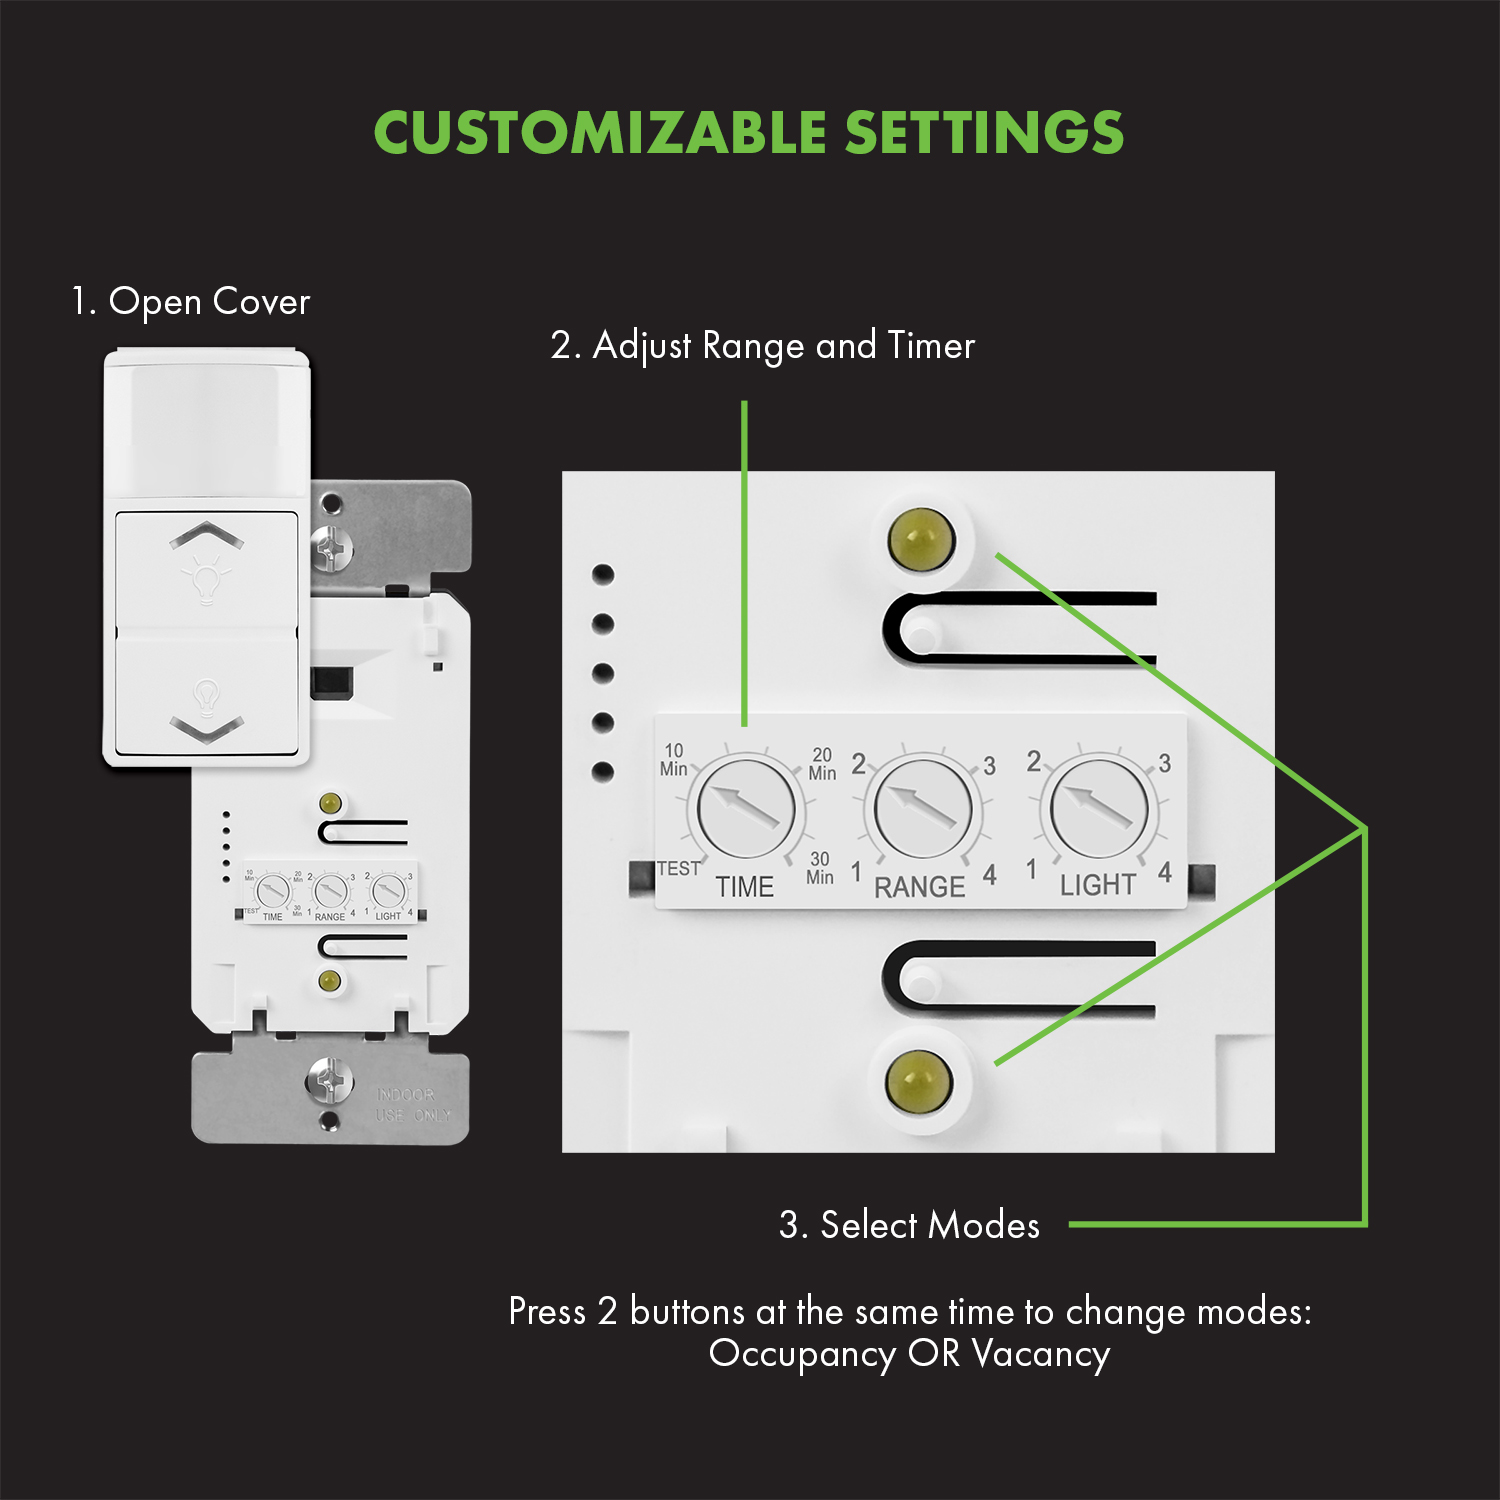
Adjusting the sensitivity settings of an automatic light switch helps control how the light reacts to movement and light levels. Proper sensitivity ensures the light turns on only when needed. It saves energy and improves convenience. Two main settings affect sensitivity: motion detection range and light sensitivity levels. Both need careful adjustment for the best performance.
Setting Motion Detection Range
The motion detection range controls how far the sensor can “see” movement. Increase the range to detect people from a distance. Decrease it to avoid triggering the light by passing cars or animals. Most sensors have a small dial or switch for this. Turn it slowly and test the light response each time. Choose a range that fits the room size and traffic flow.
Modifying Light Sensitivity Levels
Light sensitivity determines when the switch activates based on ambient light. Set it to turn on only in low light conditions. This prevents the light from coming on during the day. Find the light sensitivity dial on the device. Turn it toward a darker setting for more darkness needed to activate. Adjust it step-by-step and check how the light behaves. Proper light sensitivity saves power and extends bulb life.
Credit: www.youtube.com
Configuring Timer Settings
Configuring timer settings on an automatic light switch helps control how long the lights stay on. This feature saves energy and adds convenience. Setting the right timer duration ensures lights turn off at the best time. It also prevents lights from staying on too long or turning off too soon.
Choosing Duration For Lights On
Select a timer duration based on the room’s use. For hallways, a short time like 1 to 5 minutes works well. For living rooms, choose longer times around 15 to 30 minutes. Adjust the timer to match your daily activities and habits. Test different settings to find the best fit.
Balancing Energy Savings And Convenience
Set the timer to save electricity without losing comfort. Shorter times save more energy but may cause lights to turn off early. Longer times keep lights on for convenience but use more power. Find a balance that suits your lifestyle and reduces waste. Small changes can lead to noticeable savings over time.
Testing And Fine-tuning
Testing and fine-tuning an automatic light switch is key to its proper function. It ensures the switch reacts to light changes as expected. This step helps avoid lights turning on or off too soon or too late. Careful adjustments improve energy savings and comfort. Let’s explore how to test and adjust your switch effectively.
Performing Initial Tests
Begin by turning on the automatic light switch. Observe how it reacts in different lighting conditions. Test it in both bright and dim environments. Note the time it takes to turn the light on and off. This gives a baseline for adjustments. Check if the sensor detects movement or light changes correctly. Make sure the lights respond to normal activity around the switch.
Making Incremental Adjustments
Adjust the sensor settings in small steps. Change one setting at a time to see its effect. For example, tweak the light sensitivity slightly. Test the switch again after each change. This helps find the best balance for your space. Avoid large adjustments, which can cause errors. Keep testing until the lights respond smoothly and at the right moments.
Troubleshooting Common Issues
Troubleshooting common issues with automatic light switches helps keep your system working well. Many problems come from simple causes. Fixing these issues saves time and frustration. Below are two common problems and how to solve them.
Lights Not Turning On Or Off
Check the power source first. Make sure the switch is properly connected to electricity. Look for blown fuses or tripped circuit breakers. If the wiring is loose, tighten connections carefully. Faulty sensors can also stop lights from working. Clean the sensor lens gently to remove dust. Test the sensor by covering and uncovering it. Replace the sensor if it still fails. Adjust the timer settings to match your needs. Sometimes, settings are too short or too long.
False Triggers And How To Prevent Them
False triggers cause lights to turn on or off at wrong times. Moving pets, shadows, or passing cars often cause false triggers. Change the sensor angle to avoid these. Set the sensitivity lower to ignore small movements. Remove objects near the sensor that cause shadows. Use sensors with adjustable detection zones for better control. Regular cleaning of the sensor helps prevent errors. Check for electrical interference from nearby devices. Move or shield the sensor if interference occurs.
Maintaining Your Automatic Light Switch
Maintaining your automatic light switch keeps it working well for a long time. Dirt and dust can build up on the sensor and affect its performance. Regular checks help spot problems early and save you from bigger repairs.
Regular Cleaning Tips
Turn off the power before cleaning the switch. Use a soft, dry cloth to wipe the sensor gently. Avoid using water or liquid cleaners that can damage the switch. Clean the area around the switch to stop dust from settling. Repeat cleaning every few months for best results.
When To Replace The Switch
Replace the switch if it stops turning lights on or off correctly. Flickering lights or delayed response are signs of a problem. If the sensor is cracked or broken, replacement is needed. Old switches may not work with new bulbs or systems. Consult a professional if unsure about replacing the switch.
Credit: topgreener.com
Frequently Asked Questions
How Do I Adjust The Sensitivity Of An Automatic Light Switch?
To adjust sensitivity, locate the sensor dial or switch on the device. Turn it slowly to increase or decrease motion detection range. This ensures the light activates only when needed, saving energy and improving performance.
What Is The Best Way To Set The Timer On Automatic Light Switches?
Find the timer control on your switch. Turn the dial or press buttons to set the light duration. Adjust according to your needs, typically between 30 seconds to 10 minutes, to ensure lights stay on just long enough.
Can I Adjust The Light Switch To Work Only At Night?
Yes, use the built-in photocell or light sensor feature. Set it so the switch activates only in low light. This saves energy by preventing the light from turning on during daylight hours.
How To Troubleshoot If The Automatic Light Switch Doesn’t Adjust Properly?
First, check the power supply and sensor cleanliness. Reset the switch by turning it off and on. If it still fails, consult the manual or replace the sensor for proper adjustment.
Conclusion
Adjusting an automatic light switch can save energy and add comfort. Small changes in settings make a big difference. Check the sensor’s range and timing regularly. Make sure the light turns on and off when needed. Simple steps keep your space bright and efficient.
Try adjusting the switch today to see improvements. You will enjoy easier control over your lighting. Easy to do, and helpful every day.