Are you struggling with mounting taper roller bearings correctly? Getting this step right is crucial for your machine’s performance and longevity.
If the bearing isn’t installed properly, it can lead to costly damage and downtime. But don’t worry—this guide will walk you through the process, making it simple and clear. By the end, you’ll have the confidence to mount taper roller bearings like a pro, saving you time and avoiding mistakes.
Keep reading to master this essential skill and protect your equipment.
Tools And Materials Needed
Mounting a taper roller bearing needs the right tools and materials. Using proper equipment helps ensure a smooth installation. It also protects the bearing from damage during the process.
Gathering everything before you start saves time. It also makes the work safer and more precise. This section lists the essential tools and materials for the job.
Essential Tools
- Bearing puller or press for easy mounting
- Torque wrench to tighten bolts correctly
- Soft-faced hammer to avoid bearing damage
- Caliper or micrometer for measuring parts
- Cleaning brush or cloth to clean surfaces
- Dial indicator to check bearing play
Required Materials
- High-quality taper roller bearing
- Appropriate lubricant for smooth operation
- Protective gloves to keep hands clean
- Cleaning solvent to remove old grease and dirt
- Sealing compounds to prevent contamination
- Anti-corrosion spray for bearing protection
Preparing The Workspace
Preparing the workspace is the first step in mounting a taper roller bearing. A clean and organized area helps prevent damage to the bearing parts. It also makes the process faster and safer. Taking time to prepare the workspace saves effort later.
Cleaning The Area
Start by wiping down the work surface. Remove all dust, dirt, and grease. Use a clean cloth and a mild cleaner. A spotless area stops dirt from getting into the bearing. Dirt can cause wear and reduce the bearing’s life.
Clear away any tools or materials not needed for the job. This reduces clutter and chances of mistakes. Make sure the lighting is good to see small parts clearly.
Organizing Components
Lay out all bearing parts in the order of assembly. Keep the cones, cups, and rollers separated. Use small containers or trays to hold tiny pieces. Label each part if possible to avoid confusion.
Gather necessary tools close by. This includes gloves, a bearing press, and cleaning supplies. Organized components help maintain focus and reduce errors during mounting.
Inspecting The Bearing
Inspecting the bearing is a crucial step before mounting a taper roller bearing. This process helps ensure the bearing works properly and lasts longer. Careful inspection prevents damage during installation and avoids future failures.
Check the bearing closely for any signs of damage or wear. Look at the rollers, raceways, and cages. Clean the bearing gently to see any hidden problems clearly.
Checking For Damage
Start by examining the bearing for cracks, chips, or rust. Small damages can cause big issues later. Roll the bearing on a flat surface to feel for rough spots or noise. Check for discoloration, which may indicate overheating. Replace any bearing that shows visible damage.
Verifying Bearing Specifications
Confirm the bearing matches the required specifications. Check the part number stamped on the bearing. Compare it with the machine’s manual or order sheet. Verify the bearing size, type, and load rating. Using the correct bearing ensures proper fit and performance.
Credit: www.nodeshk.com
Cleaning The Bearing And Housing
Cleaning the bearing and housing is a critical step before mounting a taper roller bearing. Dirt, old grease, and moisture can cause damage and reduce bearing life. Proper cleaning ensures smooth operation and prevents early failure.
Take your time to clean every part carefully. Clean surfaces allow the bearing to fit perfectly. This step makes installation easier and extends the bearing’s performance.
Removing Old Grease And Debris
Start by removing all old grease from the bearing and housing. Use a clean cloth or brush to wipe off loose dirt. Apply a solvent or degreaser to dissolve stubborn grease. Avoid using water as it may cause rust. Repeat the cleaning until no grease remains. Check for any debris or metal particles and remove them carefully.
Ensuring Dry And Clean Surfaces
After cleaning, dry the bearing and housing completely. Use a clean, dry cloth or compressed air to remove moisture. Wet surfaces cause corrosion and damage the bearing. Make sure no lint or dust is left behind. Clean, dry surfaces help the bearing sit correctly in the housing. This step is important for long-lasting performance.
Applying Lubrication
Applying lubrication is a key step in mounting a taper roller bearing. It reduces friction between the bearing parts. This helps the bearing last longer and work smoothly. Proper lubrication prevents heat build-up and wear. Without good lubrication, the bearing can fail quickly. Understanding how to choose and apply grease ensures the bearing performs well.
Choosing The Right Grease
Select grease that matches the bearing’s speed and load needs. Use grease with good thermal stability and water resistance. Avoid grease that breaks down at high temperatures. Check the grease’s compatibility with the bearing material. Choose grease designed for taper roller bearings. This keeps the bearing protected in tough conditions.
Proper Lubrication Techniques
Apply grease evenly to all bearing surfaces. Use a clean tool to avoid dirt contamination. Fill the bearing cavity about 30-50% full with grease. Overfilling can cause excess heat and damage. Rotate the bearing slightly to spread the grease inside. Regularly check and reapply grease during maintenance. Good technique extends the bearing’s life and efficiency.
Positioning The Bearing
Positioning the taper roller bearing correctly is key for its long life and smooth operation. This step ensures the bearing fits perfectly and works without extra friction or wear. Proper positioning reduces the risk of damage during use. It also helps maintain the right alignment of parts.
Careful handling and exact alignment make sure the bearing performs well under pressure. Understanding these steps makes mounting easier and safer. Below are important tips and steps for positioning the bearing.
Aligning The Bearing Correctly
Start by checking the bearing and shaft for any dirt or damage. Clean both surfaces fully before positioning. Place the bearing gently on the shaft. Make sure the bearing sits straight and square to the shaft axis. Avoid tilting or forcing the bearing into place. Proper alignment prevents uneven pressure on the rollers. This keeps the bearing rolling smoothly. Use light taps with a soft hammer if needed. Check that the bearing seats evenly all around. Misalignment can cause early failure and noise.
Handling Tips To Avoid Damage
Handle the bearing with clean hands or gloves. Dirt and oils can harm the bearing surfaces. Lift the bearing by the outer ring only. Avoid touching the rollers or inner ring. Do not use sharp tools to pry the bearing. Use proper tools designed for bearing mounting. Apply even pressure to avoid bending or denting parts. Store the bearing in a clean, dry place until use. Protect it from moisture and dust. Careful handling keeps the bearing free from scratches and dents. This ensures smooth performance and longer life.
Mounting The Bearing
Mounting the taper roller bearing correctly is key for its performance and life. This process needs care to avoid damage and ensure smooth operation. Follow the right steps to fit the bearing securely on the shaft or housing.
Choosing the proper method depends on the bearing size and application. Two common ways are heating the bearing or using press force. Each method has its own benefits and precautions.
Using Heat Or Press Methods
Heating the bearing expands the metal, making it easier to mount. Use an oil bath or an induction heater for safe heating. Keep the temperature under 120°C to avoid damage.
Press methods push the bearing onto the shaft using controlled force. This method suits larger bearings or those that cannot be heated. Use a hydraulic press or arbor press to apply steady pressure.
Both methods need care to prevent bearing parts from deforming. Avoid overheating or using too much force during installation.
Applying Correct Force
Apply force only on the bearing ring that fits tightly to the shaft or housing. This avoids damage to the rollers or raceways. Use a mounting sleeve or adapter to distribute the force evenly.
Too much force can cause permanent bearing damage. Too little force leads to loose fitting and poor performance. Use a torque wrench or press gauge to control the force.
Check the bearing fit after mounting. It should rotate smoothly without play or tight spots.
Adjusting Bearing Clearance
Adjusting bearing clearance is critical for taper roller bearing performance. It affects bearing life, noise, and heat. Proper clearance avoids early failure and ensures smooth operation.
Clearance means the small space between the bearing parts. Too tight causes friction and wear. Too loose causes vibration and noise. Correct clearance balances these factors.
Measuring Clearance
Measure clearance using a dial indicator or feeler gauge. Place the bearing in its housing and apply a light load. Check the gap between the roller and raceway.
Record the measurement carefully. Repeat to confirm accuracy. Compare with manufacturer specifications to ensure it is within limits.
Setting Proper Tolerance
Set tolerance by adjusting the bearing preload or spacer thickness. Turn the bearing nut or adjust shims to change clearance.
Use a torque wrench to apply even force. Avoid over-tightening, which reduces clearance excessively. Allow small movement for proper lubrication.
Verify clearance again after adjustment. Fine-tune until it matches recommended tolerance for your bearing model.
Securing The Assembly
Securing the assembly of a taper roller bearing is a crucial step. It ensures the bearing stays in place and works correctly. Proper securing prevents movement that can cause damage or reduce bearing life. This process requires attention to detail and the right tools. Follow each step carefully for a safe and strong setup.
Tightening Fasteners
Start by tightening the fasteners in a cross pattern. This method spreads the pressure evenly across the bearing. Use a torque wrench to apply the recommended torque. Avoid overtightening, which can damage the bearing or housing. Check the fasteners again after initial tightening to ensure they remain secure.
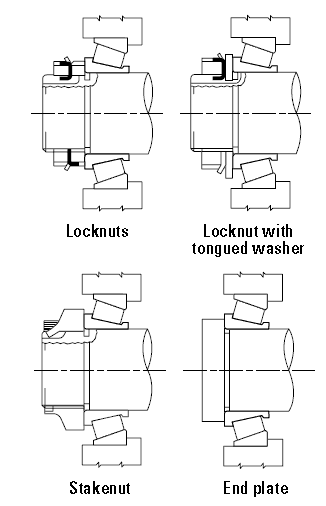
Locking Mechanisms
Locking mechanisms stop fasteners from loosening over time. Common types include lock washers, nuts with nylon inserts, and locking plates. Choose the right locking device for your bearing assembly. Secure the locking mechanism firmly without damaging any parts. Confirm the locking mechanism holds tight after the first use.

Credit: www.youtube.com
Testing The Mounted Bearing
Testing the mounted taper roller bearing ensures it works smoothly and lasts longer. It helps find any problems early. Proper checks prevent damage and reduce downtime. Two key tests are rotational checks and noise and vibration inspections. Both show how well the bearing performs after mounting.
Rotational Checks
Rotate the bearing by hand to feel its movement. It should turn smoothly without resistance or rough spots. Any tightness or sticking means poor installation or damage. Check for free rotation in both directions. This step ensures the bearing rolls properly and is correctly seated.
Noise And Vibration Inspection
Listen carefully while the bearing spins at operating speed. It should run quietly without unusual sounds. Use a stethoscope or vibration meter to detect noise or irregular vibrations. Humming, grinding, or knocking sounds indicate issues. Early detection helps avoid bearing failure and costly repairs.
Maintenance Tips
Proper maintenance keeps taper roller bearings working well for a long time. It helps avoid costly repairs and machine downtime. Regular checks catch problems early and keep the bearing running smoothly.
Regular Inspection Schedule
Check bearings often based on how fast and hard the machine works. Daily checks are best for busy equipment. Weekly or monthly checks work for less used machines. Always follow the machine maker’s advice for inspection times.
During inspection, look for noise, heat, or vibration. These can signal bearing trouble. Use tools like stethoscopes or temperature guns to help find issues. Keep a record of every inspection to track changes over time.
Signs Of Wear To Watch For
Listen for grinding or knocking sounds from the bearing. These noises often mean damage inside. Feel the bearing housing for extra heat. High temperature shows the bearing may be failing.
Check the bearing for rough movement or play. Too much looseness means wear. Look for visible damage like cracks or rust. These signs require immediate attention to avoid bigger problems.

Credit: www.reddit.com
Frequently Asked Questions
What Tools Are Needed To Mount Taper Roller Bearings?
You need a bearing puller, press, clean cloth, grease, and a torque wrench. These tools ensure proper fitting and safety during installation.
How To Prepare Taper Roller Bearings Before Mounting?
Clean the bearing thoroughly and apply high-quality grease evenly. Proper preparation reduces friction and prevents premature wear.
What Is The Correct Mounting Process For Taper Roller Bearings?
Align the bearing carefully, press it onto the shaft, and tighten nuts gradually. Ensure no misalignment or excessive force during mounting.
How To Check Bearing Fit After Mounting?
Rotate the bearing by hand and listen for smooth motion. Check for minimal play and ensure proper tightness to avoid damage.
Conclusion
Mounting taper roller bearings needs care and attention. Follow the steps slowly and check each part. Use the right tools and avoid forcing the bearing. Keep the bearing clean and grease it well. Proper mounting helps the bearing last longer and work smoothly.
Take your time to avoid mistakes and save future repairs. Simple steps make a big difference in machine performance. Keep practicing these tips for best results every time.